An Exceptional Game Model (Including Generic Theory and Lessons)
On December 2nd, 2018, Holstein Kiel travelled to MSV Duisburg and convincingly won 4-0. Last season, under the command of Tim Walter (now the coach of VfB Stuttgart), Kiel gained popularity as a high-pressing, possession-hungry side, using a variety of unique actions and structures not used by other teams. Kiel were identified as promotion candidates, but inconsistency lead to a 6th place finish. Amid this inconsistency though, were games where their approach couldn’t have been much better, with their win against Duisburg perhaps being the best example.
Duisburg came bottom of the league in 18th position, but what I want to talk about makes the strength of the opposition somewhat irrelevant. The purpose of this article is to portray what an exceptional game model and systematic approach looks like by highlighting Kiel’s principles and mechanisms against Duisburg. The game model determines, to a variety of specificities, the guidelines that players should follow during individual and collective actions. After accounting for both their own strengths as well as the opposition’s weaknesses, these precepts were primed into Kiel’s game model in order to dictate how the game would be played on their own terms. This is the ultimate aim of any competent game model.
Kiel’s progressive and aggressive style of play is risky with noticeable weaknesses. In combination with Kiel’s other actions however, this risk was formed into a well-planned overall construct by Walter. The way the collective system was established upon the context of Duisburg by Kiel limited the extent to which their own weaknesses could be exploited. After going through the match, I will consider what universal points other teams can take and implement from Kiel’s approach.
I am going to be discussing game models regarding the final in-game product, but if you would like to learn more about creating and training a game model from inception, you can read RM’s article, as well as PR’s newest work on tactical principles.
The Match
The players at a coach’s disposal and the general trends of how other teams in the same league play are important e.g. aggressive man-orientated high-pressing and direct, fast-paced attacking which is common in the 2. Bundesliga. These trends influence a team’s approach, being considered when instructing individual players and the collective unit.
Duisburg are no exception to the generic 2. Bundesliga team profile, aiming to aggressively press Kiel’s build-up with combative man-orientations. This is what Walter and Kiel expected, using the principle of moving away from where the ball is to be played. This meant using third-man movements to manipulate Duisburg’s man-orientations, creating passing options for progression in addition to space in central zones when attacking.
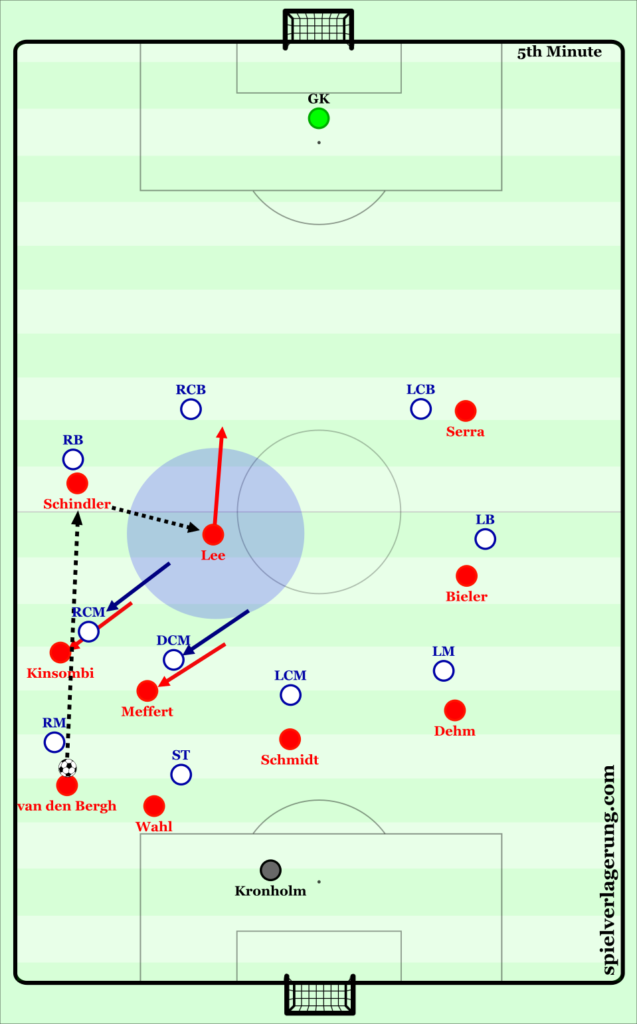
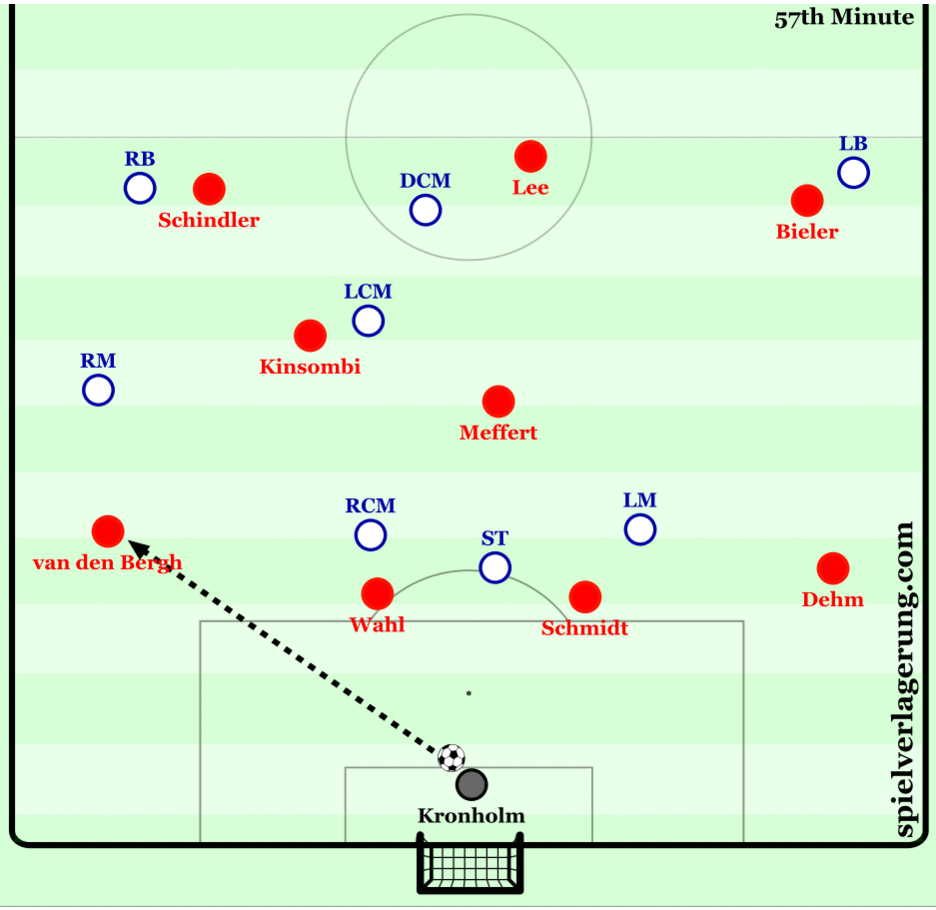
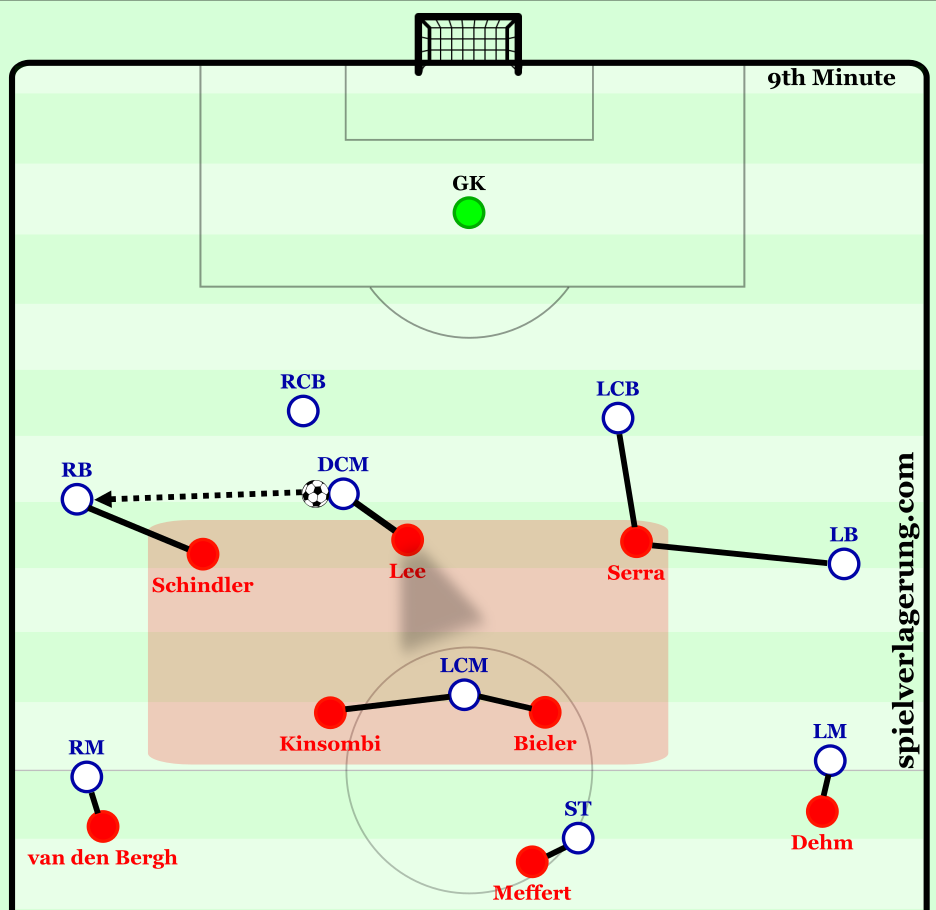
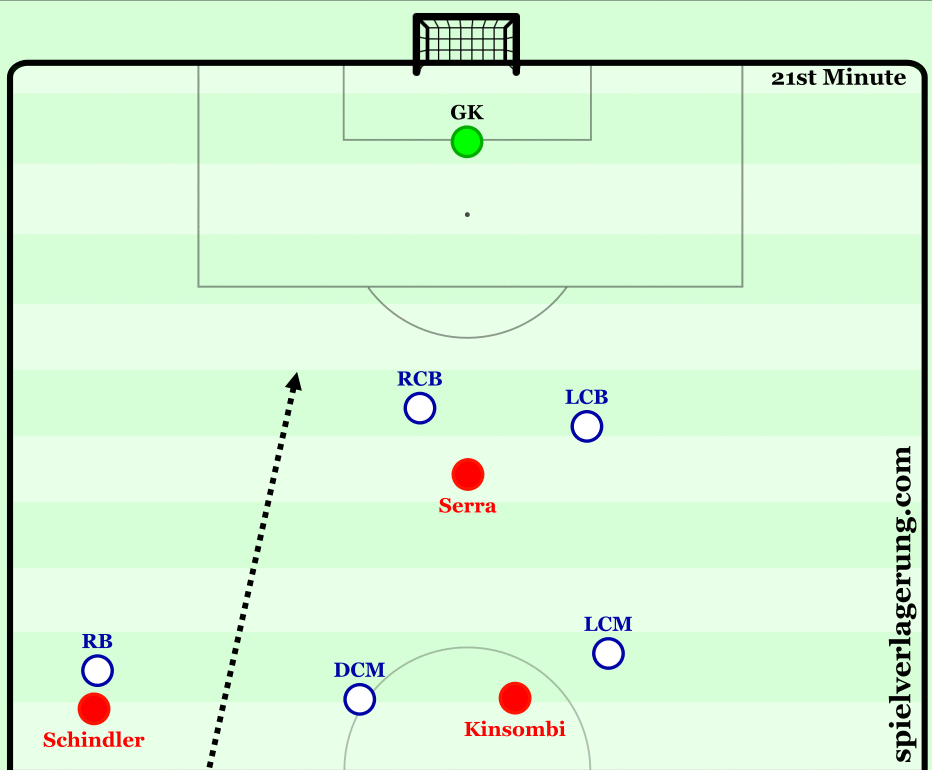
Duisburg have assigned a player to each of Kiel’s back four, meaning they are unlikely to move far unless the Kiel players do. Because Duisburg’s LCM has had to step out from midfield to mark Schmidt, this leaves a 3 v 2 scenario in Kiel’s favour in central midfield. Kiel’s forwards, Schindler and Serra, are high and wide to leave space in the centre. All Kinsombi and Meffert must do is move away from where Kiel want the ball to be. By moving towards van den Bergh, they create space to play over the top of them into Schindler’s feet, who is then able to lay-off to Lee who is now completely free. This puts Duisburg on the back foot in a 3 v 3 scenario as Bieler is occupying Duisburg’s LB away from the other defenders.
The same principles can be seen here.
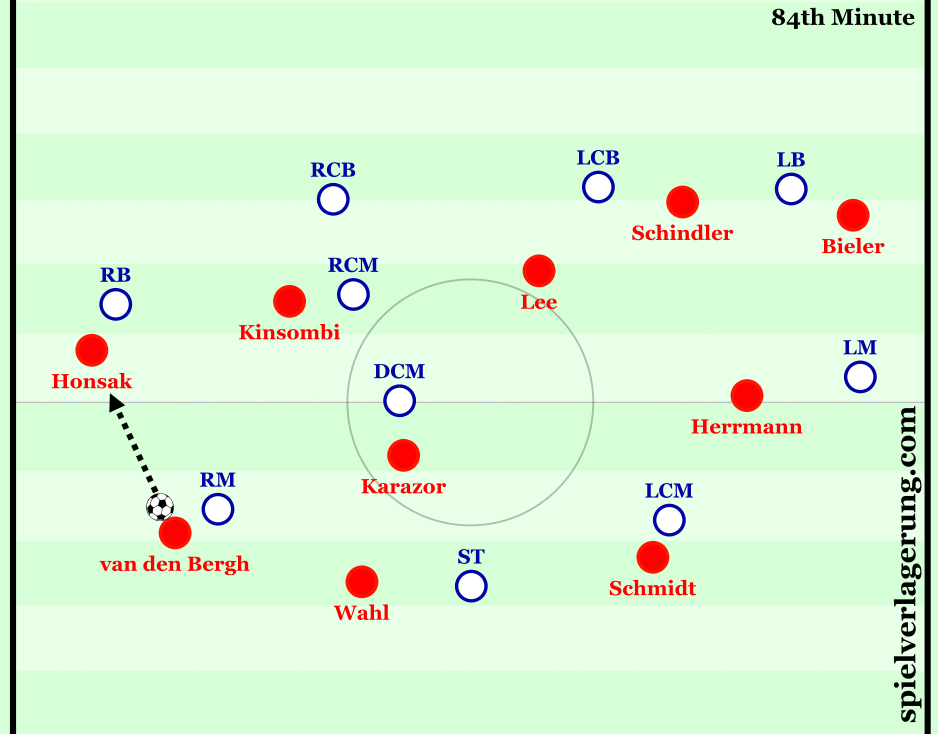
Kinsombi and van den Bergh drag their markers away from where they have a chance of intercepting a pass to Lee from Honsak, who is unmarked in the middle because of his teammate’s positions occupying the Duisburg CB’s and CM’s.
Note the similarity in both situations despite being at opposite stages of the game.
A single player moving himself and his marker away from Lee was commonly all that was required to free him. Lee routinely occupied intelligent positions between Duisburg’s defensive structure away from the ball.
Lee positions himself in the space between the LCM and LM out of their line of sight. Schindler moving towards the touchline minimalises the chance of the LB applying pressure on Lee, who is also too far from the LCB for him to apply pressure quickly enough.
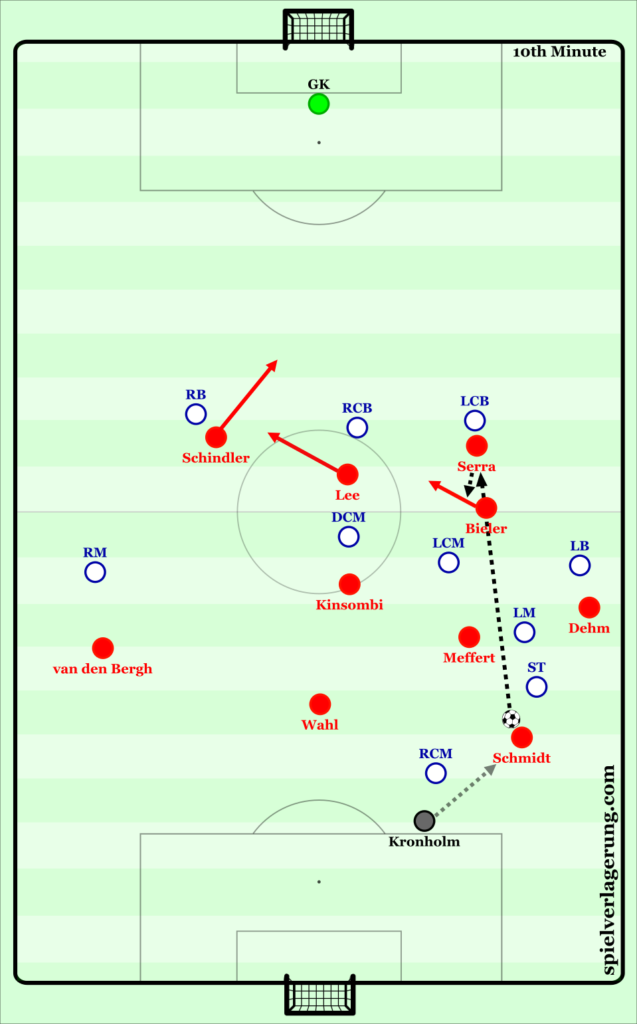
Kiel’s centre-backs were also utilised in these third-man actions. Meffert, Kiel’s #6, was marked closely all game to disrupt Kiel’s build-up. This meant that he repeatedly had to move away from the central space so that another player could enter this space unmarked. This was occasionally the other centre-midfielders, Kinsombi and Bieler, but this task was more frequently undertaken by Schmidt. As part of Kiel’s system, he could be classified as an ‘attacking centre-back’.
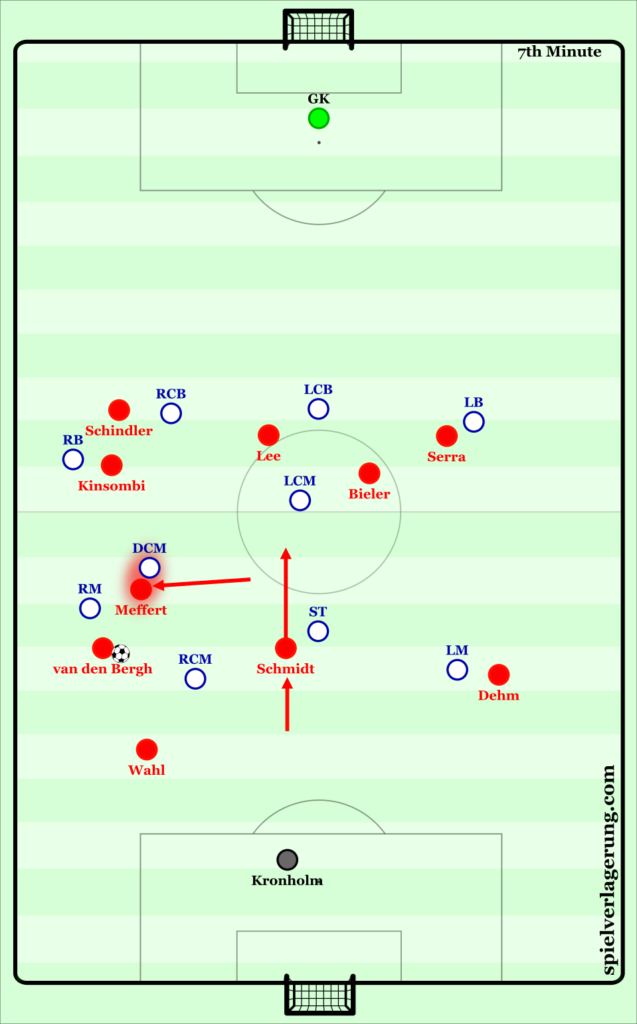
Meffert moves away from the centre, allowing Schmidt to advance and offer a worthwhile progression route. This will force the ST to follow him, meaning Wahl won’t be outnumbered as the temporary lone centre-back. It also means that the LCM will have to close Schmidt after receiving the ball, meaning Bieler and Kinsombi should be open to receive the next pass.
The solution did not always require complexity. Sometimes all that was required when facing a 3 v 2 situation was quick horizontal circulation, resulting in the third player of the passing chain having space to dribble forward past the pressure. Duisburg’s aggressive pressure in the opening stages of the match, involving most of their team pressing high, routinely went unrewarded, as Kiel were able to manufacture numerical superiority while still having satisfactory attacking occupation, squeezing Duisburg’s remaining defensive players back.
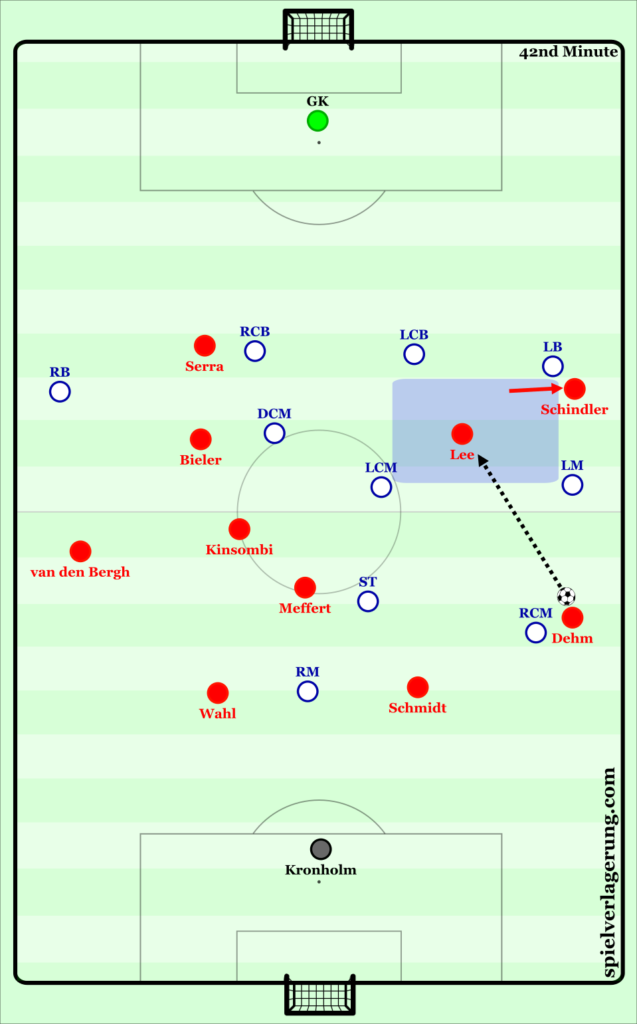
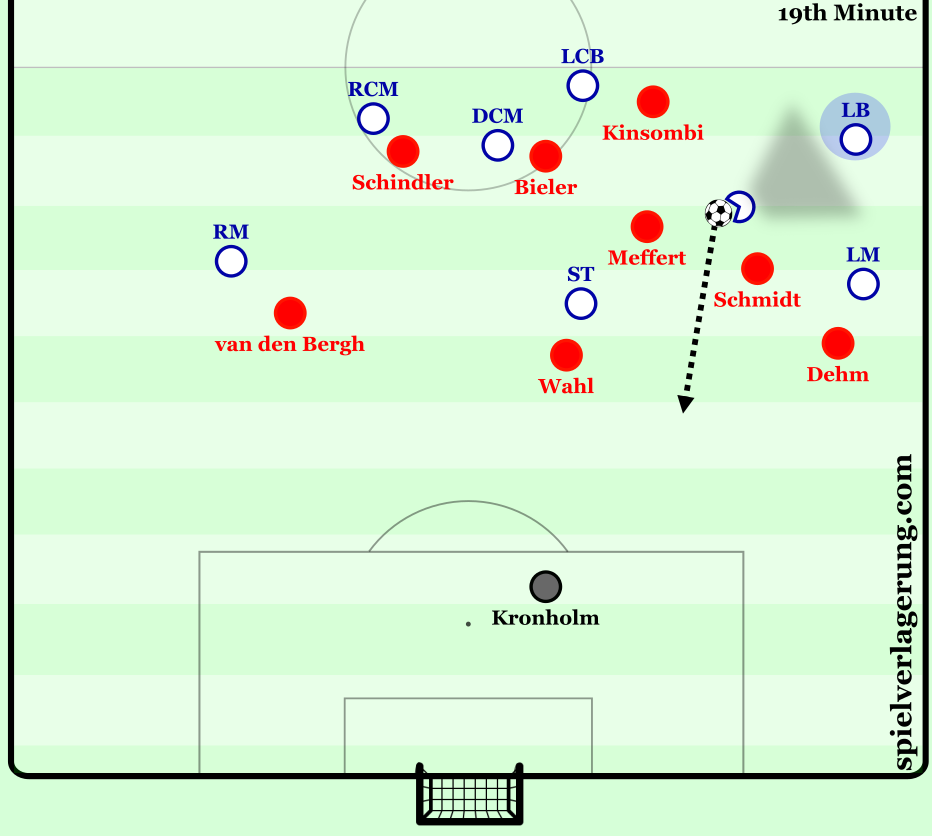
Schmidt has the most important role during Kiel’s possession relative to the other defenders. He manipulates the positioning of the player marking him so that passing lanes to his teammates can be created.
Meffert has moved into the left half space, attracting the attention of Duisburg’s RM. Wahl is occupying the ST. These two actions allow van den Bergh to dribble into the centre of the field without anyone closing him down. Schmidt then advances, taking the LM with him, generating an opportunity for a pass to Dehm.
You can see here that the occupation of opposing defenders as a principle of the game model doesn’t always require moving them. This is made simpler against a team like Duisburg because of their man-marking scheme.
By advancing into the #6 space, Schmidt also permits Kiel’s midfielders to move into more advanced positions, meaning they have greater positional superiority in attacking areas.

Schmidt advances into the #6 space. Wahl covers Duisburg’s striker by himself (if Duisburg had two strikers, he would be left exposed by Schmidt’s attacking actions). Meffert can now temporarily operate as the right #8, and Bieler moves into the right-wing position. Serra is occupying the LCB on his outside, and the LB’s attention is directed at Dehm (with Bieler in his blindside). This leaves Bieler free to receive the ball and dribble at the defence.
When the Duisburg striker was assisted by the LM or RM, Kiel could create a 2 v 1 scenario on the wings. If the strikers could occupy the CB’s, and the full-backs could occupy their opposite number, the #8’s could position themselves close to the touchline, as in the above scenario with Bieler.
Schmidt had a greater attacking intent in this match because of Duisburg’s lone striker system. This wasn’t a fortuitous exploitation. If Duisburg wanted to cover both Wahl and Schmidt, a midfielder would have to step up to assist the striker, but simple positional adjustments (as in the above scenarios) allowed Kiel to play through the pressure with relative ease. This also meant that Duisburg had one less midfielder to contend with Kiel’s high proximity of central players.
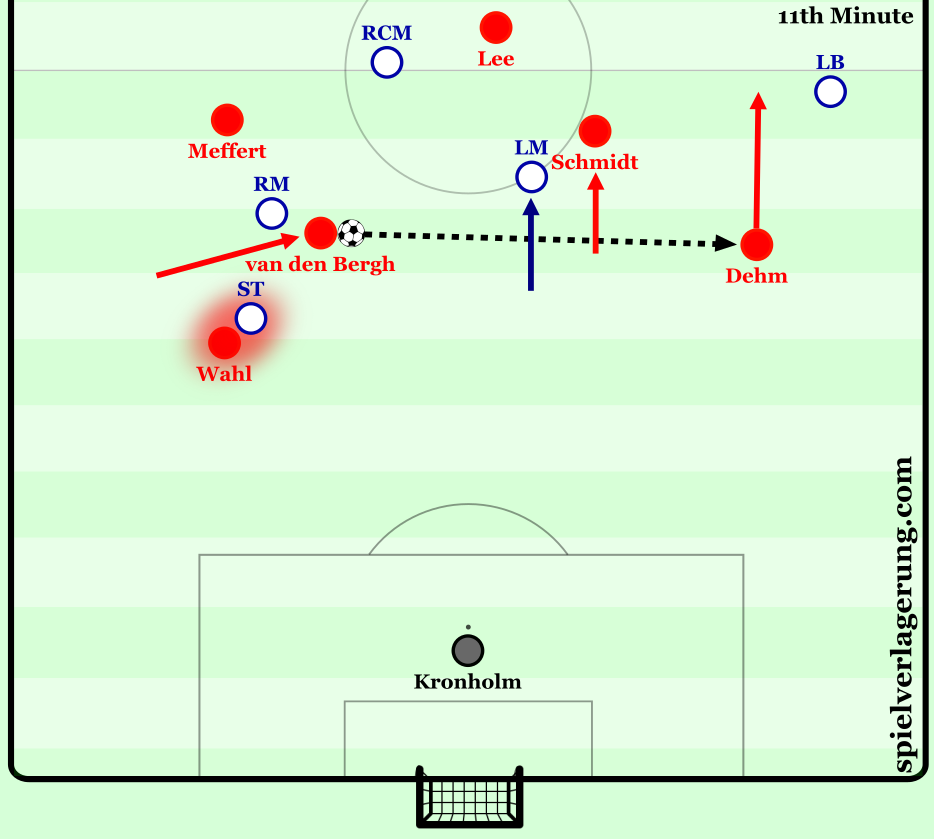
van den Bergh tended to move into central positions (as seen in the first 11th minute scene), almost as a temporary left-sided #6. This usually only occurred when he was left unmarked as a result of his teammates occupying opposing players around him. Another example of this can be seen below.
Serra’s occupation of the opposing RM, and Wahl, Kinsombi and Meffert’s control of the opposing centre-midfielders means that van den Bergh can move into an open space in the middle of the pitch to receive Dehm’s pass. This also makes it difficult for Dusiburg in the next stage of the attack, because the RM or DCM will have to leave their marking assignments if they want to put pressure on the ball. This would leave either Serra or Kinsombi unmarked.
van den Bergh would, however, infrequently move inside when there wasn’t controlled occupation of nearby opposing players. This was done as a means of aiding build-up progression.
van den Bergh moves through the RM’s blindside in an attempt to dis-orientate and deceive him as to who he thinks he’s marking, as Bieler has now moved into the LB position in a near opposite direction (such opposite movements are commonly successful in breaking down aggressive man-marking assignments). Wahl finds Bieler via Kronholm. Meffert is in an #8 position, so someone else must be the situational #6. Although van den Bergh is there initially, Wahl is able to advance through the RM’s blindside, who is now looking at Bieler with the ball. This means that van den Bergh can also advance and move back to the wing, where the RCM has now vacated this position because of his duty to follow Bieler. Although Kiel’s players had the license to move away from their ‘positions’, whether to create space or numerical superiority, they always had their returning points and positions to retreat to.
Kronholm was not just used as an intermediary in possession, aiding the generation of numerical superiority over Duisburg’s press. One extra man was routinely all that was required to play through them.
This is a 4 v 3 situation. Kinsombi and Wahl are marked, leaving one Duisburg player to cover both Schmidt and Kronholm. Kinsombi passes the ball to Kronholm, but by the time the Duisburg RCM has pressurised him, the ball has already been released to Schmidt, who as the extra man, is able to receive with the time to receive, turn, and make an optimal decision as to what to do next.
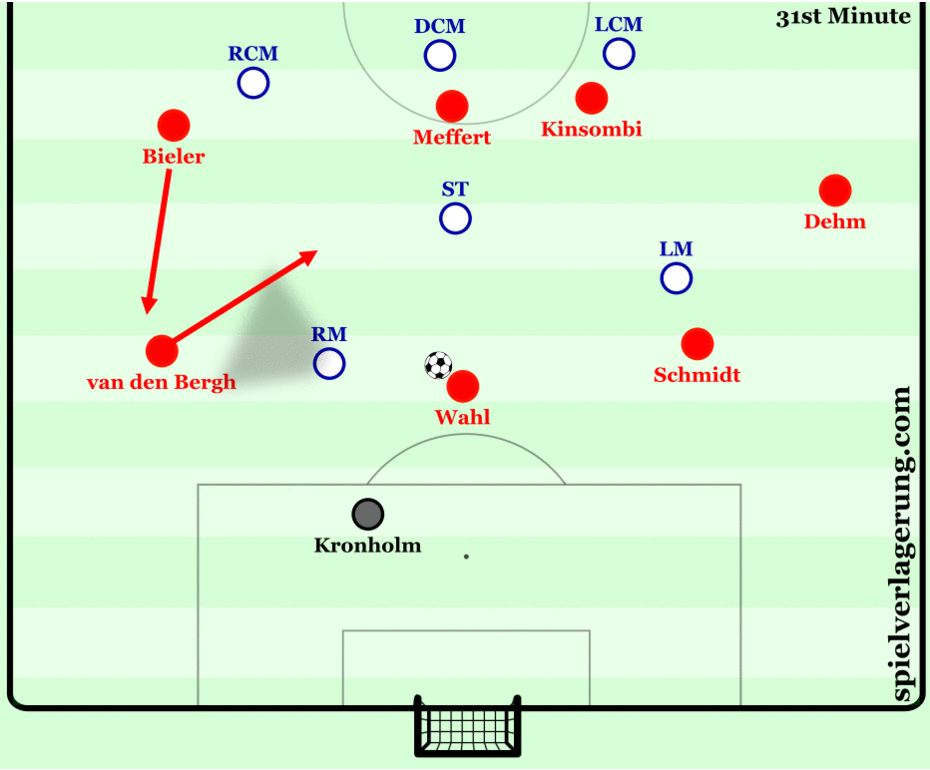
Some situations required both Wahl and Schmidt to move out of the defence to receive the ball.
van den Bergh is the best passing option for Kronholm, but the next pass is less clear, as Kinsombi is closely marked by the Duisburg LCM who would provide immediate pressure upon any pass in Kinsombi’s direction. The RCM moves to pressurise van den Bergh whilst blocking a lane to Meffert, but Wahl provides the solution, moving past the RCM to receive the ball. Kinsombi is still closely marked, and the ST moves to neutralise Meffert as a passing option. This leads to the LM anticipating a pass back to Kronholm, but Schmidt moving forward creates a lane from Wahl to him. Because of the LM having to assist the striker, Dehm is completely open on the wing as the next pass. The size of this space has partially been manufactured by Bieler occupying the LB. Meffert advances through the midfield to receive the next pass, and Lee moves to drag the DCM away from applying pressure to Meffert.
Additionally, Kiel players would move against the direction that the defence was moving.
Because of the horizontal movement of the ball from Kinsombi to Schmidt, the defence move from right to left, but Bieler moves against this movement to a space between the Duisburg centre-midfielders and then stays there, despite teammates remaining dynamic around him. This leaves him open to receive Schmidt’s pass.
A nice example with two vertical passes to Bieler operating between Duisburg’s structure can be seen in the lead-up to Kiel’s fourth goal.
The spaces between Duisburg’s structure and Kiel players like Bieler and Lee occupying them meant that line-breaking vertical passes like the ones above were common. The opportunity was there to be exploited, and Kiel sought to exploit it prior to the game beginning and unfolding in the way it did.
It is important to remember that all of these situations required different solutions, but they all used the same principles of moving away from where Kiel wanted the ball to be played next, third-man movement, and the occupation of opposing defenders, both statically and dynamically.
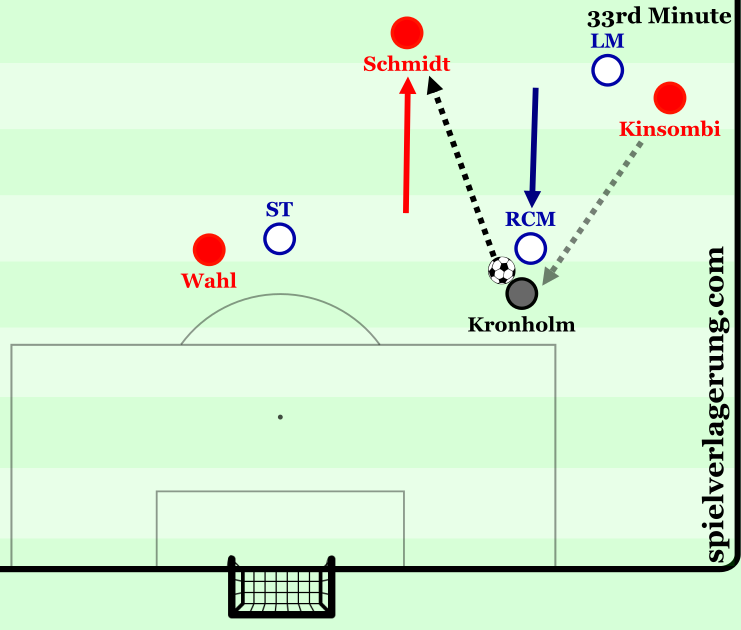
It should be noted that Kiel’s build-up was not always well executed, but this was predominantly caused by player errors as opposed to tactical weaknesses. Their positions were sometimes too square and lacked depth, making it simpler for Duisburg to defend. Furthermore, Kronholm occasionally played long passes forward when there was an open teammate to play short to.
Dehm is forced backwards by the LM directly in front of him. The Duisburg ST and RCM are able to press Dehm within the time it takes him to turn, while preventing any passes to surrounding players.
Scenes like the one above were rare, though. After initial high intensity pressure, Dusiburg’s press slowed. Chasing after Kiel’s 62% possession of the ball only made it easier for Kiel to routinely build from the back. Their numerical superiority with the ball became more difficult to contend with, and Duisburg’s defensive transitions became slower and slower.
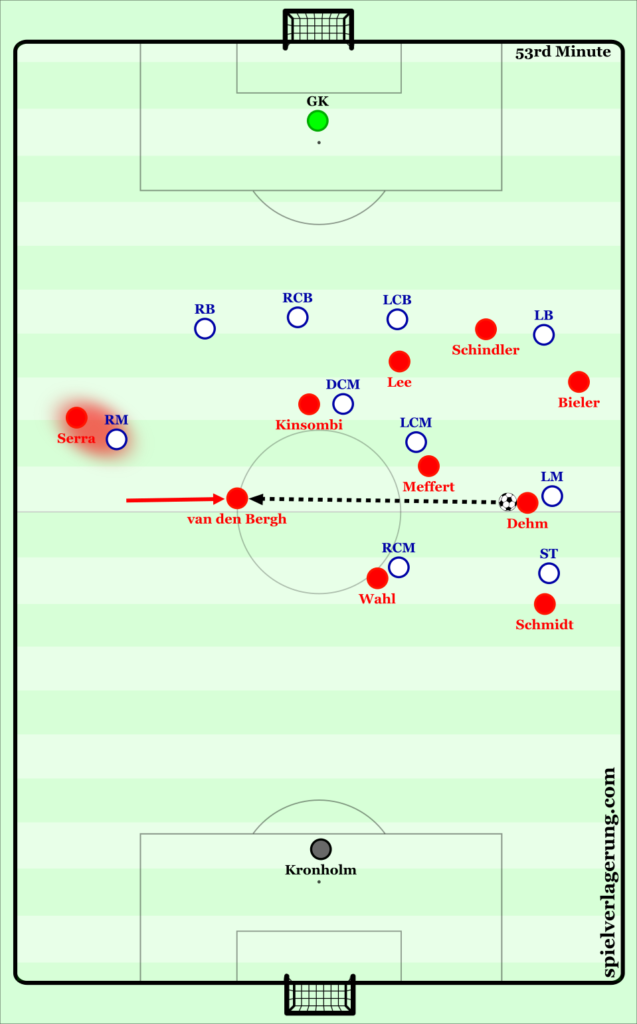
After regaining the ball, some of the Duisburg players are out of position, the most important one in this situation being the RM. This left a 4 v 2 scenario in Kiel’s favour in the centre, which along with the RM being out of position, meant that no one was able to apply pressure on van den Bergh. He is able to dribble all the way through the middle third of the pitch.
Kiel’s own defensive pressure played a major role in tiring Duisburg out very quickly, resulting in the game growing into Kiel’s favour as it progressed.
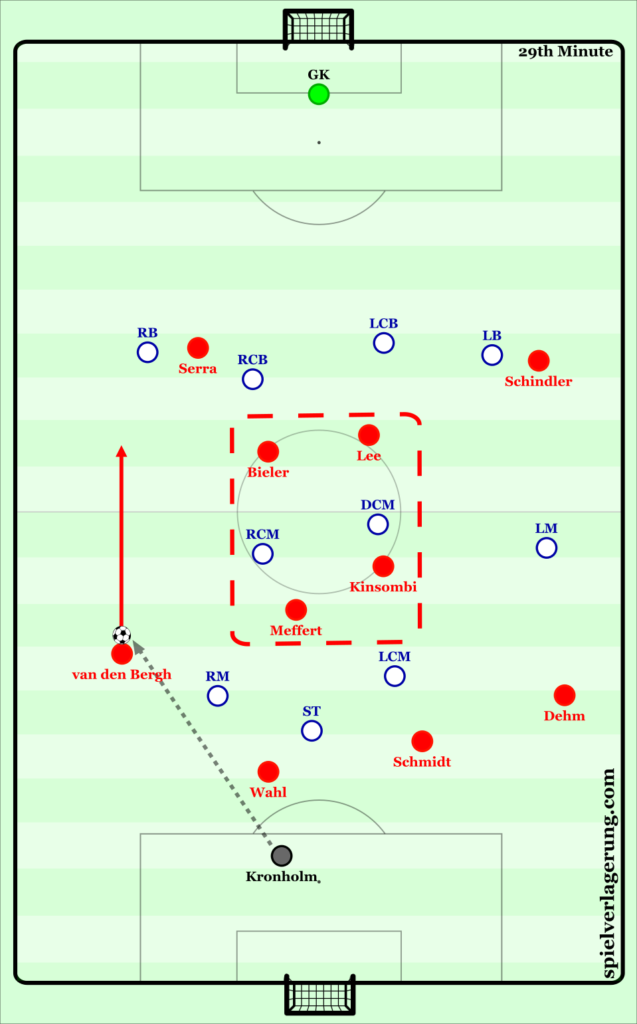
Two key aims of Kiel’s press were to force Duisburg to the wings and to play long passes. The diagram below shows the structure with which they accomplished this when defending inside Duisburg’s half. They used man-orientations within each individual player’s zone, a less aggressive scheme than that of Duisburg’s. This meant that Kiel players were lurking close enough to neutralise Duisburg players as passing options, and prevented Kiel players from being dragged out of their defensive positions by the players they were marking. Unlike Duisburg’s man-marking assignments, Kiel’s had the adaptability to shift between players depending on which zone of the pitch their opponents were in.
Lee is putting pressure on the ball-carrier while keeping the LCM in his cover shadow. Any pass in his direction would result in the 5 forward Kiel players collapsing on the ball as part of a pressing trap, deterring Duisburg from attempting to play through this area. This means they are forced to play horizontally, even though they know that Serra and Schindler want them to do this. The Kiel forwards are ready to press Duisburg’s full-backs, and the centre-back with the ball’s options are limited. The Duisburg RB is forced to play a long pass, but his attacking teammates are marked. Most passes in their direction are likely to result in losing the ball.
Another situation designed as a trap for Duisburg to try and play through the middle, but with different positioning, can be seen below.
The DCM would have to be a pretty exceptional player to keep the ball in this scenario.
The next diagram portrays another scene where Kiel forced Duisburg to the wings.
The full-backs are left open, while Serra and Schindler are marking a player each. Lee puts pressure on the GK while keeping the RCB in his cover shadow.
Occasional defensive positional errors on Kiel’s part meant that Duisburg could very seldom play through Kiel’s large central concentration.

This is a 6 v 3 scenario, but Kiel’s two lines of 3 lack depth. Meffert’s pressure forces the receiving LCM to turn towards the touchline where there is a passing lane to the LB open. Ideally, Bieler would be higher up to deter any passes in the LB’s direction, which would also allow Schindler to press the LCB if necessary.
On the rare occasion where Duisburg were able to play through Kiel, they didn’t get much further. This was primarily because of Kiel’s unwavering compactness and speed in applying pressure.
There was also an intermittent lack of synchrony between the lines of Kiel’s press. The Kiel midfield often lingered too far away from the defensive line, but when they dropped to amend this, the forwards were left isolated. This only really began to occur towards the end of the game, though, a sign of Kiel themselves fatiguing.
There is no way for the ball-carrier to play through the middle, meaning he should turn and play back to the LB. But the pressure applied by the closest Kiel players, Meffert and Schmidt, reduces his time to make a decision and execute an action considerably. He ends up playing through the gap in the defensive line to no one, and Kiel can begin another attack.
Kiel applied significant pressure in second ball scenarios too.
A long ball is played forward, giving the Kiel players a chance to pressurise and regain possession. Serra puts pressure on the centre-backs, leading to the RCB making an error when trying to clear. Kinsombi and Schindler are now the closest players to the ball after having greater awareness of the situation than their Duisburg counterparts, and Kinsombi regains possession in a dangerous area.
Quick combinations in attacking transitions lead to dangerous chances. This was how Kiel used their central numerical superiority to produce a tangible benefit, rather than just creating a numerical advantage and not utilising it.
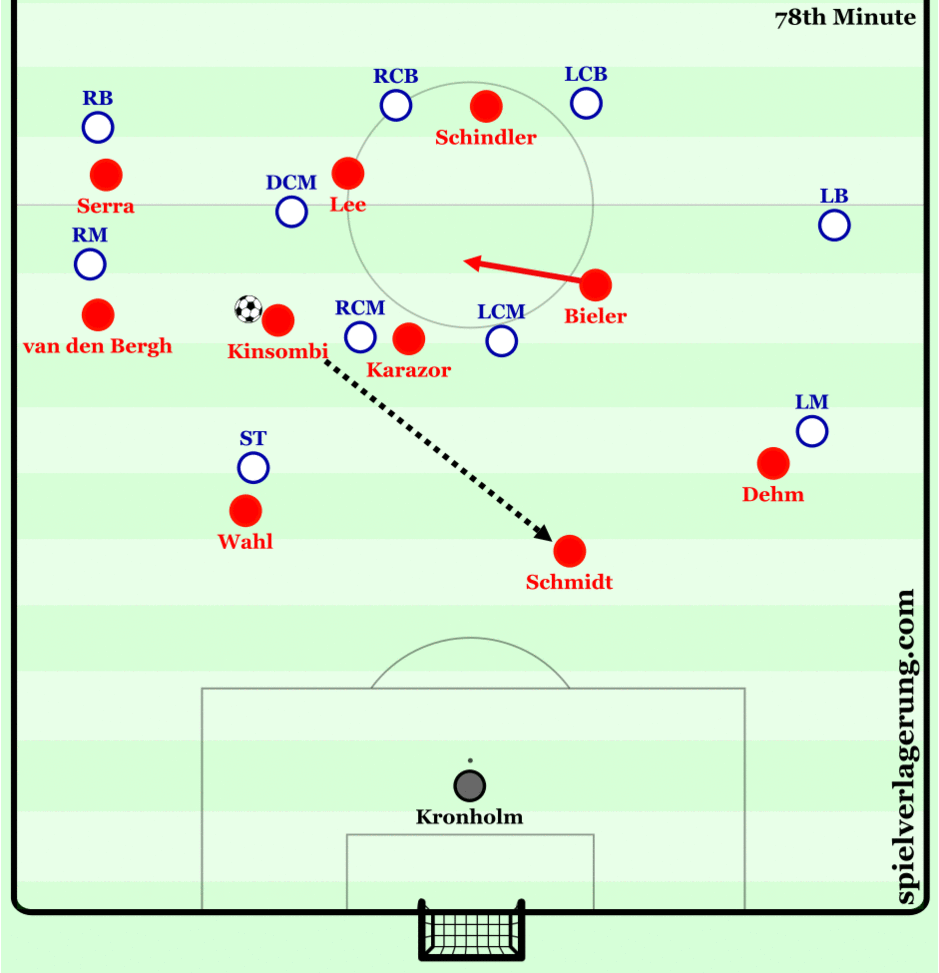
While Duisburg’s LCM is attracted to Karazor and Lee when they have the ball, Serra moves through his blindside to receive from Lee after playing the first pass of the sequence. Bieler, Kinsombi and van Den Bergh’s initial deep positioning means that some Duisburg defenders are further up the pitch than they ideally should be. This means that once Serra has the ball, he is in a 4 v 3 situation with Lee, Schindler and Kinsombi.
The quasi-wall pass that Lee played to Serra here was typical of Kiel when they wanted to maintain/increase the tempo of their attacks. This tempo is difficult to contend with when there is a high concentration of players within metres of each other.
Once Schmidt releases the ball when passing to Serra, Bieler positions himself in the direction and closely in front of where the forward will receive the ball. This allows the ball to be progressed much quicker than if Serra had to control, turn, and gain speed himself. Bieler, on the other hand, can gain momentum before receiving the ball from Serra, triggering Lee and Schindler’s runs into depth. Their direction is designed to dis-orientate who the Duisburg CB’s should be marking.
This can also be seen in the sequence leading to Kiel’s third goal. The combined effect of Duisburg preventing Kronholm playing a short pass and Kiel still managing to have a high central concentration in attacking areas lead to a cruel outcome.
Summary and Lessons
Kiel dominated Duisburg, using their pre-determined principles centering on building-up through Duisburg’s single-forward structure, their man-marking scheme, and tiring them out. This was comprised of mostly micro-actions based on their opponent’s weaknesses that are easily implementable and actionable within the team’s structure and existing personnel. Kiel’s own weaknesses were minor and hardly damaging. They were individual errors arising from lacking player quality, which is bound to be unavoidable for a second division team. Nevertheless, Kiel’s tactical system and game plan enabled many Kiel players to outperform themselves, which is a credit to Walter and his staff.
So, why isn’t it simple for Kiel to replicate their Duisburg performance against every opponent, or for other teams to devise the best game model possible week in, week out? Well, Kiel had the ability to deal with Duisburg because of the relative ease in predicting how they would play. Duisburg, on the other hand, had a good idea of how Kiel would play, but lacked the quality in terms of structure and personnel to do much about it.
Teams can prevent opponents from creating the best game models to play against them by increasing and maintaining unpredictability. This applies to top-tier teams with the best personnel, good enough to overpower most opponents by playing the same way. Unpredictability can be created to different degrees, with major collective structural changes within and between games being at one end of the spectrum, and minor individual changes at the other. The latter is, of course, much easier to train, which is why many teams rarely adjust how they play as frequently as desired. But by preparing, planning, and training multiple systems to become tactically flexible with the same personnel, unpredictability is easier to embody, and opponents won’t know what exactly they are coming up against and what they should be preparing for.
For example, if I played 3-1-4-2 against 4-4-2 to generate numerical superiority in all phases, I might decide to change to 4-3-1-2 against 4-3-3 because of structural impacts that the different formation of my opponent would bring, such as not needing three centre backs in my 3-1-4-2 against one striker in a 4-3-3, and needing more central midfielders against 4-3-3 compared to 4-4-2. Even if I couldn’t train both formations as much as I would ideally like, I may decide to go ahead with this change anyway, because my team should still be able to perform and adapt better to the opponent with the formation change, despite being more familiar with the first formation and performing well with it previously. The benefit of limiting structural weaknesses as part of my game model outweighs having a degree of unfamiliarity arising from formation changes.
Yet, it is crucial to remember that complexity is not always required. Simple problems may only require simple solutions. If I usually play with defensive-full backs behind wingers to generate greater control in defensive transition, but our upcoming opponents are a weaker, defensive team that plays with full-backs and no wingers, I could instruct my full-backs to overlap the wingers to create 2 v 1 situations on the wings. The inability of the opponent means that our defence should be able to cope with this change. The rest of the team would remain unchanged, but this can be the difference between drawing and winning a match for instance.
Reality is not usually as simple as the examples I described, but the same rationale applies to both domains.
The final thing I will mention for today is finding the optimal solutions to the opponent’s predominant weaknesses. Schmidt, for example, was Kiel’s greatest weapon against Duisburg’s single-striker system. In this instance, the solution to the problem presented it itself, but manufacturing solutions to problems presented by opponents comes from experimentation and theorisation. Randomness will always linger because that’s football, but developing the best game model possible can help minimise it.
I will link RM and PR’s articles on developing a game model and tactical principles again here as next steps:
spielverlagerung.com/2016/03/07/how-to-create-a-game-model/
spielverlagerung.com/2019/07/31/tactical-principles-brief-overview/
Keine Kommentare vorhanden Alle anzeigen