Chelsea triumph in Madrid with flexible midfield diamond
For much of the early stages of this season I have been unable to write for various reasons. During that time there were a number of interesting games and impressive performances. In this series I will analyse aspects of some of these matches.
Early Interactions
In the early stages of the game the interaction between the initial structures of both teams led to a number of significant situations, with Chelsea in particular benefitting.
Bakayoko the one that got away
Simeone’s side started the game pressing in a 4-3-3 base shape. The front 3 would theoretically create a natural access to Chelsea’s back 3. In addition to the man-marking in midfield this could force Chelsea wide early in build-up, or encourage them to bypass the midfield zone with longer passes. However, whilst Partey marked Hazard, Saul stuck to Fabregas and Koke marked Kante, Bakayoko was left free.
Due to the advanced positioning of Hazard, Kante and at times Fabregas, Atleti’s man-oriented midfield were dragged into deep positions. This often left Bakayoko in huge space behind Griezmann, and with small adjustments to his position, he could receive from the defence and drive Chelsea’s attacks forward.
Furthermore, by virtue of being unmarked, Bakayoko created confusion amongst Atletico’s midfield as to who would press him. At times this meant he could attract two or more opposing midfielders out of position, leaving his previously marked team-mates free.
Atletico’s midfield man-marking caused them a number of issues, allowing Chelsea to make a number of dangerous break-throughs in the opening stages. Hazard’s positioning as a second striker resulted in Partey constantly being dragged into deeper areas, leaving larger space for Koke and Saul to defend in width. With movements into wider areas, Fabregas and Kante were effective at drawing Saul and Koke into wider positions, opening passing lanes into Hazard or Morata, allowing Chelsea to break through at speed. This contributed to a hectic opening period and a number of half chances for the London side.

Atleti’s wide focus draws out Chelsea’s 8s
In possession, Atleti had a strong wing-focus, attempting to create breakthroughs by focusing on the space besides Chelsea’s midfield and forward line, and combining to attack from there. Koke and Saul dropped deep and wide in their respective half spaces to receive the ball outside Chelsea’s 3-2 structure. With Atletico’s full-backs moving high on the flanks, pinning Chelsea’s wing-backs the pressing responsibility in these spaces fell to Kante and Fabregas.
As such, Chelsea’s 8s were drawn far out of position, and the home side used this to open passing lanes into their narrow front 3 via a short pass either inside to Partey or out to the full-backs to bypass Kante/Fabregas’ cover shadow. With Carrasco or Correa receiving the ball and threatening the diagonal path to goal, they could open the wing for the overlapping full-back to cross.
…But harms transition defence
However, the focus on wide spaces was quite extreme, with Koke and Saul at times simultaneously in deep and wide positions. Furthermore, Partey initially dropped in front of Chelsea’s forward line, whilst Atletico’s front 3 stayed behind Chelsea’s midfield. This created a hugely stretched shape, with the centre in particular open for Chelsea to counter into.
Atletico’s defensive shape-shifting
After around 8 minutes, Simeone switched to a 4-4-2-0 defensive shape in an attempt to stabilise his team’s midfield. The two
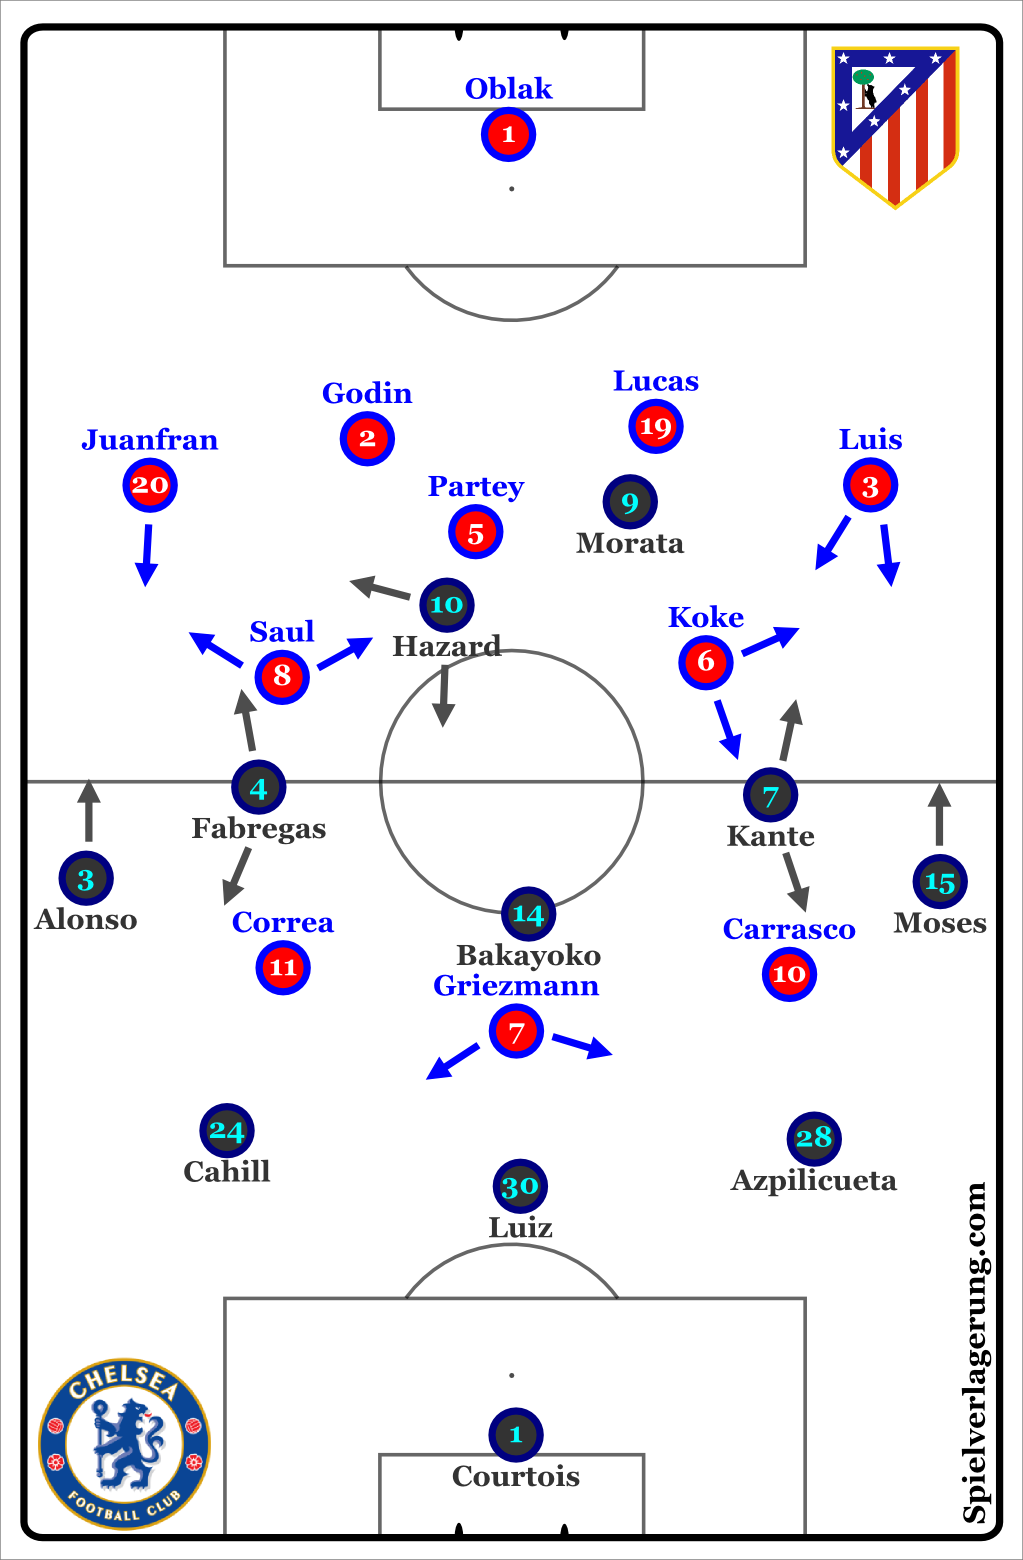
The starting line-ups
strikers focused primarily on preventing Bakayoko from receiving the ball, at the cost of little or no access to Chelsea’s first line. Koke and Carrasco, the wide midfielders, now focused on marking Chelsea’s 8s, Partey continued to follow Hazard whilst Saul often acted as a spare man alongside him.
15 minutes later the Spanish side moved to 4-3-3-0, with Carrasco moving back to the left wing, and Correa dropping to a right wing spot. Interestingly this combined with Fabregas/Kante’s movement encouraged Atletico’s midfield to defend more ball-oriented. Fabregas and Kante often moved high in their respective half spaces, with the Spaniard at times dropping into deep and wide positions on the left, moving out of Saul/Koke’s access areas in the process. Without direct opponents in their access areas, Atletico’s ball-far midfielder would now shift further across, protecting the centre more aggressively.
Interestingly however, the closer Chelsea moved to the wings, the tighter Atleti would mark their nearby opponents. Partey would stick tighter to Hazard and the ball-near 8 would mark their direct opponent closely. With this, Atleti were able to combine their man-marking assignments with highly compact structures and used their access on the wings to prevent switches to the weak areas of their structure.
After taking the lead through Griezmann’s penalty, the home side dropped into a 4-1-4-1-0, with Carrasco and Correa moving deep alongside Saul and Koke. With extra cover from the wide players, Saul and Koke were freed to pursue their direct opponents more aggressively. Furthermore, Fabregas and Kante could be passed on to the wingers if they moved too deep and wide for the midfielders to follow.
Chelsea’s varied dismarking
One of Conte’s strengths as a coach lies in creating patterns to beat man-oriented opponents, this was a feature of his Italy side’s progress at Euro 2016 and part of his Chelsea team’s success last season. In this game, Chelsea’s midfield diamond in the 3-1-4-1-1/3-diamond-3 formation showed several interesting movements to separate themselves from Atletico’s man-marking.
Opening direct route & layoffs
Kante and Fabregas frequently moved wide in their respective half spaces, reducing Atletico’s control of the centre in the process by dragging Koke and Saul to defend wider. This had the effect of widening the passing lanes into Morata, and Chelsea frequently used this in the early stages of the game.
As explained in my dismarking theory piece using the longest possible pass, or “direct route” can be effective against man-marking since it forces the bypassed defenders to turn, increasing the chance of losing their marker in the process.

By bypassing Atletico’s midfield with direct passes to Morata, Chelsea were able to attract the likes of Saul, Partey and Koke to the ball, freeing the midfielders to receive lay-offs from the Spaniard. Morata’s late movements into open lanes behind Atletico’s midfield was also a key factor in this, and his awareness of his team-mates’ positions allowed him to choose efficient lay-offs or through balls to continue the attack.
Vacating position
The idea of vacating position is about creating dilemmas for a man-oriented defence. By moving far out of one’s base position, a question is posed to the marker, namely; do they follow at the risk of leaving valuable space open, or do they leave their opponents free.
Kante and Fabregas showed varied movements throughout the game, creating different situations but consistently creating the potential to bypass Atletico’s man-marking. On many occasions when they deemed themselves unable to receive from the defenders, they would move high in their half spaces.
If Saul and Koke followed, they would be drawn into touching distance of their defenders, creating extremely flat structures and large space behind the forwards. As such, Atletico’s midfielders decided to hold position. This created the potential to advance the attack in various ways. In situations where Atletico’s full-backs remained wide and focused on Chelsea’s wing-backs, Kante or Fabregas could run free through the half space.
Alternately, they could attract Filipe Luis and Juanfran to defend narrower, opening space for the Alonso or Moses to receive longer passes. In these situations, the Atletico full-back would sprint out to press and the near Chelsea 8 would support with an underlapping run to either receive a through ball, or pin the Atletico full-back giving their team-mate more time to control the ball. From these high positions behind Atletico’s midfield line, Chelsea’s 8s could also provide more options for Morata to lay the ball off to.

In other situations, mostly when Chelsea’s first line was pressed, Kante and Fabregas dropped into deep and wide positions whilst the wing-backs moved higher on the wing. For Koke and Saul, following their opponents would significantly weaken Atletico’s central cover. As such, Chelsea’s 8s were often left free to receive the ball in these areas.
Although they were seemingly moving into harmless spaces, receiving the ball in space meant they could dribble to advance the attack, particularly since most of Simeone’s men had a direct opponent to attend to. This positioning was particularly effective for giving the defenders simple pressure-relieving passes to stabilise the away side’s build-up in moments of Atletico pressure.
Position switches to create different match-ups
In the 2nd half, Chelsea demonstrated interesting position switches on the left side which created favourable conditions for attacks. Starting from his base position on the left flank, Alonso often moved higher and narrower into a forwards’ position against Atletico’s defensive line. At times, this drew Juanfran infield with him, opening the wing in the process. Hazard frequently moved all the way out to the left wing, losing Partey in the process of vacating his position.
From his left wing spot the Belgian forward could use his excellent dribbling ability to create dangerous attacks, particularly when Alonso had drawn Juanfran infield, giving Hazard more space to control the long pass. This was particularly evident in Morata’s equalising goal.
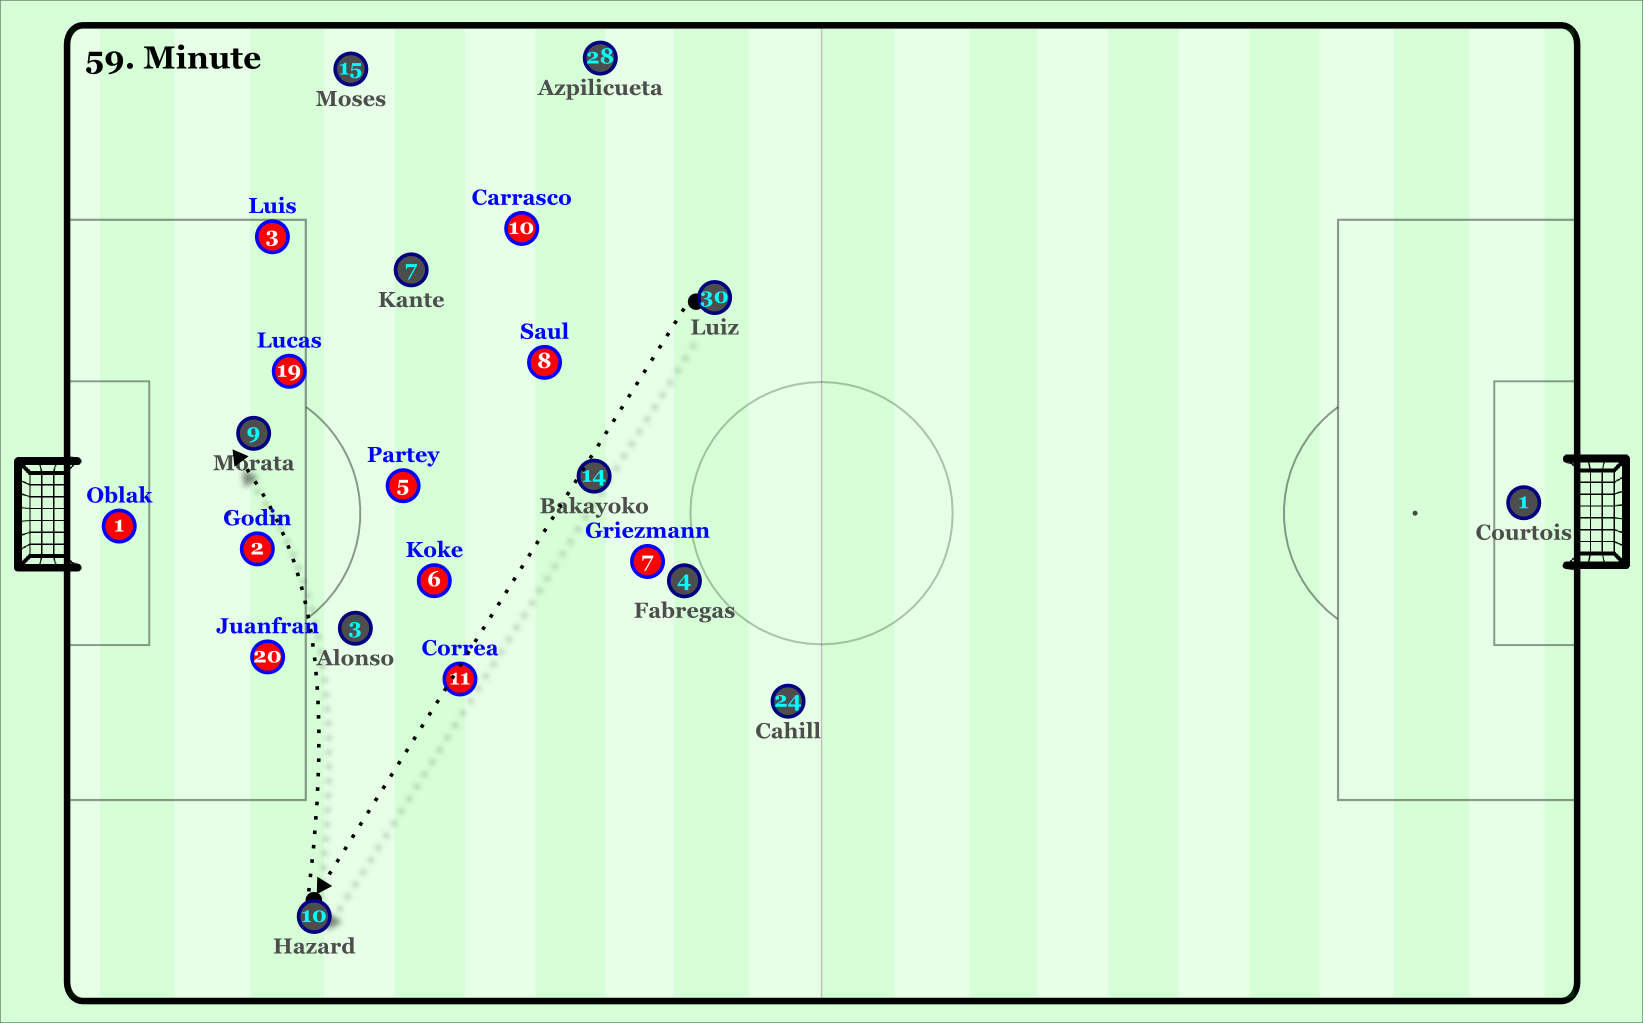
Chelsea’s equalising goal. Also notice Kante and Alonso’s positions between opponents and the resulting free space on the flanks.
Simeone’s late switch
Even at the final stages of the game, Simeone’s defensive shape shifting had not yet provided a solution to deal with Chelsea’s midfield diamond and advanced wing-backs. Particularly in the situations where Kante and Fabregas moved high between the lines, Chelsea had a 6-man presence in offensive areas behind Atletico’s midfield, which the defensive line understandably struggled to deal with.
With less than 15 minutes to go, Simeone brought on Gimenez for Thomas Partey and moved to a 5-4-1 defensive shape. With a 5-man backline, Juanfran and Filipe Luis would be freed to defend wider, having quicker access to the wings, whilst the wide centre backs could help control the space inside them better. Furthermore, they could retain the 3-man front line in higher pressing by moving into a 5-2-3 or 4-3-3 shape in these phases.
This had a positive impact, giving them quicker access to Chelsea’s build-up, stabilising their own build-up and leading to a dominant closing spell. However, it wasn’t enough to see them find a winner, with Conte’s men finding one instead from a very well worked free kick in the final play of the game.
Conclusion
Although it came against the run of play at the time, Chelsea’s late winner was well deserved on the overall balance of play. The flexible movements of the midfield diamond combined with the position switches were effective at beating Atletico’s midfield man-marking, and it took Simeone until the final 15 minutes to come up with an effective solution.
Keine Kommentare vorhanden Alle anzeigen