Gerhard Struber’s intense pressing system at Barnsley
When he was appointed as Barnsley manager in November, Gerhard Struber was a relative unknown to the typical English football fan, but the Austrian had begun to make a name for himself in Europe with his high intensity philosophy and his success at Wolfsberger AC. When he was appointed, Barnsley were rock bottom of the Championship and were without a win in sixteen, and so the aim was very much to fight against relegation.
Barnsley managed to stay up by one point, albeit with some help from point deductions, but the more interesting topic is the manner in which they played in order to stay up. Struber implemented his high pressing, vertical football almost immediately, and Barnsley finished the season with the most defensive duels in the league, most interceptions, most tackles and the second highest PPDA in the Championship. He also achieved all of this with the youngest squad in the league, with Barnsley’s average age being 22.7.
This analysis will therefore focus on the defensive system which has been implemented since his arrival and will break down the principles and ideas behind their pressing system.
General structure and principles
From analysing footage of their matches this season, the most visible principles in Barnsley’s pressing seem to be:
- Constant pressure on the ball carrier
- Force the opposition backwards while pressing
- Protect the central areas and show the opposition wide
- Encourage the opposition to play out
- Cut off one side of the pitch using diagonal runs where possible
These are the general principles of Barnsley’s pressing, and so regardless of the structure of the side, these principles are always seen. Barnsley’s pressing structure this seen has mainly fluctuated between the 4-diamond-2 and a 3-4-1-2, with the latter becoming more prevalent post corona break.
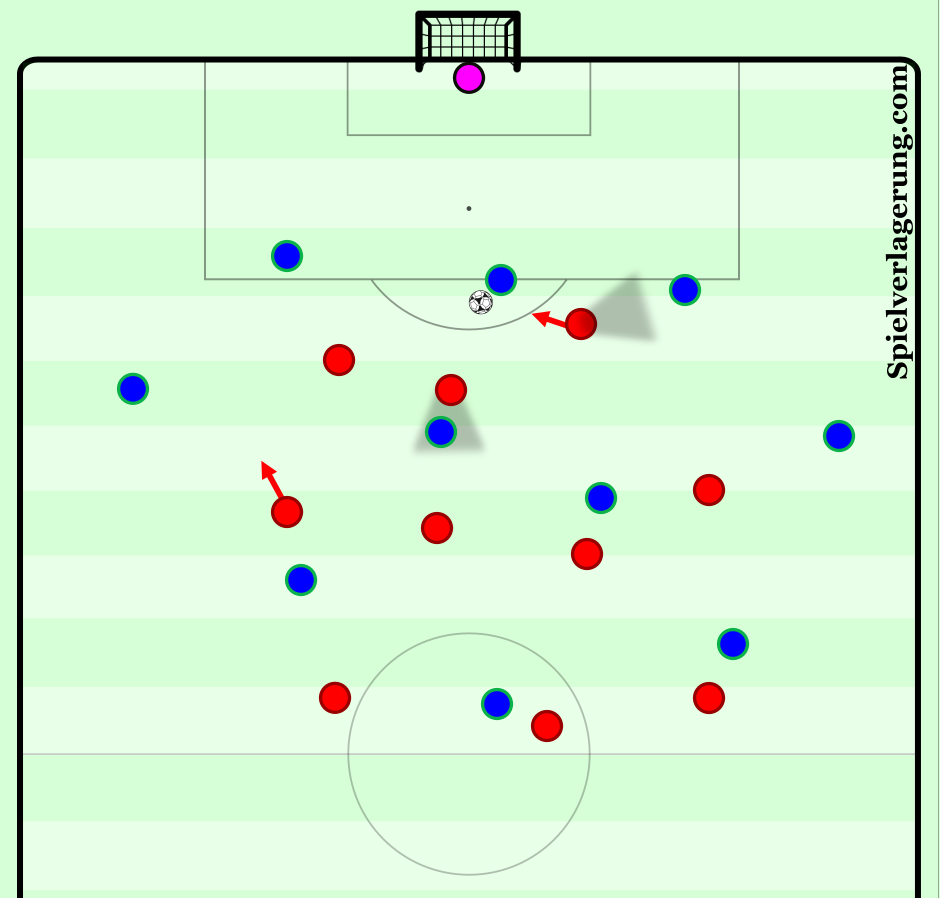
We can see this 3-4-1-2 below in its general structure, here interacting with a 4-5-1. The two strikers press the centre backs respectively, and press while covering the inside lane, therefore showing the opposition into a wide area. The opposition pivot, or ball near central midfielder, is pressed by the Barnsley pressing ten, and so the freest option for the opposition is the full-back. Barnsley’s wing backs will then press the opposition full-backs, and Barnsley’s staggering within their structure aims to cut options from these wide areas.
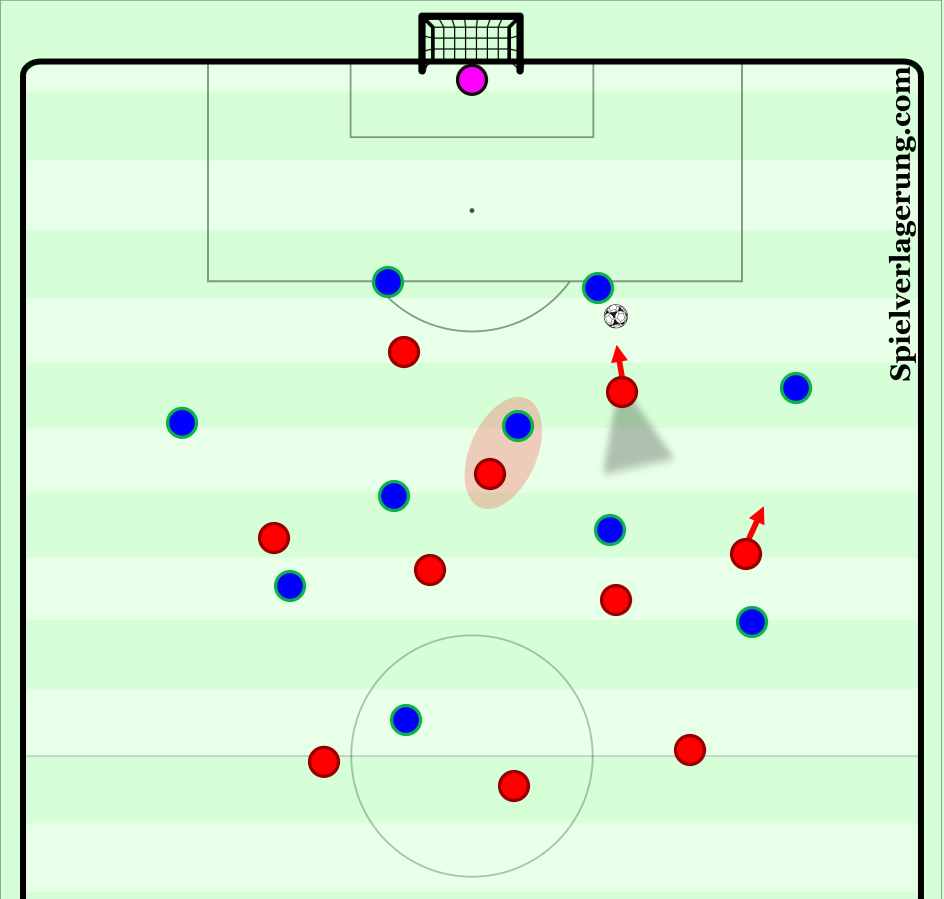
Barnsley’s wing-backs press forwards at pace and look to prevent the ball going down the line. The wide centre back will step forward and also cover the pass down the line. The pressing ten can come across with the opposition pivot, while the central midfielder can mark the opposition central midfielder. The central midfielders of Barnsley are more option oriented and will balance between two players if necessary. The pressing ten can also carry on their run here and leave the pivot in his cover shadow, further reducing any inside space. The strikers back press often, and so will follow the passes from centre back to full-back and run backwards. This is something I will explain in more detail later on.
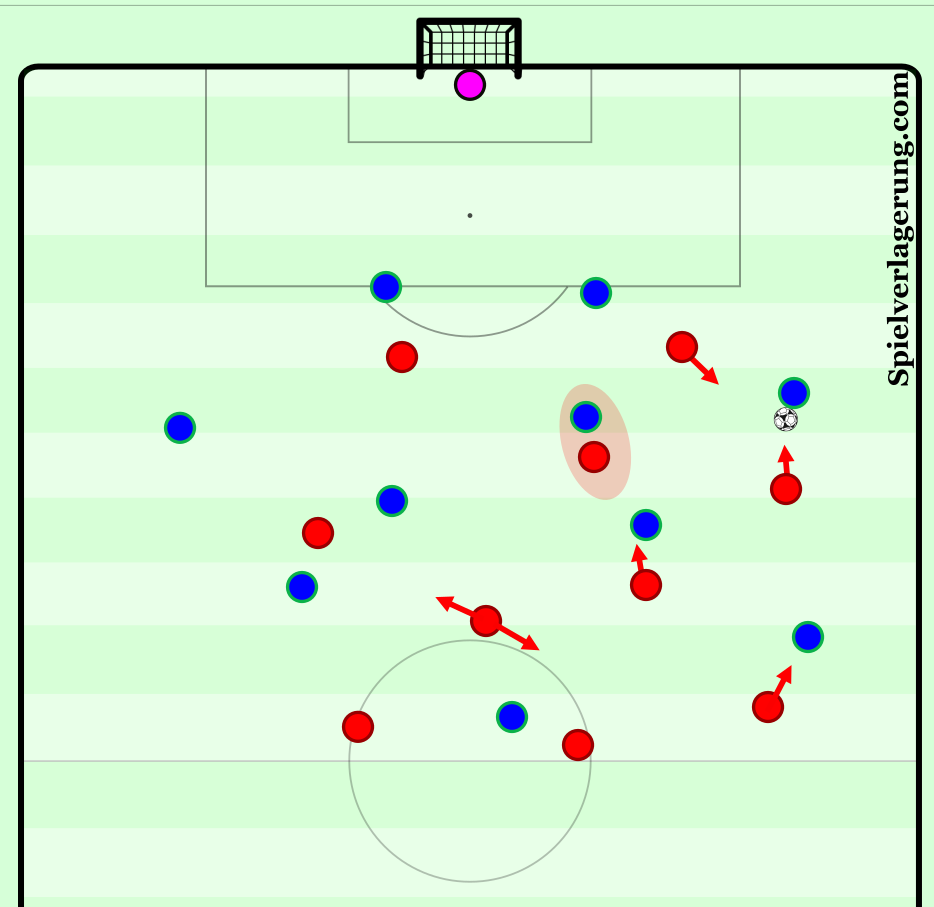
In this example here, the opposition use a double pivot, but the actions of the team allow for Barnsley to maintain balance in their pressing. We can see the opposition right centre back has the ball, and the ball near central midfielder is pressed by the pressing ten. The far Barnsley striker drops slightly deeper to protect the pass to the far pivot, and so the opposition go to the left centre back. This centre back can then be pressed in a similar way to shown above, and because the striker aims to cut the central lane, the pivot cannot be accessed immediately. The ball is therefore forced wide again to the full-back.
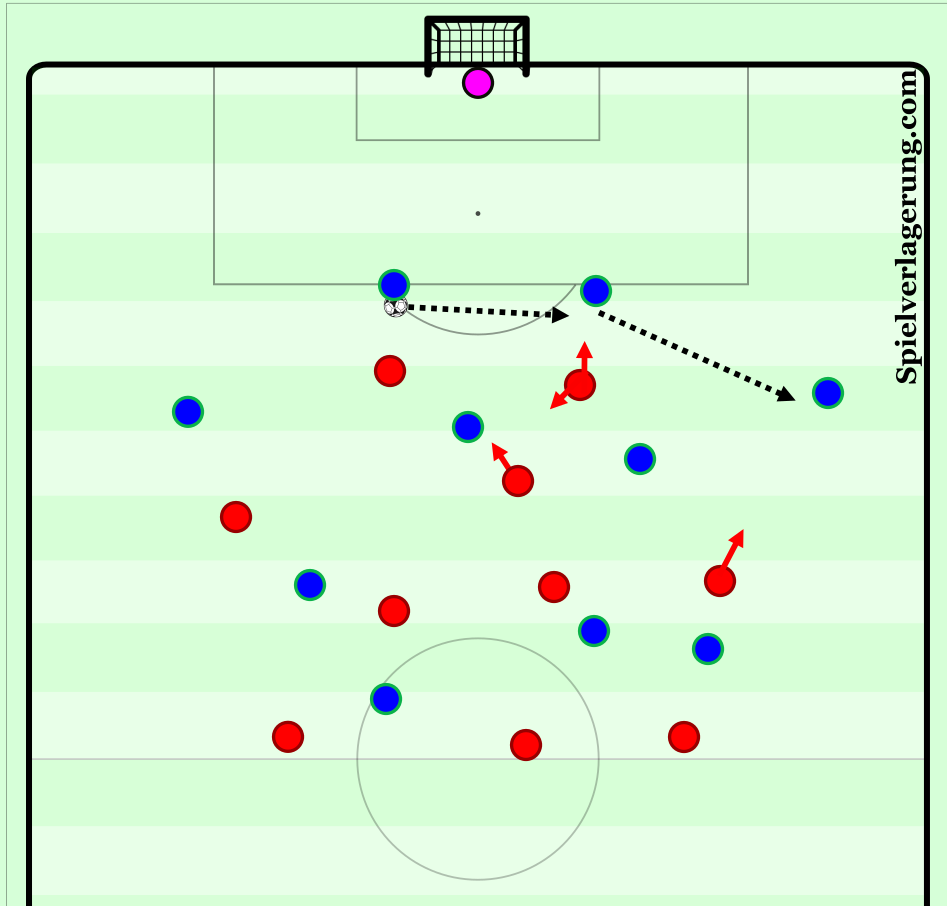
The wing-back then presses high, and because Barnsley force it to take three passes before they access the pivot, the pressing ten has enough time to push across to cover the new ball near central midfielder (previously the far pivot). Pressure is maintained on the ball carrier by the wing-back and from the back-pressing striker. The central midfielders remain option orientated, and so here because the ball near central midfielder is covered, they don’t need to push forward and can just monitor the player behind. If the pressing ten isn’t able to come across at times, the central midfielder will balance between the two options and press when one receives the ball. The other central midfielder can also come across to cover the space behind.
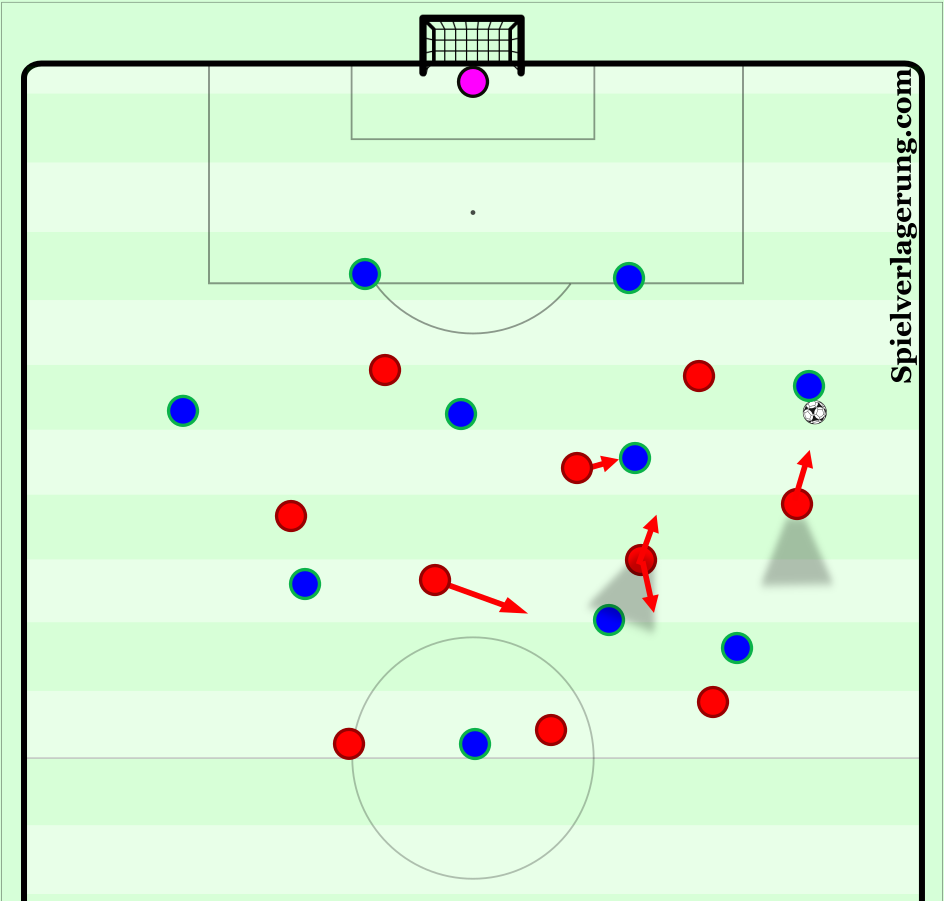
Here is a video of a similar scene here involving a back three and a single pivot, where the pressing ten balances play well and can cover two ball near central midfielders in the play. We also see some of Barnsley’s cutting of the pitch which we will talk about later in detail.
Against a back three, the system alters slightly but again maintains the same principles. Here, the pressing ten balances between pressing the central centre back and covering a pivot. A common trigger for the press is backwards passes, particularly to a central centre back in a back three, as this allows the strikers to press at an angle. This follows the principle of cutting off one side of the pitch (which I will detail later) and allows for Barnsley to dictate play towards one wing again. Their midfield staggering is then able to close around the wide spaces as seen, and most commonly the wing-back presses and blocks the pass down the line.
4-diamond-2
Their other system used while pressing, the 4-diamond-2, can be seen below, and we can start to see the similarities in the two presses and how these similarities allow for their principles to be executed. Again, you have the same dynamics between two strikers and a pressing ten, with the strikers protecting the central lanes and showing the outside lane, while the pressing ten covers the pivot. The opposition are again forced wide.
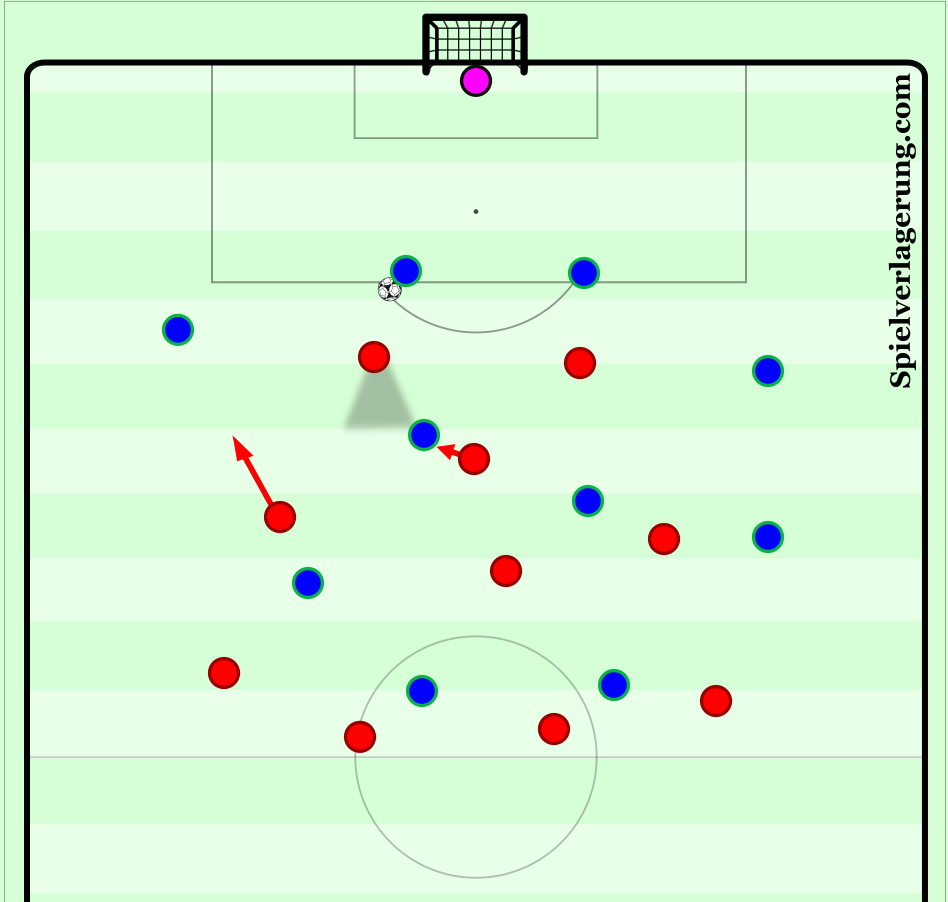
The widest central midfielder will then push across to press the full-back, while a Barnsley full-back is now able to monitor the pass in behind. The pivot can be covered by the pressing ten, while the central midfielder pushes across to cover the inside lane and can cover any higher opposition midfielders, as well as helping to control any long balls from the opposition.
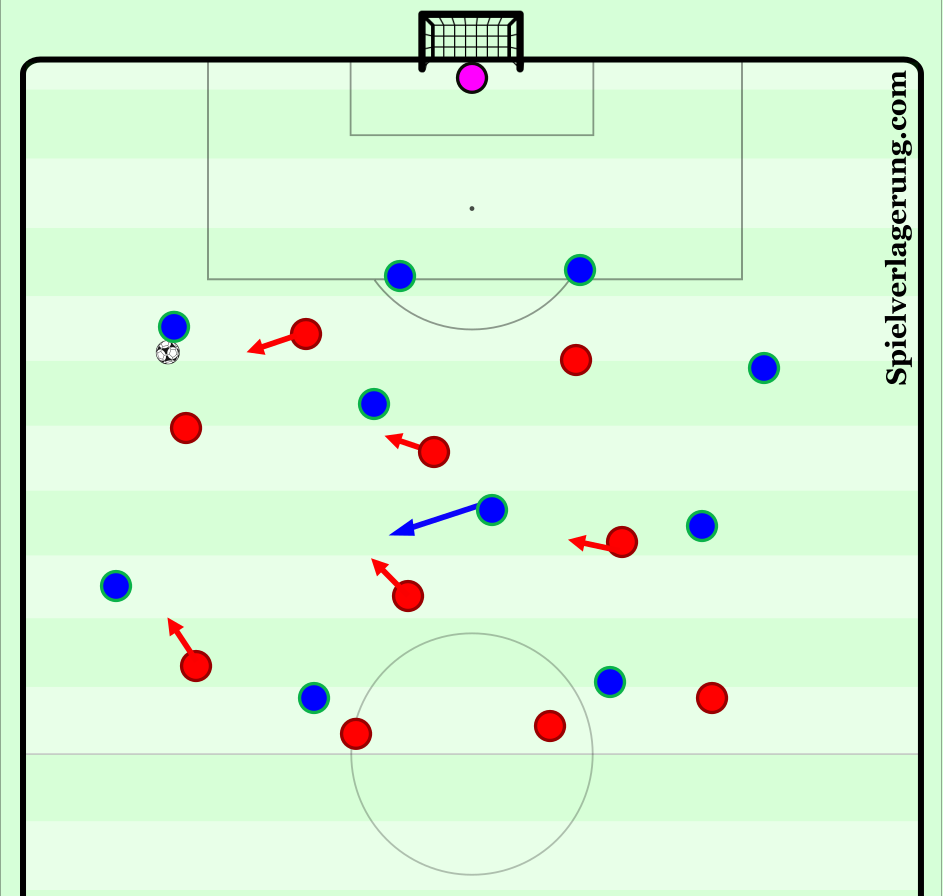
This scene against Fulham from a goal kick demonstrates that same idea of showing the opposition wide and being able to collapse around the area. Fulham play the ball short to the left centre back and are set up in a 4-3-3. The pivot is marked by the pressing ten, while the Fulham left central midfielder (our right) looks to receive the ball in a central lane. Due to the striker’s central positioning, it allows for this option to be cut, and therefore allows for the right sided central midfielder of Barnsley to move out and press the full-back.
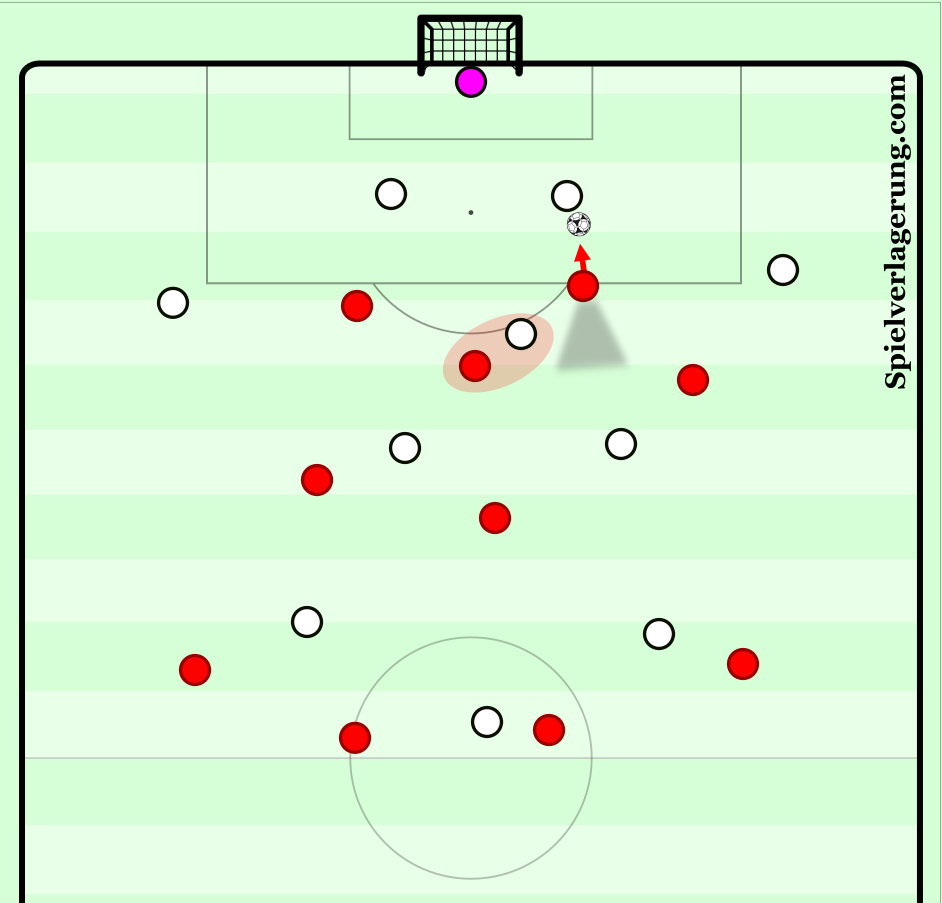
Fulham opt to play the ball back to the goalkeeper, who then goes long into the left back. The central midfielder can then press the full-back, who heads the ball over him and into that once free Fulham midfielder. But because the ball has been forced wide, it allows time for the diamond to push over, and so the nearest Barnsley central midfielder can now push across onto this player to press, whereas previously he would expose Barnsley in a central area if he marked tightly. Barnsley’s far central midfielder can also tuck across, and so Fulham can’t create any overloads. Barnsley steal the ball, and the pressing ten beats his man and gets a shot away.
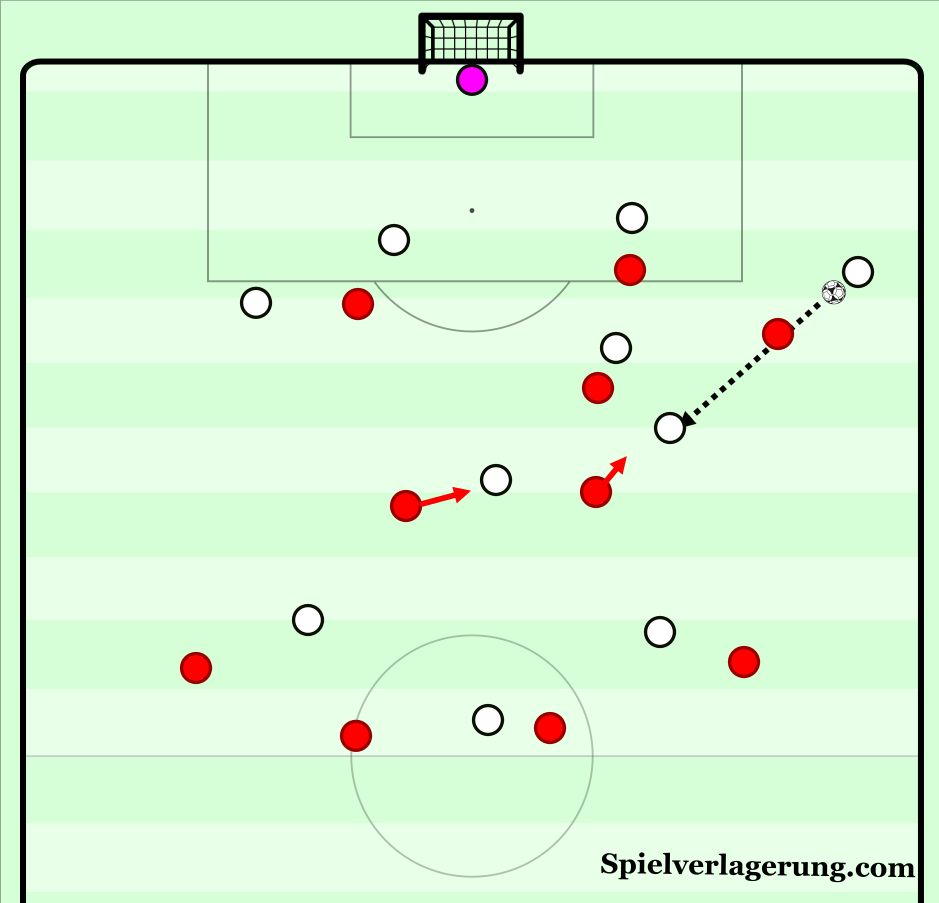
This section gave an overview of the general pressing scheme Barnsley use, and introduces the principles of their pressing. These next sections will focus on their principles in detail and how they demonstrate these in situations.
Forcing the opposition backwards and cutting access to one side of the pitch
Due to Barnsley more or less always looking to maintain pressure on the ball, they are not a side who work from as many triggers as others do. They do look to create their own triggers at times, and backwards passes often act as a trigger for players to press forwards to win the ball. I mentioned that in the Championship, due to how direct some teams are, Barnsley like to encourage teams to play out against them when possible. They will allow players to receive in an attempt to build out, and will then either look to win the ball, or at the minimum force them backwards or long, in order to allow them to then press again.
To force the opposition backwards, you have to maintain pressure on the ball from the front, and also have to leave passing options open for the backwards passes to be played to. You then have to have a structure in place that allows for these options to then be pressed once they receive. As I’ve mentioned briefly, the way Barnsley do this is through back pressing with their strikers. This scene against Millwall demonstrates this well, and the intentions behind it. We see the ball has been forced wide again, with Barnsley in their 3-4-1-2. The wing-back moves out to press, and the striker continues his pressing run and back presses to help the wing-back. This leaves the backwards pass open to the centre back open.
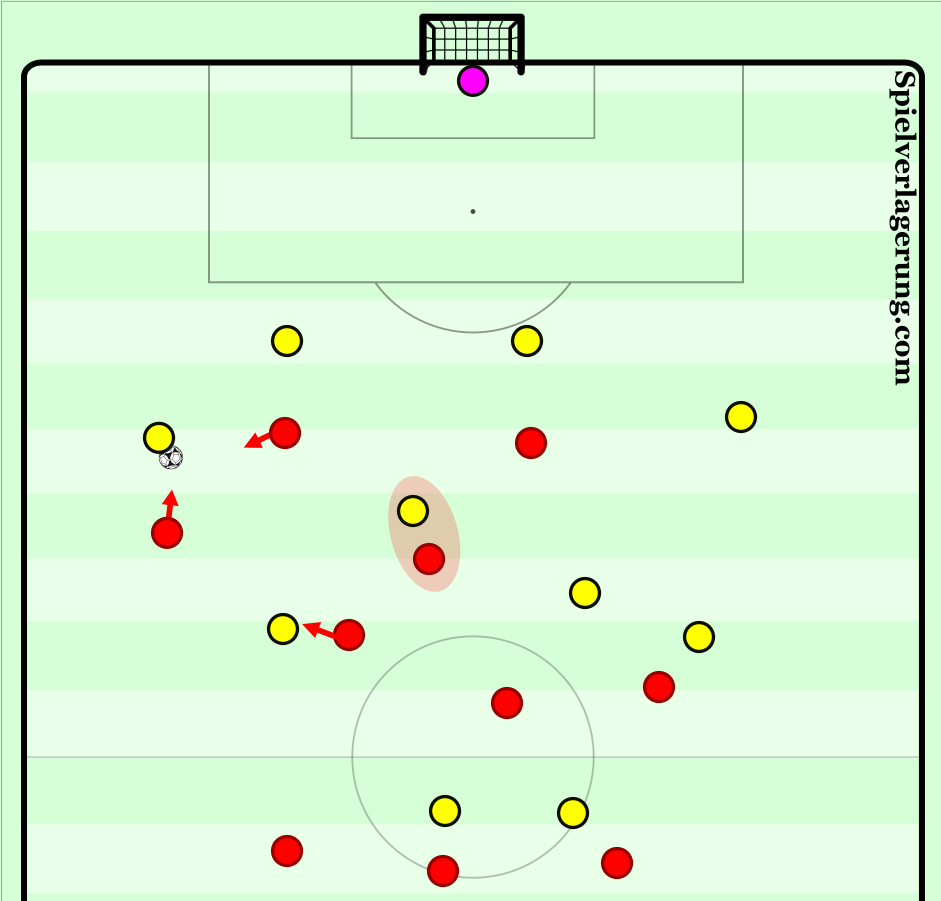
Once the ball is played backwards to the centre back, because the near striker has followed the movement of the ball almost, they can make an arced run to cut the right full-back off using his cover shadow, and so Millwall are forced left. The pressure on the left centre back isn’t intense but is enough to make Millwall not want to play short, and so they go long by switching the play. The length of this switch allows Barnsley to get across and win the ball comfortably.
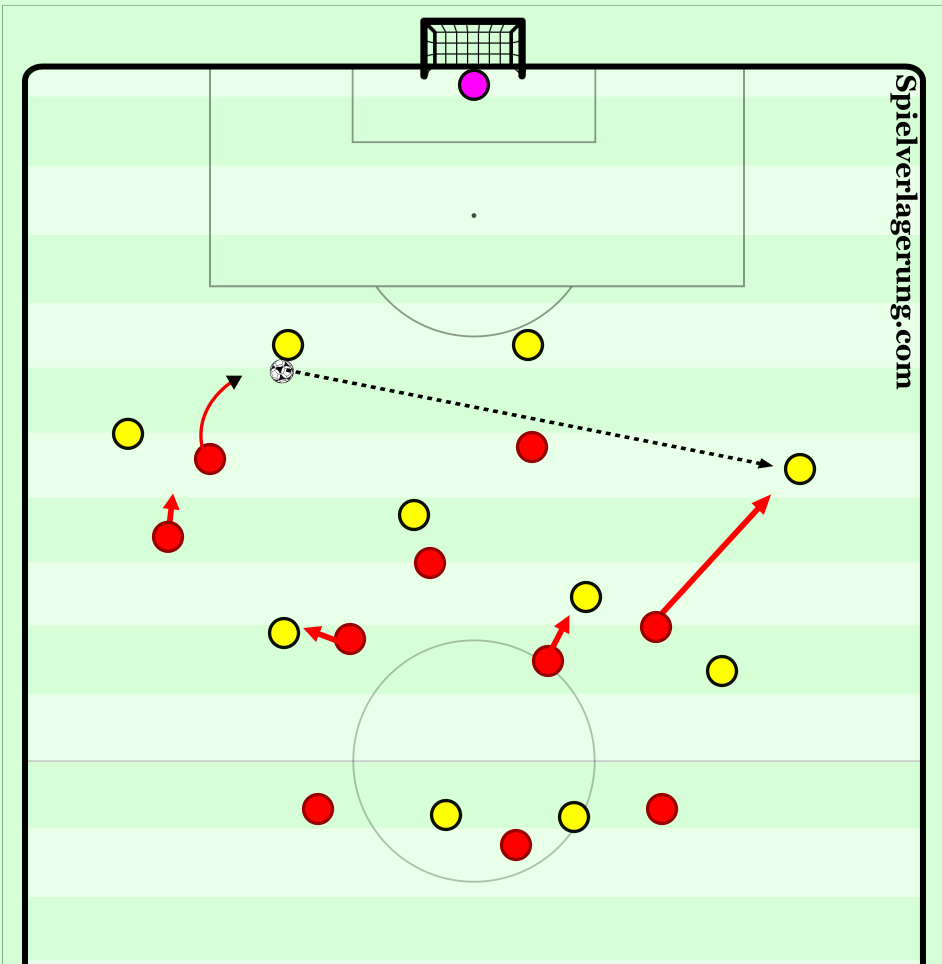
Barnsley could have cut the passes back to the centre backs and forced Millwall to likely go long, but they allow Millwall another opportunity to try and play, as they are confident that their structure is balanced enough. Here’s a video of the scene below.
This scene against Blackburn in the diamond demonstrates a similar idea again, where the near striker back presses again and allows the near centre back to receive a backwards pass. This triggers an arced run from the far striker, as well as from the near striker, and so both wide angles are cut off and nearby central options are covered.
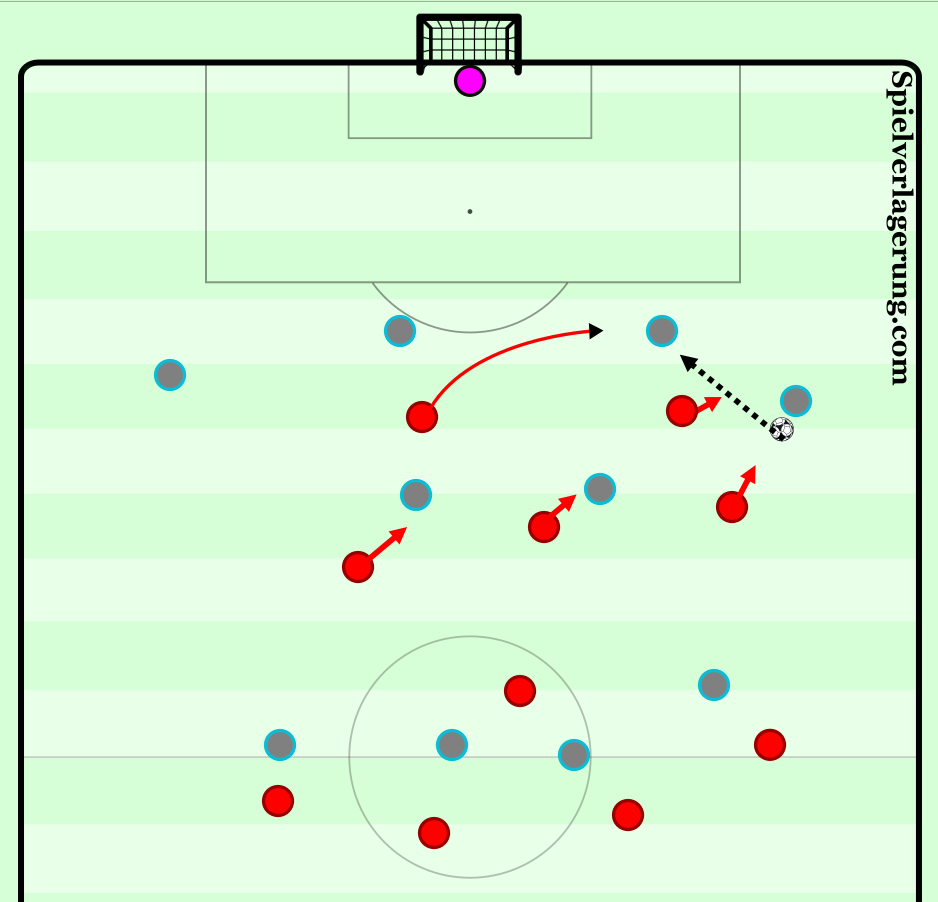
Again, here’s a video of the scene below.
The opposition generally may not want to play these straight passes down the line, as they are usually harder to progress the ball from, and so this backwards option allows them to keep trying to build, but it also allows Barnsley more opportunities to press. If the opposition feel too threatened, the goalkeeper is always an option, but Barnsley always press the goalkeeper in the same way. We can see a situation below again where their structure may force the opposition back, and eventually to the goalkeeper.
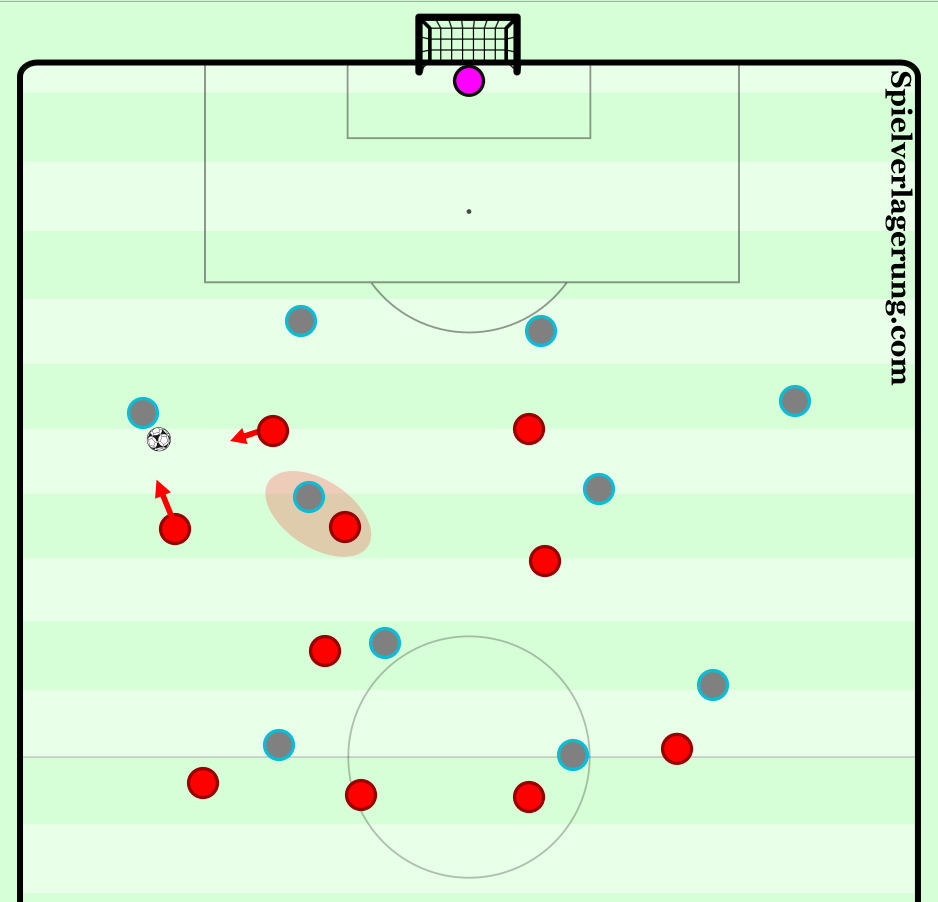
The basic idea behind the back press in this way is that it allows you to retrace your steps, as when the ball goes backwards you are already occupying the lane back to the full-back. The same applies for if the ball is played back to the goalkeeper, as the back presser will usually then arc their run to look to take one side of the pitch out again. This will usually result in the opposition going long or playing short to the other side. Here, the opposition go long to the wings, and because no other option is really available but this side, Barnsley can anticipate and get across quicker.
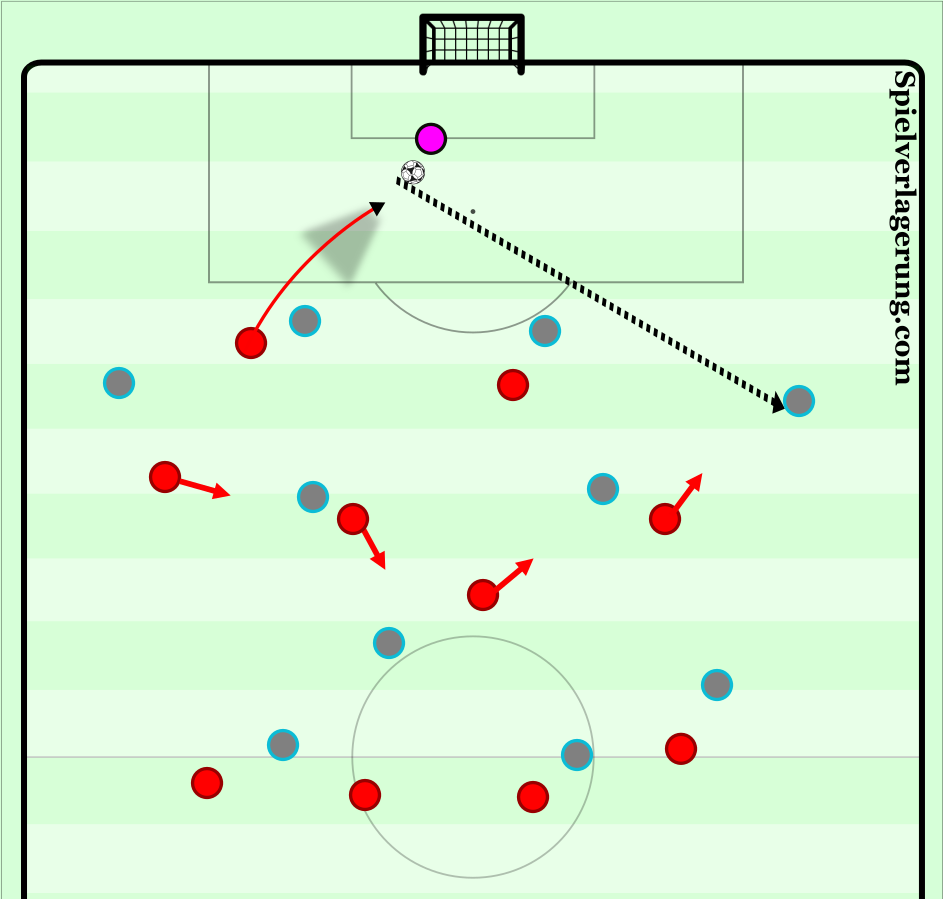
Similarly, if pressing has occurred on the right side, the left sided striker can also come across to cut access to the far side, which forces the goalkeeper to go long into an area which is already compact with Barnsley players.
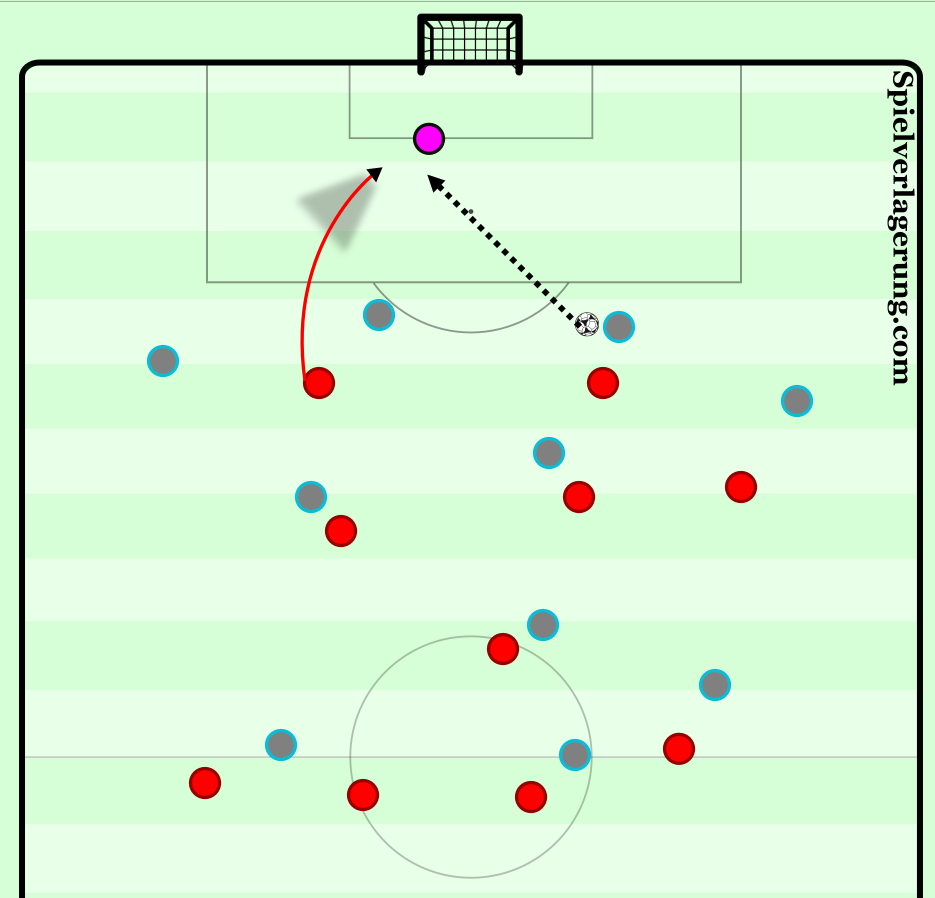
We can see a video example of a diagonal press against the goalkeeper being successful here.
It’s worth noting that the strikers don’t always press inwards at an angle against the centre backs on backwards passes, especially the far striker, however they do use this commonly to dictate play. If they force the opposition backwards and don’t press inwards, it simply gives them an opportunity to reset and gives them another pressing situation, or another opportunity for the opposition to build up, depending on how you think about it. Not every team will play the ball backwards either, and some teams will play directly and not allow Barnsley these pressing situations. Unsurprisingly then, Barnsley struggle in these games against direct opposition, and tend to thrive when teams want to build-up against them.
Against a back three
Against a back three the same concept can be used, with passes from a wide centre back to the central centre back being pressed by one of the wide strikers, who can then use this to force the opposition over to one side. We can see this in a situation against Blackburn, where a ball is played from the left centre back to the centre back and the striker follows this pass and cuts the lane back to the left side of the pitch. Similar situations also came up against Leeds United.
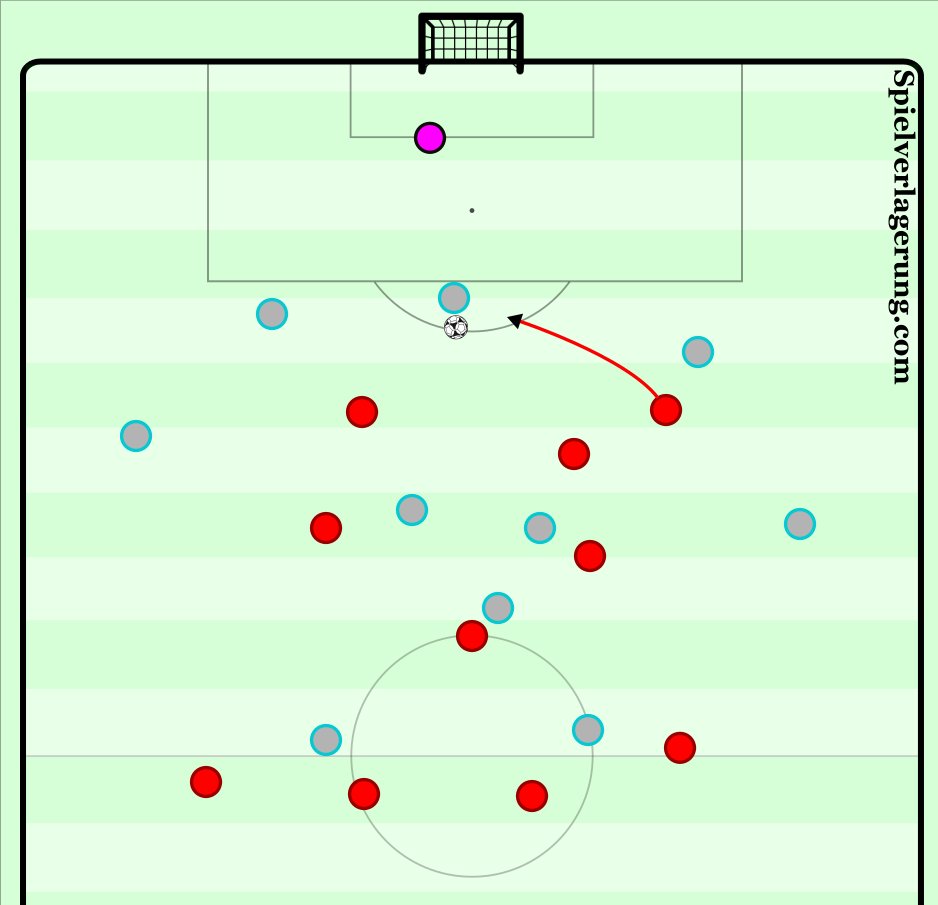
In another situation against Blackburn, this time in their 3-4-1-2, we can see the far side striker coming across to press from the left side. This therefore aims to limit this left side and effectively make Blackburn’s back three turn into a back two. However, a mistake from the pressing ten allows the pivot to receive the ball, meaning this left side (Blackburn’s right) can now be accessed. Thankfully though, due to the balance of the midfield, the pressing ten can press a centre back, the wing-back can press forward, and a central midfielder can deal with the pivot, and Barnsley win the ball back through a back press.
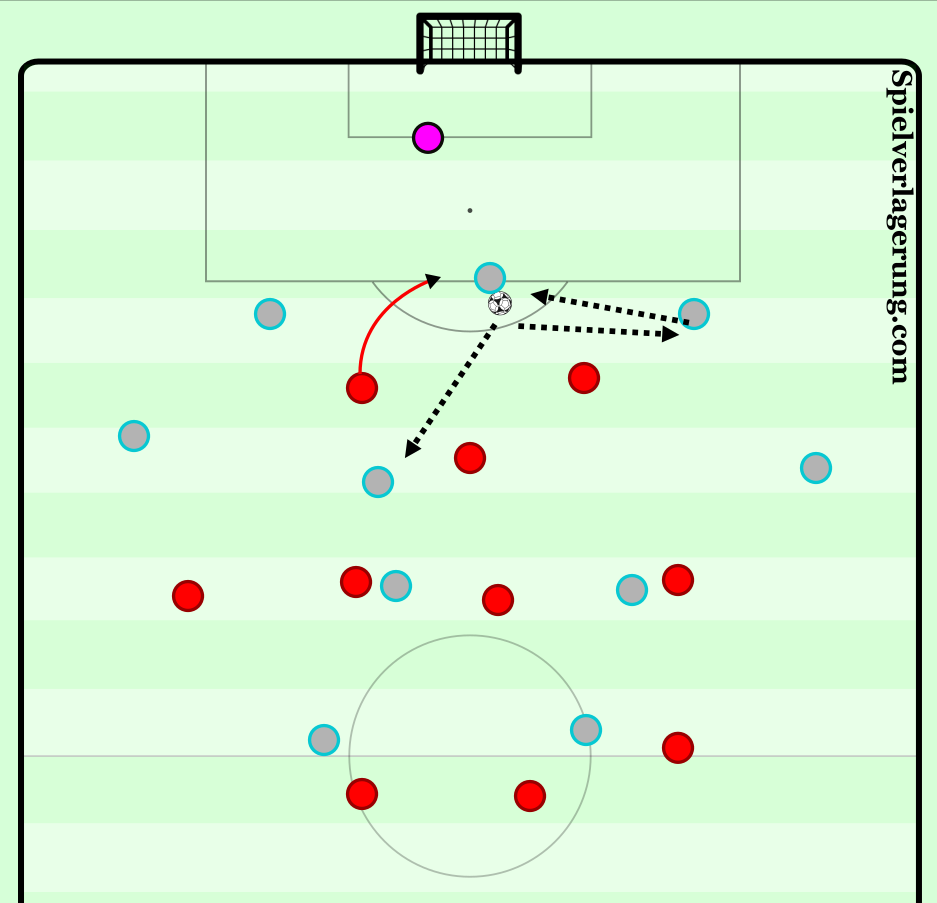
Here’s the scene on video, which also shows the benefit of a player back pressing, in that they provide inside cover against a dribble.
We’ll come back to the dynamics of this kind of pressing against a back three in the traps section, with a cool trap against Middlesbrough used twice.
Creating their own pressing opportunities from throws
With Barnsley wanting to create situations where they can press the opponent, throw-ins are an important part of their game. My previous article talked about the importance of defensive throw-ins and how they can be used as pressing opportunities, and perhaps most relevant to this piece, I talked about the need to encourage the opposition to play out, and Barnsley do just this.
We can see an example below of the common structure Barnsley use from throw-ins. In this example against Blackburn, the main principle of showing the opposition backwards from throws is visible. Quite simply, rather than staying close to the centre backs, the striker moves backwards and will stay close to the thrower on the wing, leaving the lane open for a simple throw back to the centre backs. This is done for a number of reasons, with one simple one being that it forces the opposition backwards and away from goal. More interestingly though, this gives the opposition a chance to play out, as they effectively get a free pass from the throw to restart play, therefore preventing long messy throws that lead to poor quality turnovers.
While it is a free pass, it’s what comes next that it is interesting.
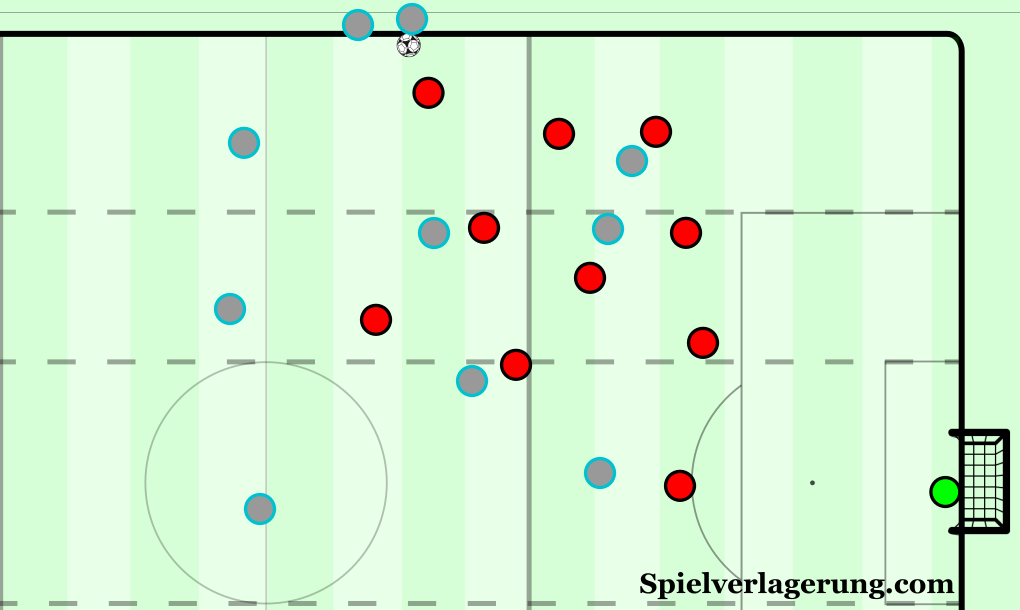
In the same way passes from full-backs to centre backs are back pressed and then pressed forwards at an angle, Barnsley nearly always look to cut the lane back to the thrower, in order to dictate play away from this area. We can see the ball is received by a centre back, and the striker can make a diagonal pressing run to force the opposition to the left. This allows for Barnsley to push out and recover into their pressing shape, and so when Blackburn are forced all the way to the wing, Barnsley are able to push Barnsley back and eventually to the goalkeeper, using the principles we have already mentioned.
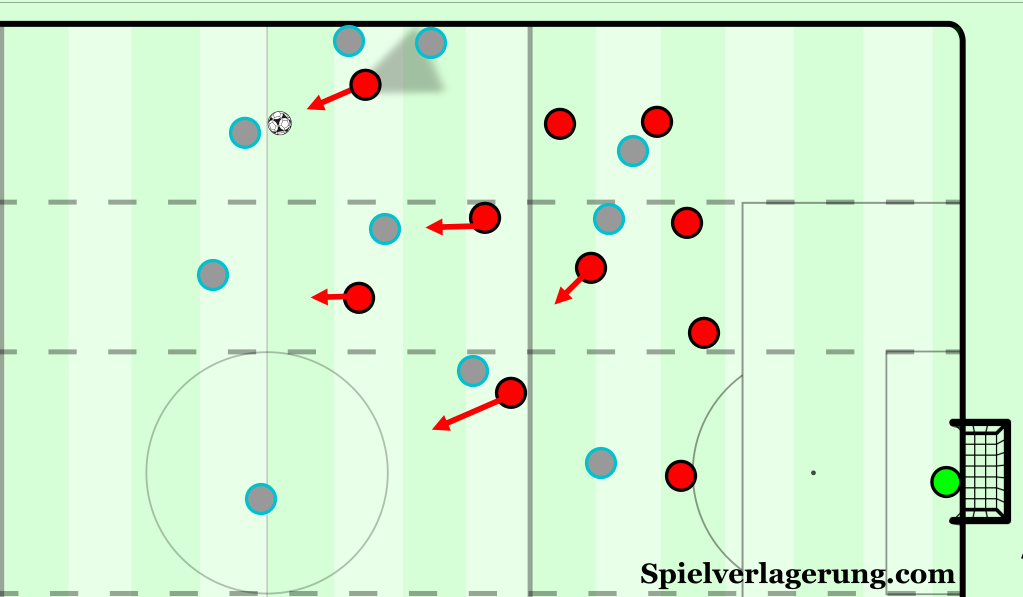
Here is the video of this scene here, which shows the throw-in principles combined with pressing the opposition backwards and pressing the goalkeeper with a diagonal run.
In this example against Wigan, again Barnsley allow the backwards throw, with the near striker staying deep. The pressing ten comes across to mark the pivot, while Barnsley double up on the player down the line, eventually moving into a one in front, one behind type structure to manage the longer throw.
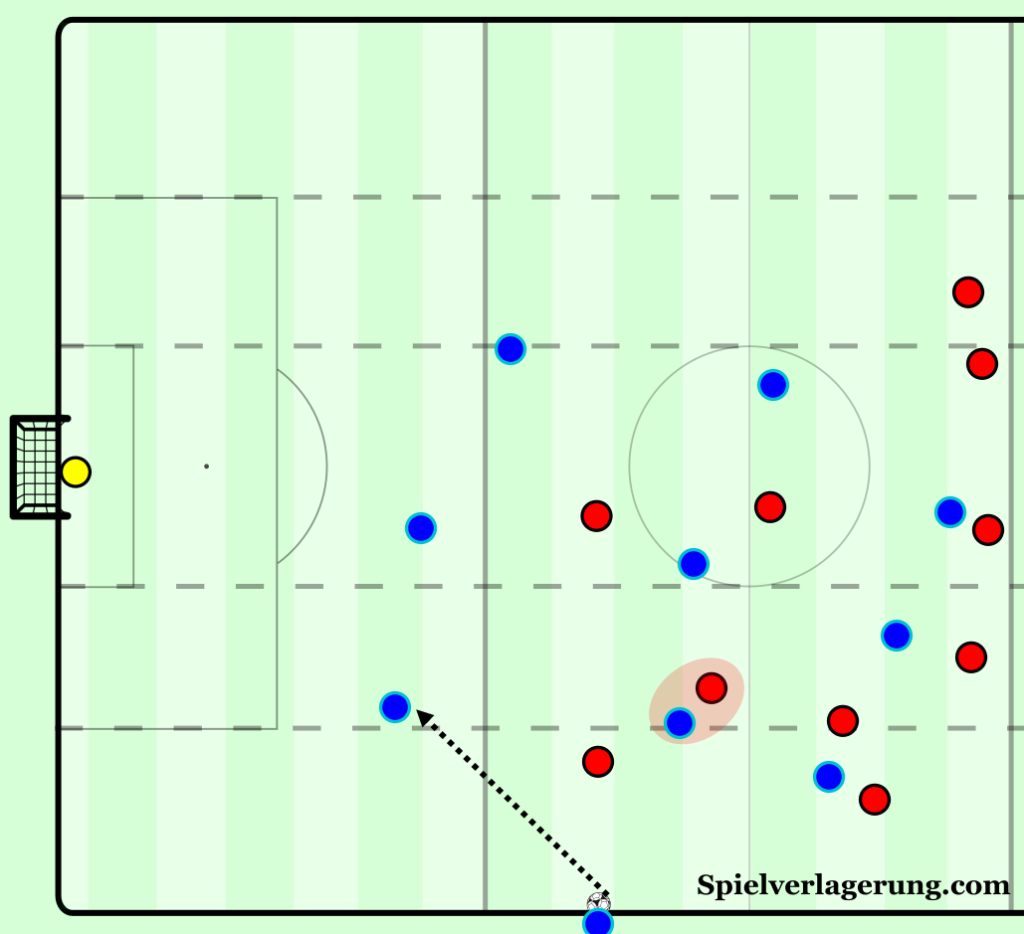
The ball is forced backwards and the striker presses to cut the lane back to the thrower. Wigan suddenly drop into a double pivot, but due to the angle of the press again, the pivot is able to balance between both pivots without leaving one free. This means play is again forced wide, and due to Barnsley forcing this number of passes, they are able to recover into their normal pressing shape, where they go on to force the ball backwards and long.
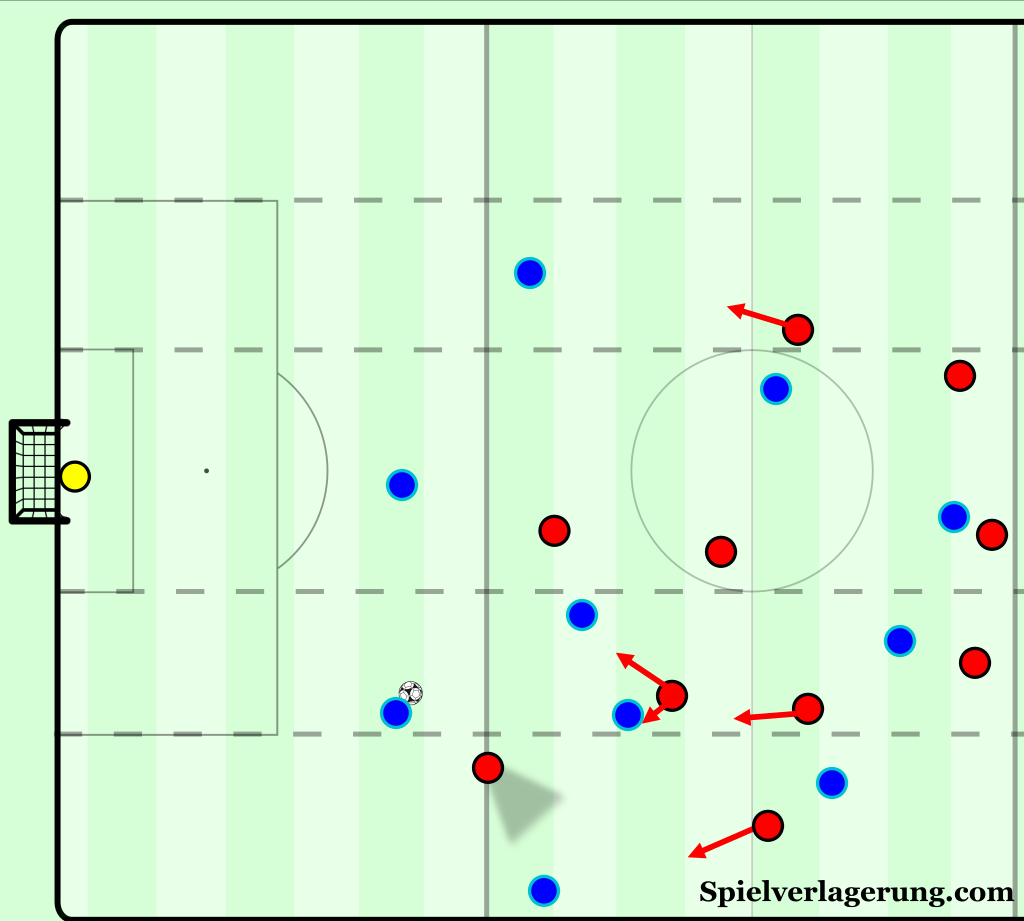
If the opposition do decide to go forward, the strikers will often be used as a spare player, who is used to press the thrower if the ball is played back to them. We see here if the opposition go forward Barnsley can collapse around the ball and achieve numerical equality, with the striker coming across onto the thrower. If the ball goes backwards behind the striker while he presses outwards, he can just turn around and continue his usual role of cutting access to the wing using his cover shadow.
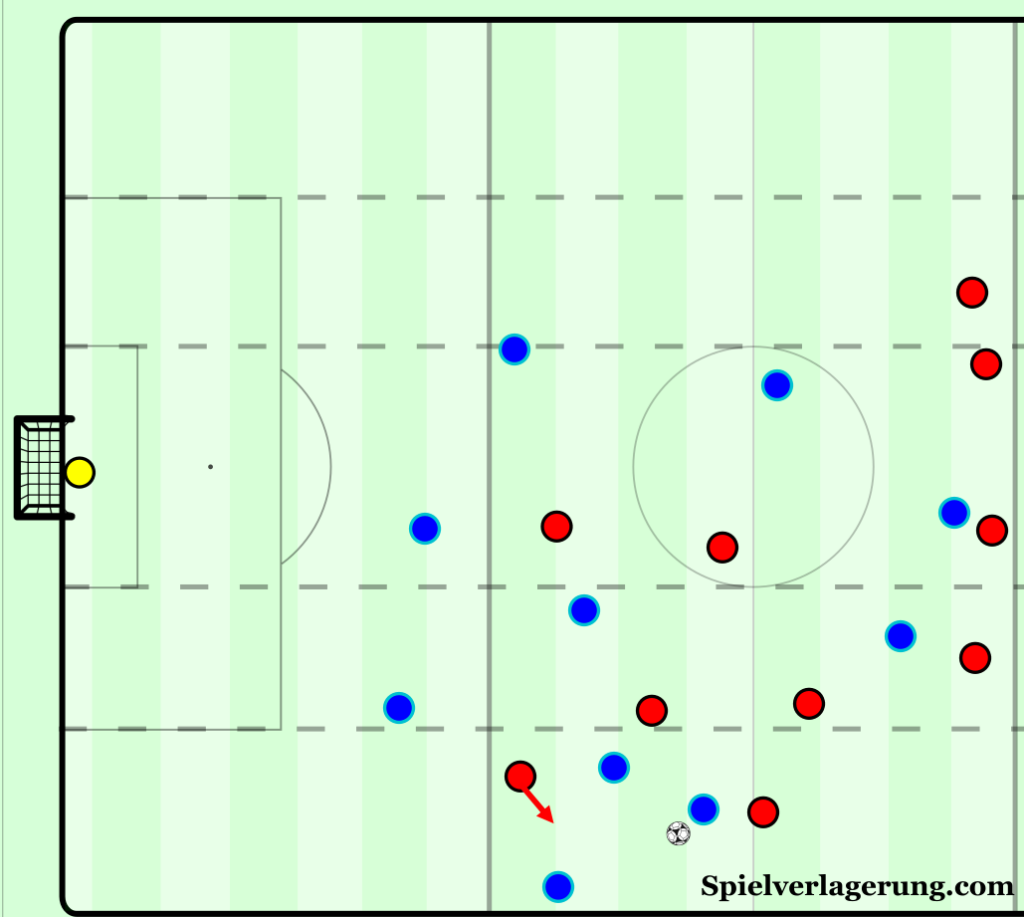
This then begs the question of you can play around their structure from throws, and Millwall were particularly stubborn in that they often refused to fall into the desired response of throwing backwards and thinking afterwards. Instead, as we can see below Millwall occupied this near striker at first, while committing players into higher positions to pin Barnsley players backwards.
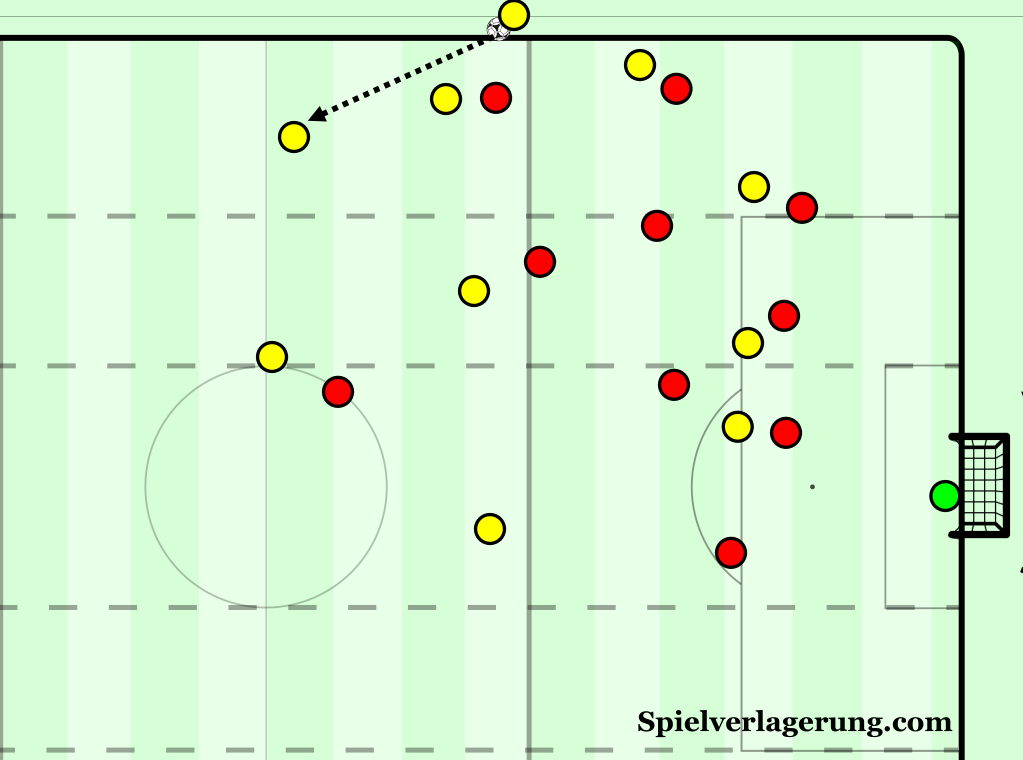
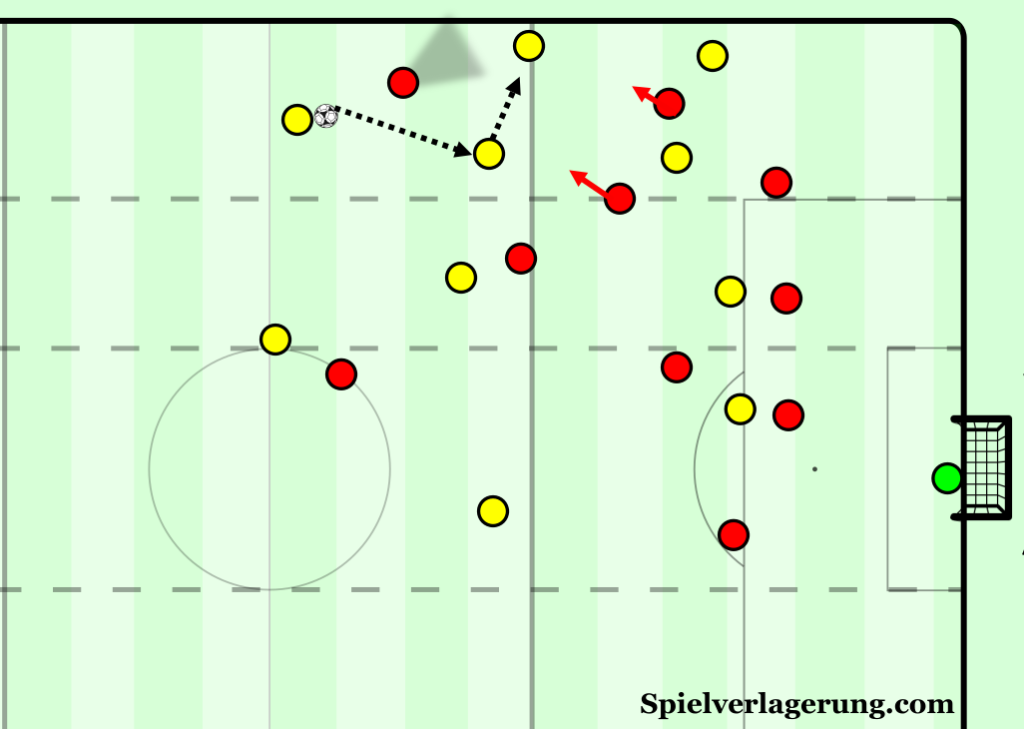
Millwall’s player, who was previously occupied by the Barnsley near striker, moves into the inside lane while the striker presses the outside lane, and so he is able to receive and play to the thrower. Due to the original pinning on the Barnsley full-back, the thrower has time to receive, and Millwall are then able to have numerical superiority over Barnsley in this area.
Examples of pressing traps
I mentioned earlier the possibilities around pressing diagonally against a back three, and Barnsley used the same trap twice to good effect against Middlesbrough. We can see in a fairly disorganised phase after the ball is cleared, Middlesbrough are forced into playing the ball backwards. The central Barnsley players look around to find an option to mark.
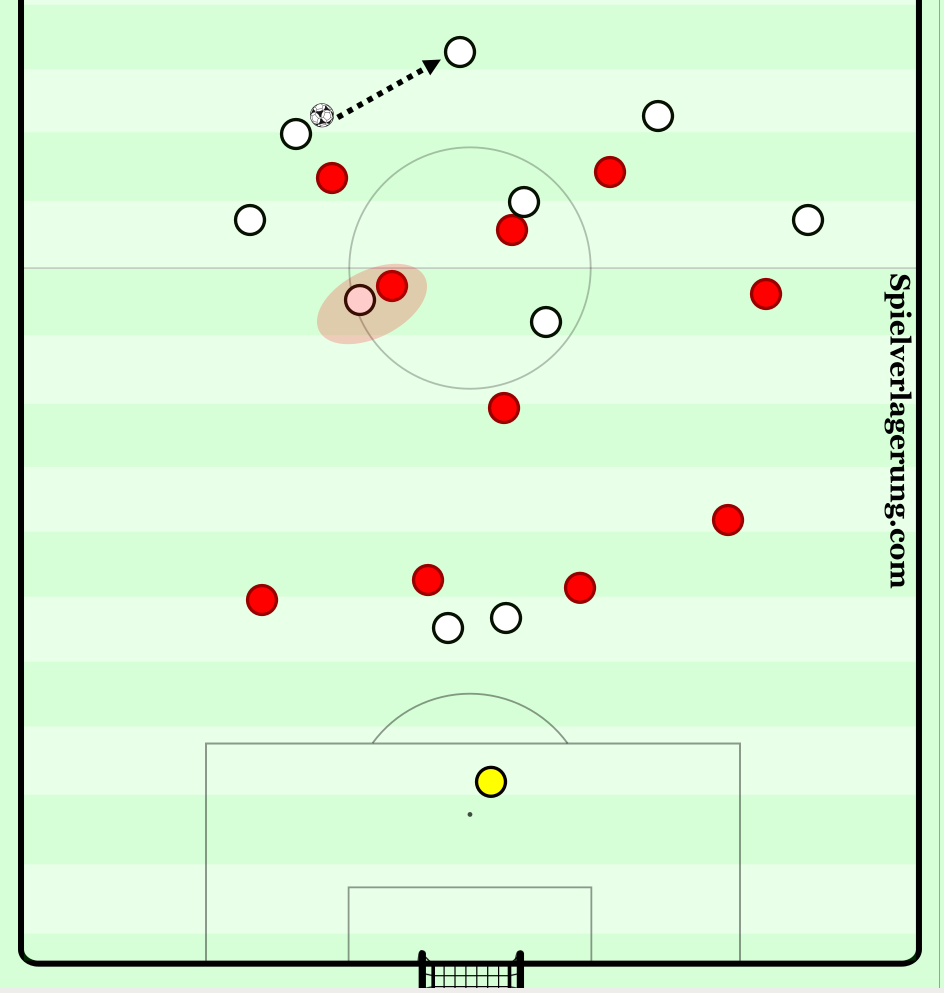
This backwards pass acts as a trigger for the strikers to press, and because both are initially looking to press the wide centre backs, they are both able to press in at an angle and cut the lanes to the wide centre backs. The central options are able to be quickly occupied, and therefore the wings and centre are cut off, which is never good for a centre back.
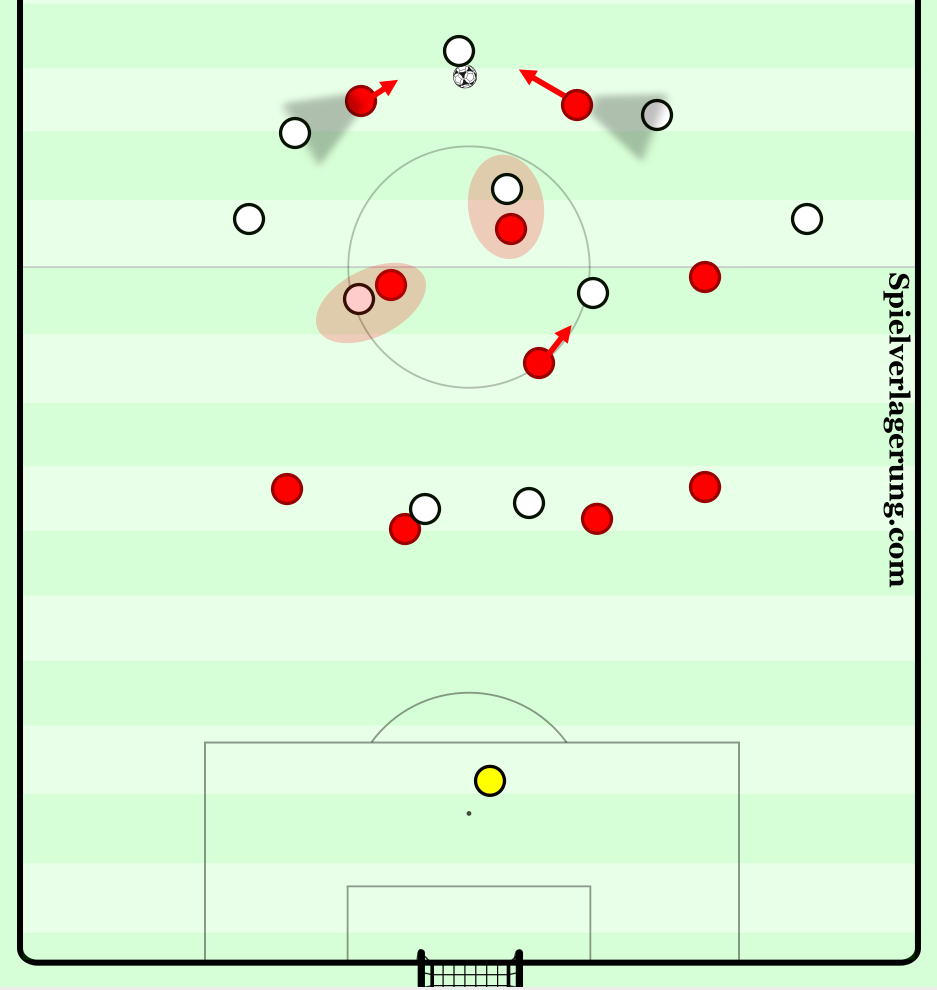
As a result, the defender simply clears the ball and Barnsley get possession back.
They created near enough this exact scene again from a throw in the same game, with this time the centre back dribbling out and being ‘fouled’.
Another pressing trap which we saw against Middlesbrough was against a double pivot, with this trap mostly relying on the timing of the pressing movement. We can see in a change to the usual principles, Barnsley here show the opposition into the centre, with the pressing ten occupying the pivot high and the striker pressing to cut the lane to the full-back. The central midfielder approaches the dropped central midfielder more from the left side, and so they push them over to the right of the pitch, and the movements of both the pressing central midfielder and the wing-back are coordinated, with both players arriving at almost the same time.
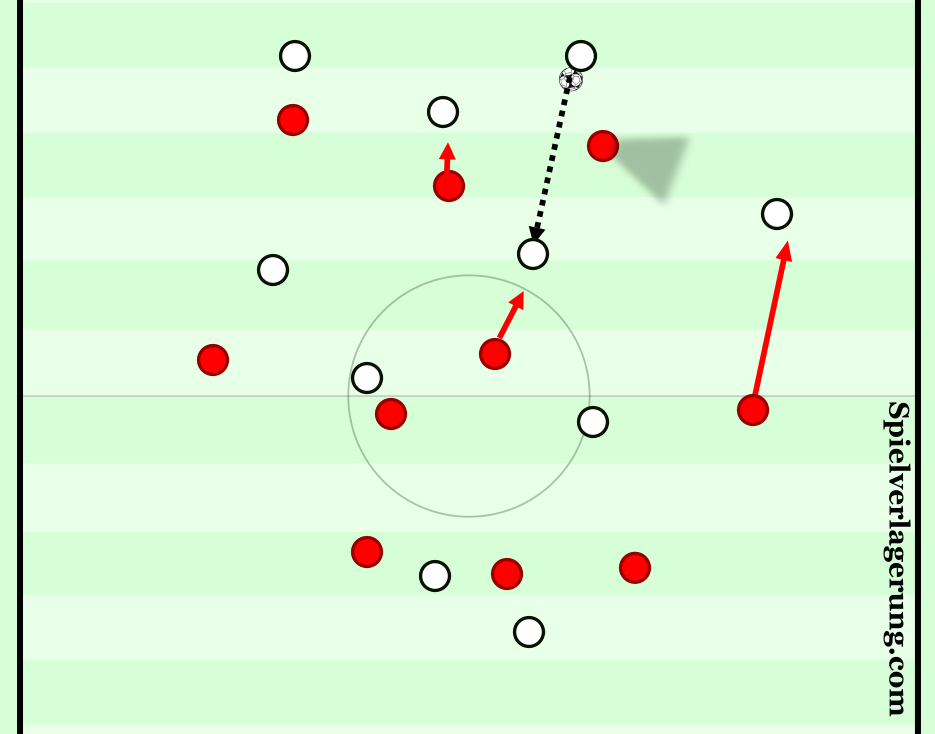
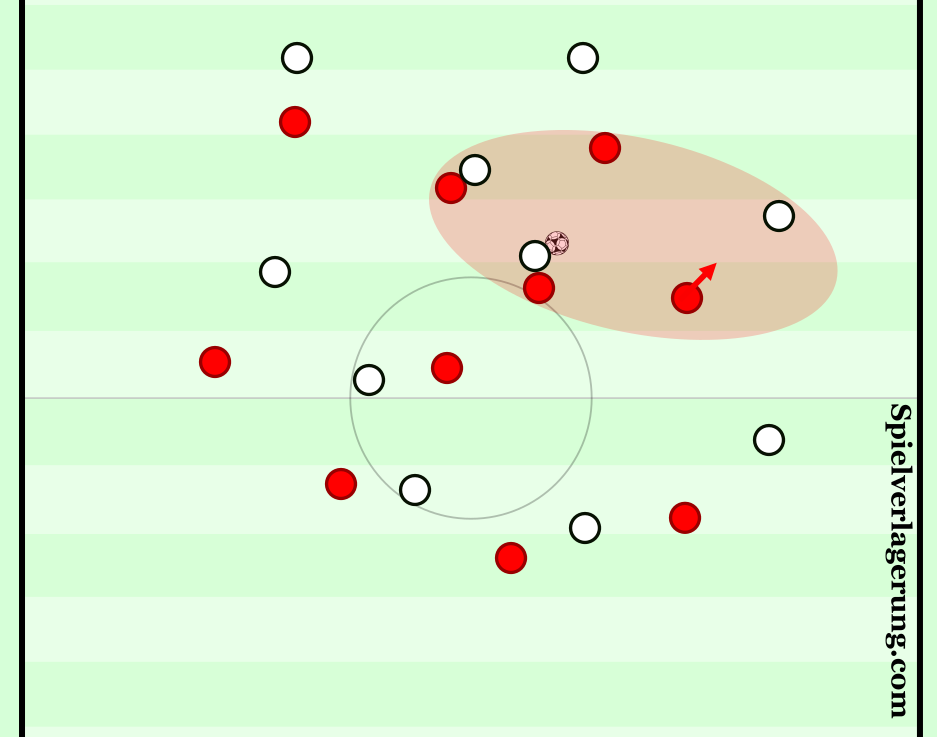
As a result, Barnsley can move into this structure, with extremely tight pressure on the ball carrier and local compactness around passing options. The opposition here shouldn’t have much of an opportunity to escape, but it is a poor press individually by the central midfielder and the opposition escape and take advantage of the space in behind that midfielder with a long ball.
Weaknesses
One of the main problems for many presses is how opponents manipulate their central midfielders, and this press is no different. Teams will often use depth, and use varying build-up methods such as a 3+1 or a double pivot in order to try to draw presses in high areas, so that the space in behind pressing central midfielders can be exploited, just like the example seen above.
After the trap fails, the opposition are able to go wide and eventually long, and are able to win the second ball due to the poor staggering of the midfield. The far central midfielder does not do a good enough job of covering the back line and picking up the second ball, while the higher midfielders get beaten to the ball by the players ahead of them.
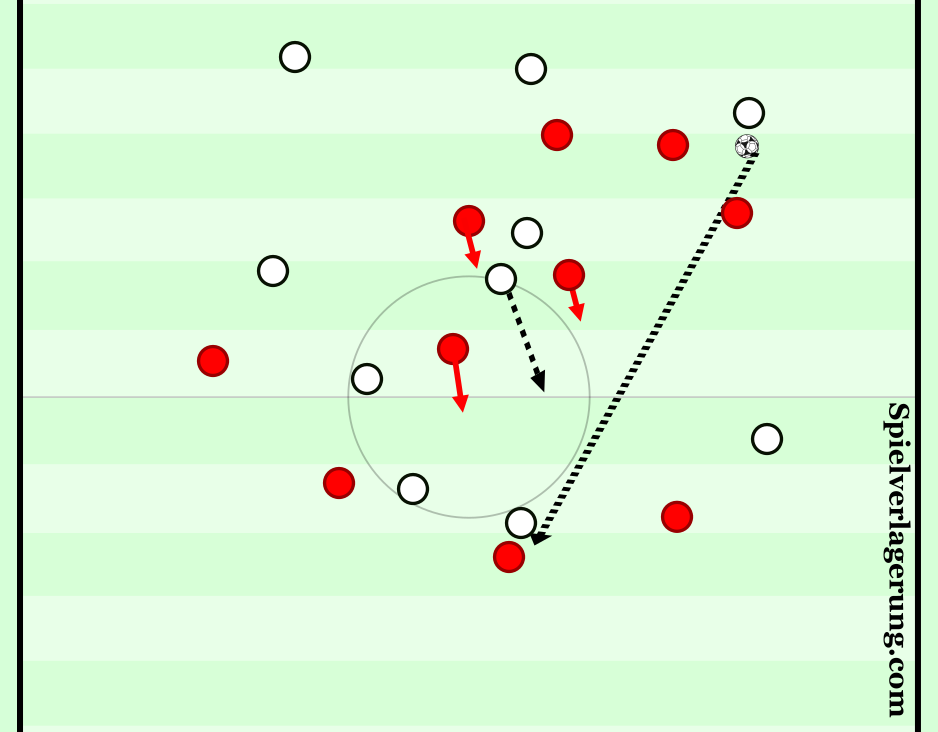
In their goal conceded against Leeds United, the central midfielder of the diamond presses forward for not much reason, and Leeds simply go long and exploit the space behind the midfielder by winning the second ball. The midfielder doesn’t cover any player and has no benefit of being higher, and the player in the space behind him ultimately plays the penetrating pass through the defence.
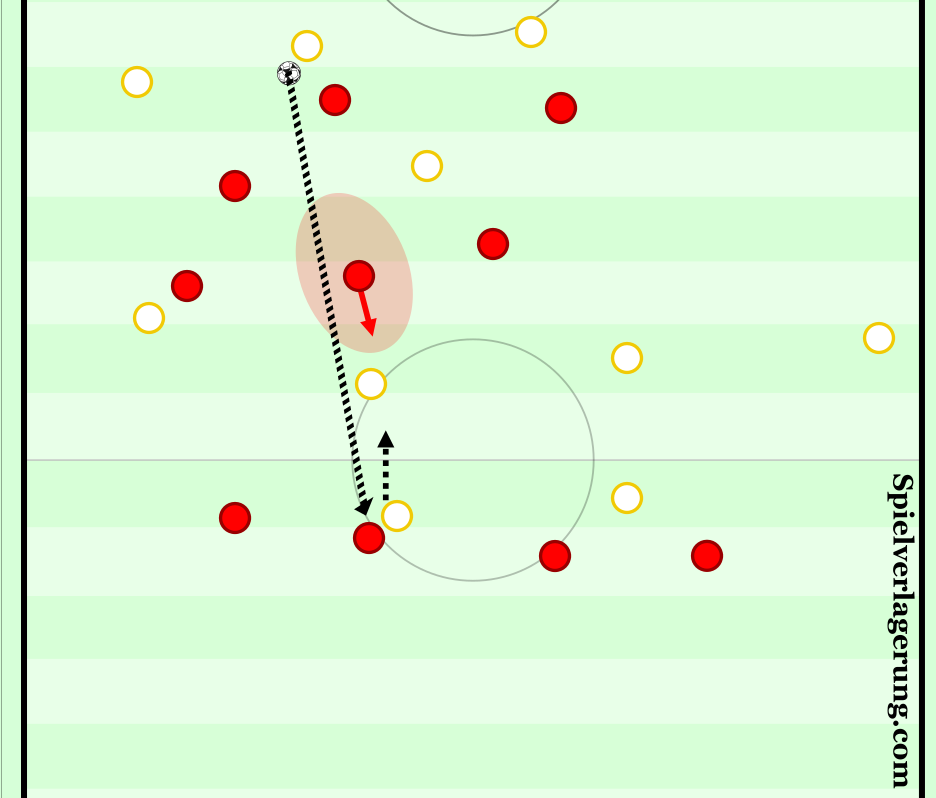
The same issue can arise at times in ground passes also, as if teams drop midfielders deeper to attract pressure, passes beyond the midfielders can also be found. We can see in this example how teams may often look to create vertical overloads on a specific midfielder, with one player dropping deep and another playing higher, creating that decisional crises of staying deep or following higher. Barnsley are well aware of this, and it isn’t really a weakness so to speak, but the ability of the side to make these decisions in pressing situations is a skill within itself.
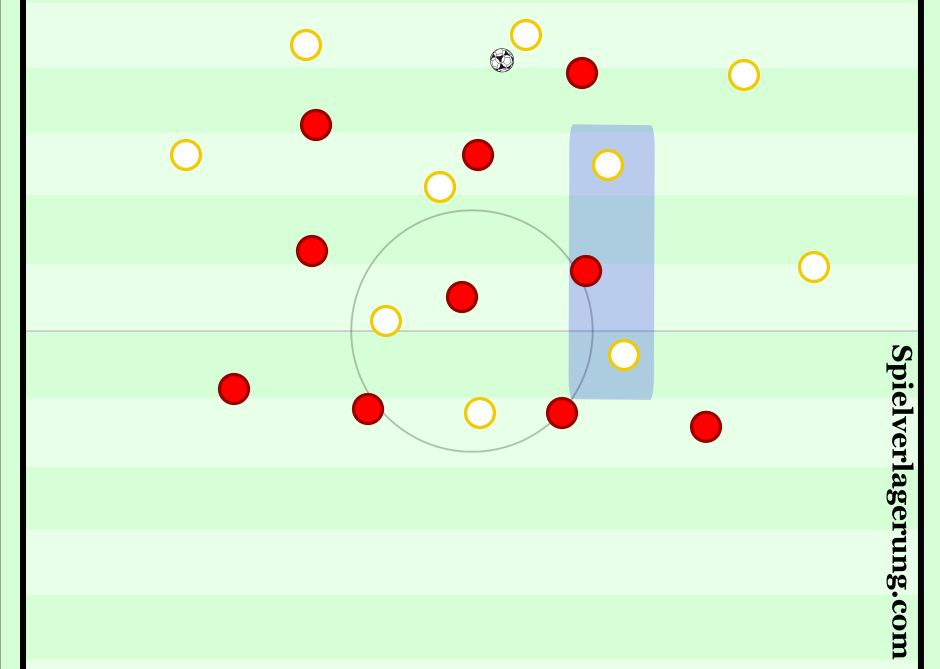
A few other small issues such as the wing-backs pressing too quickly have also been seen in games, as sometimes due to the pressing distance for the wing-back, the sprint can be made too intensely, and the pace of this run can be used against him. This doesn’t happen often though and back pressing from the strikers can help prevent this.
Conclusion
Struber’s side play the type of football you would expect from a coach who spent time around the Red Bull system, and describing their pressing as heavy metal is actually very accurate, in that it is intense and fast paced, but like many heavy metal songs, it lures you in first. To give a niche reference, ‘Fight Fire With Fire’ and ‘Damage, Inc.’ by Metallica go well with most Barnsley footage, so if anyone wants to make that compilation, please do.
Simply put, Barnsley’s defensive statistics don’t lie, and their expected points total ranks them as 14th in the Championship, seven places better than they eventually finished. Struber and his coaching staff at Barnsley clearly did an exceptional job in keeping them in the division, albeit with some external help, and it is clear to see that their defensive system played a large role in their survival. Their courage and somewhat arrogance in almost challenging teams to play out against them is something which appeals to me greatly, and I look forward to how their style of play develops in Struber’s first full season at Barnsley, with new transfers and lots of time on the training ground only likely to improve the side.
Writing by Cameron Meighan; Editing by Constantin Eckner.
2 Kommentare Alle anzeigen
Thomas Booth September 1, 2020 um 3:39 pm
This is a really great analysis. Thank you for using video clips, it really helps to visualise everything you are explaining. I was fascinated by Barnsley last season, i always thought they played better than their league position suggested and I can’t wait to see what they do next season
Vyom September 1, 2020 um 8:12 am
How can one get the video footage of such matches?