Using defensive throw ins as offensive opportunities
Throw in situations in matches are often just taken for granted and involve little meaningful thought or decision making around them, other than to mark the opposition and prevent ball progression. But these situations can dictate not only who controls possession, but also how and where this possession takes place.
In my previous analysis, I discussed the use of pressing traps in order to win the ball back in favourable areas, and pressing from throw-ins is no different. Every throw in situation is an opportunity to press in a favourable area of the pitch, and to shape the next phase of the opposition build-up. In open play pressing, the aim is not simply to stop the opposition progressing, but to also lure the opposition into trying to play through. We then aim to win the ball back in favourable areas that allow for the best offensive opportunities, and so why does this mindset change for throws?
Within this article I will discuss various strategies that can be used surrounding defensive throw ins, with the majority focusing on using a defensive throw in as an offensive opportunity.
Man orientated marking
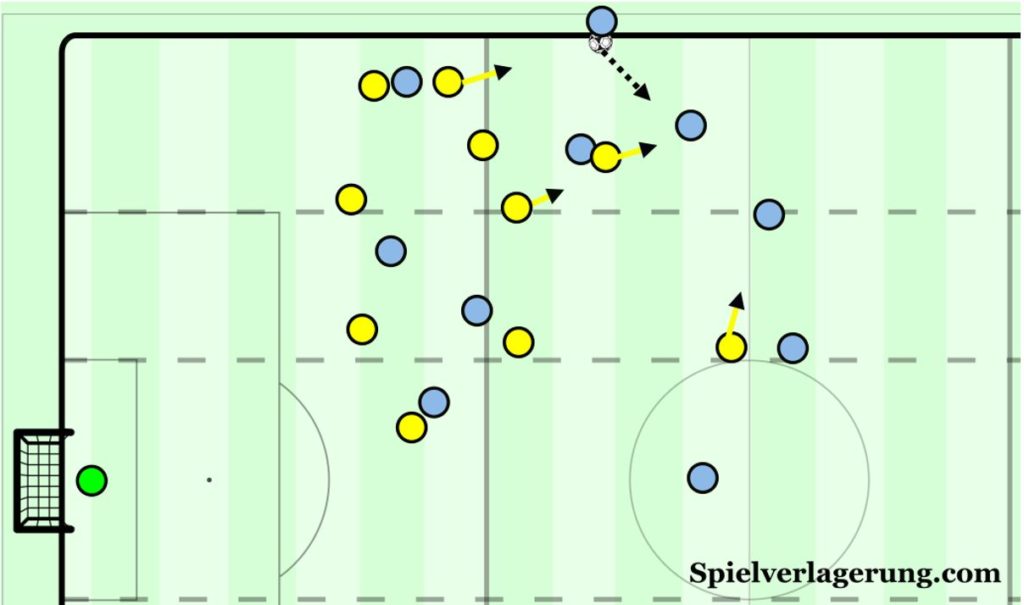
The simplest and most common way teams defend throw ins in football is through man marking Each player usually marks the player closest to him and follows this player strictly. Little rotation in roles occurs, and so the structure of the defending side is completely determined by the offensive movements of the opposition. We can see an example of this simple structure below, in which the defending team create numerical equality with the opposition on the field. Players stay strictly to their player, and so if two opponents rotate into each other’s space, the same player follows their man. As a result, like most man marking systems in football, simple decoy movements, rotations and patterns allow for this system to be manipulated and overcome.
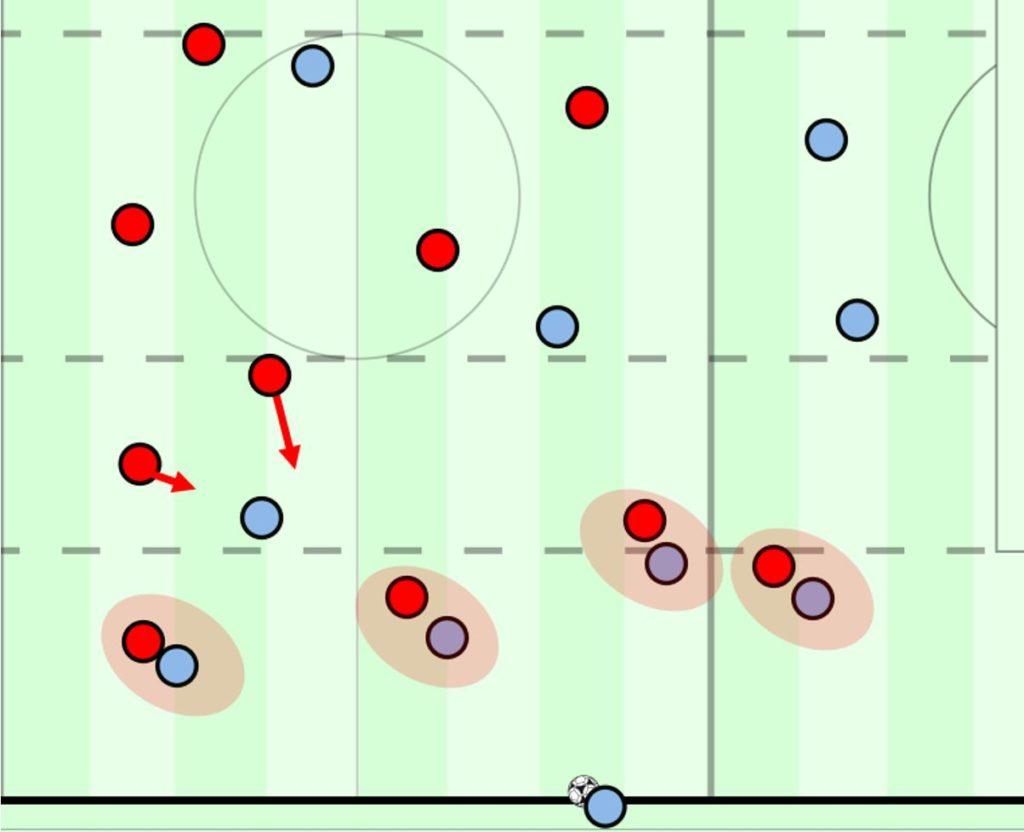
Furthermore, numerical equality is only created up until the moment the ball is thrown, when it then becomes a 5v4 in this scenario, with the thrower of course now becoming an extra player. As a result, with a simple pass the opposition can access the free player and look to progress the ball through multiple gaps. The defending team then has to shuffle to close these passing lanes and make the area more compact, while the nearest defender has to react and prepare to press the thrower, while his marker runs behind him.
Furthermore, numerical equality is only created up until the moment the ball is thrown, when it then becomes a 5v4 in this scenario, with the thrower of course now becoming an extra player. As a result, with a simple pass the opposition can access the free player and look to progress the ball through multiple gaps. The defending team then has to shuffle to close these passing lanes and make the area more compact, while the nearest defender has to react and prepare to press the thrower, while his marker runs behind him.
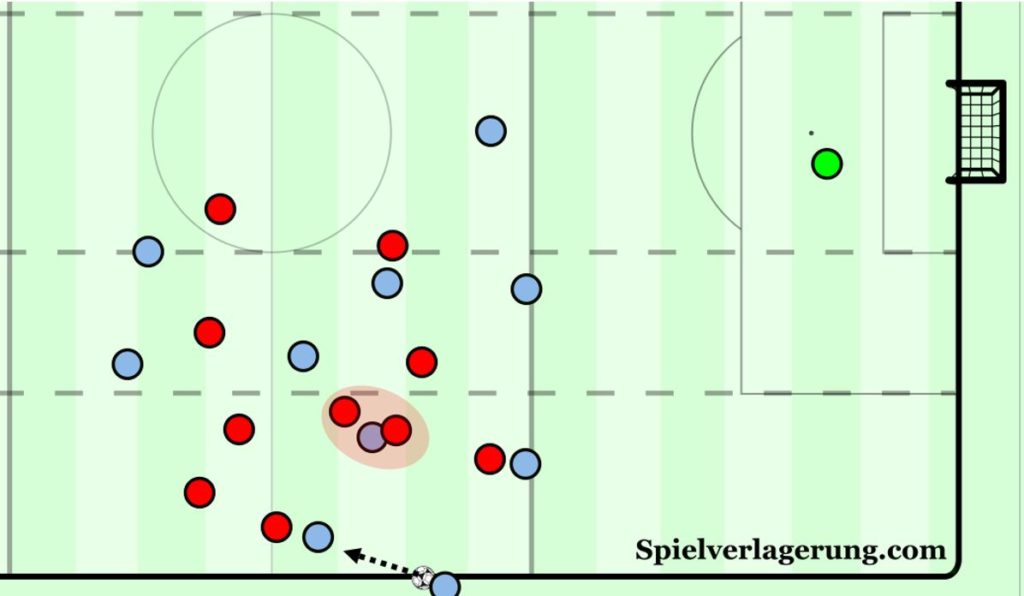
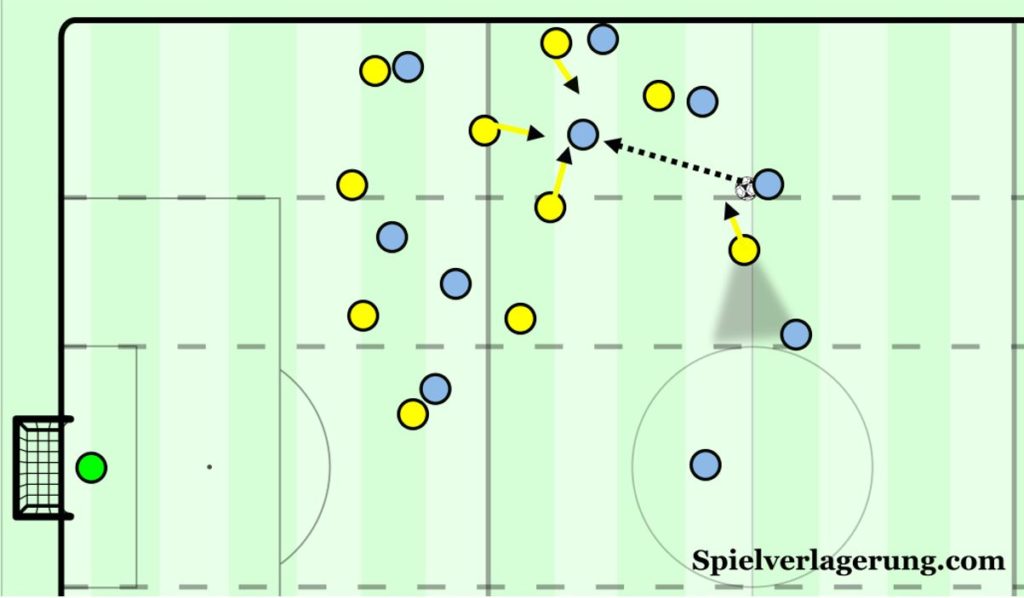
The attacking team do not throw to the closest available player, and instead space around the thrower well, in order to create more space when they receive the ball next. If the receiver moves in close, they decrease the pressing distance of the opposition player to jump from their marker.
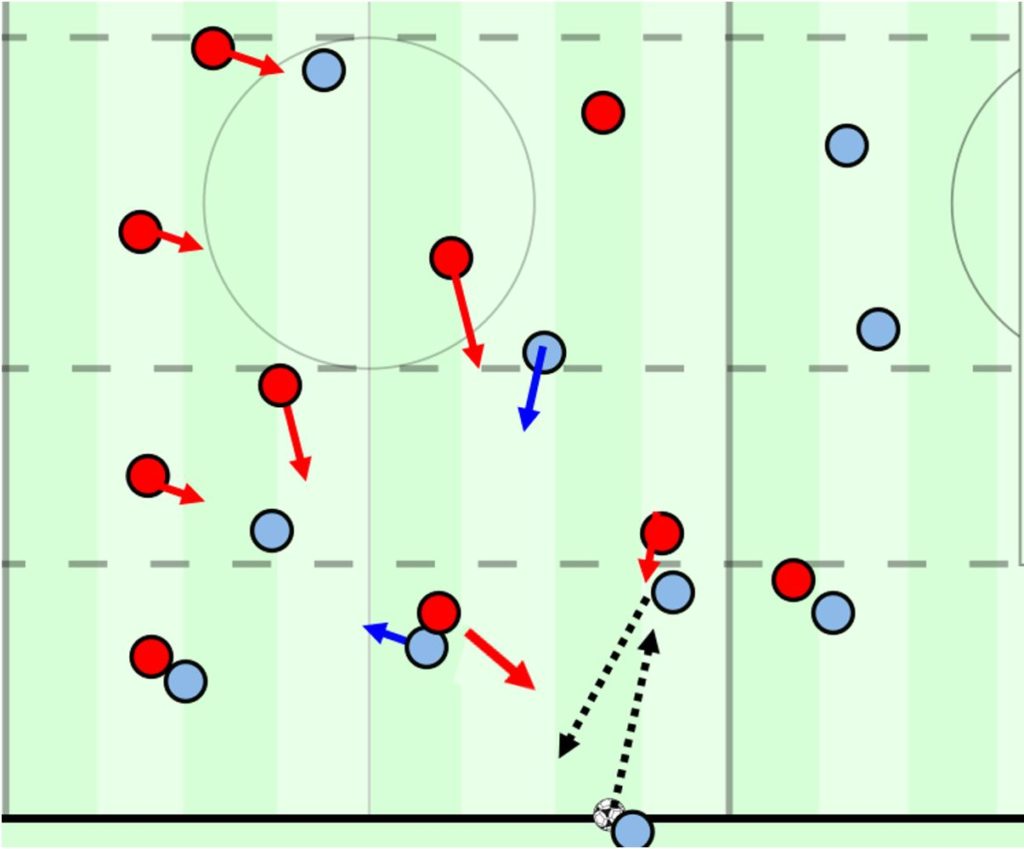
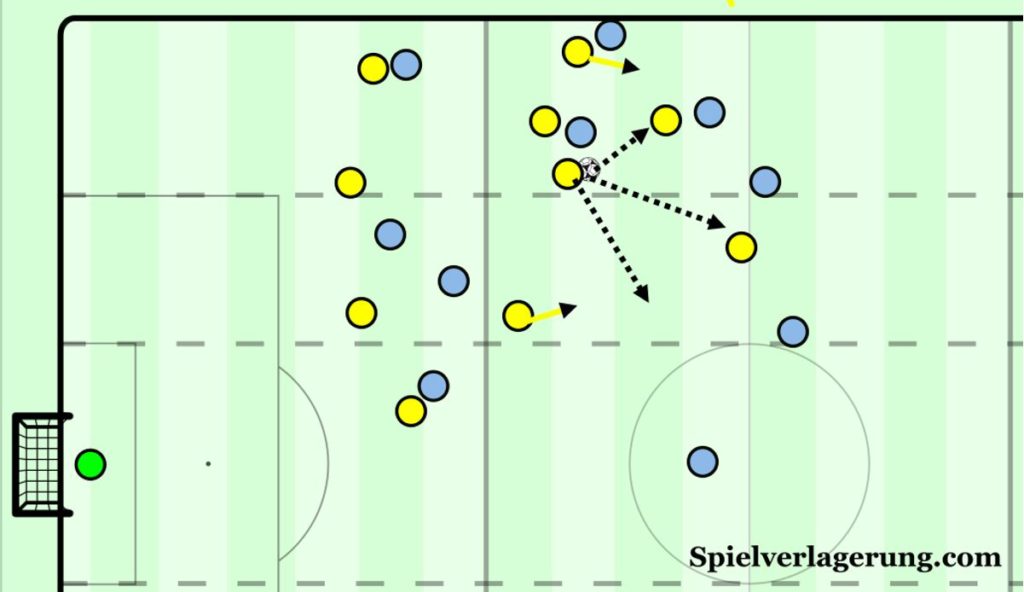
The nearest player to the ball moves in to press, but the distance between the receiver and this player gives time to control the ball and play a pass. A 2v1 is now created between the nearest players ex marker, and the thrower, and passing lanes wide and inside are available depending on the reaction and structure of the defence.
This numerical disadvantage plus the relative ease to overcome it using intelligent offensive movement are the major downfall of a strictly man orientated system. As a result, there are several other varying ways to defend a throw in situation.
Zonal marking
Zonal marking from throws relies on each player covering their own zone and occupying any player who enters this zone. Many throw ins rely on space oriented zonal marking initially, in that the team pushes to one compact area to reduce space, which is much more effective if done correctly compared to open play, where it is easier to switch the ball quickly. This means that again regarding rotations and movement, the side becomes less disorganised and is less easily manipulated, with each covering clear zone and passing lanes.
We can see below when two players rotate the zonal markers do not move with them, and so are able to track the runners more easily and don’t leave spaces. You may often see markers stand front side to make the zone more compact and leave a player in their cover shadow. If the thrower is capable of a longer throw, this zonal structure can sometimes be bypassed, and so cover is needed around the ball near markers.
Again, though in this scenario, the thrower is a free player who can be accessed easily, with the nearest zonal player again jumping to press this player, now making this zonal system ball orientated, with players adjusting their shape to impact the ball.
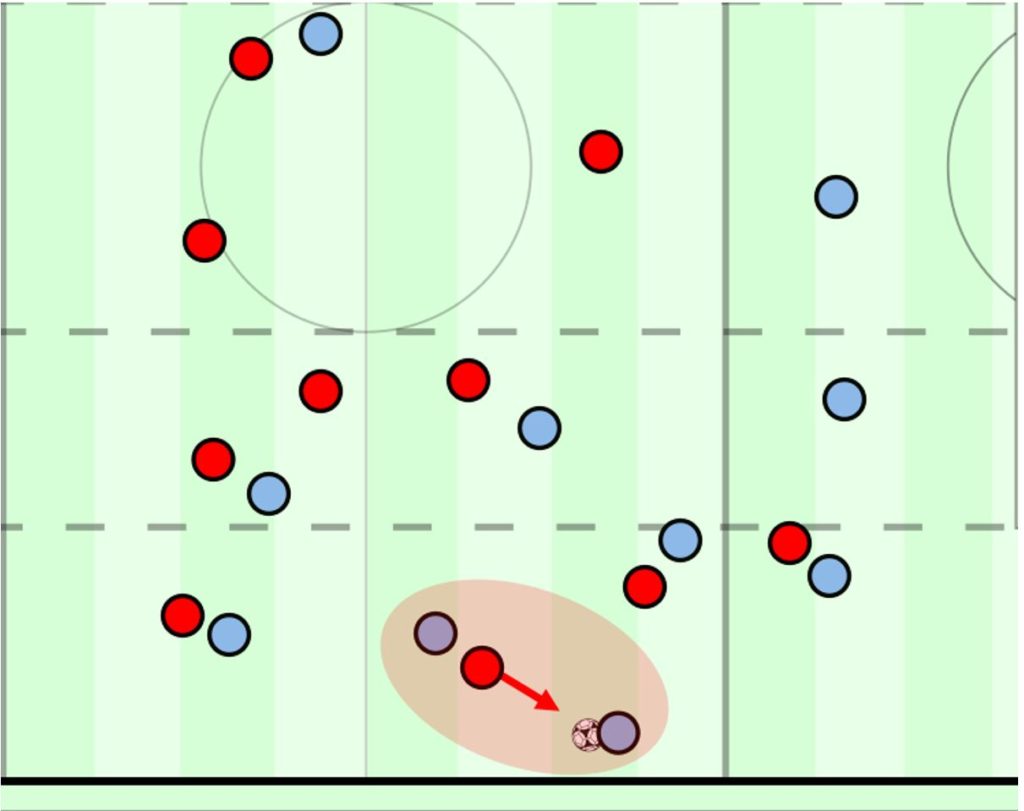
Many teams will employ a mix of both of these strategies depending on the area of the pitch, which is something I will discuss later. We can see an example of a mixed set up in the defensive third here, where some players man mark opponents while others cover a specific zone.
Here the right full-back covers the ball near zone which is initially unoccupied. They anticipate a movement from behind, but do not compromise their ball near position to mark the player, instead they wait for them to enter the zone and then stay close, an example of man oriented zonal marking. If the opponent can make intelligent blind side runs or overloads can be created, this can cause problems, and again commonly in this area, you will see a quick 1-2 between thrower and the nearest receiver, where a cross can be played in immediately. It is also worth noting not every team recovers into as compact a shape as this, as we can see in this example from lower league English football.
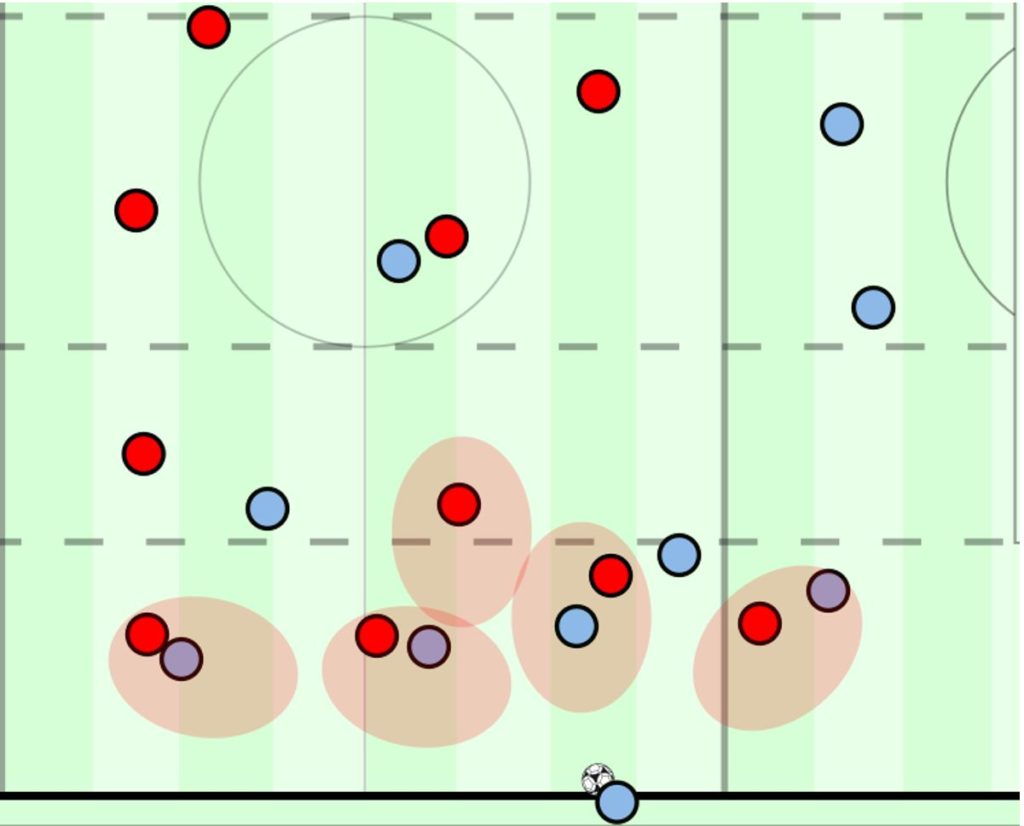
Spare player concept
With many throws resulting in the thrower receiving the ball again, teams have to structure themselves to be able to press or mark this player. The most common way teams do this, is through using a ‘spare player’. This concept has multiple variations which I will discuss, with the first one being an explicit spare player. Here, from the initial throw, the spare player has no player to mark, and simply stands closely in front of the thrower. The rest of the side marks the players around the ball and therefore commit players across, but this spare player remains focused solely on the thrower. Marking on one player may not be as intense, which therefore allows them to initially receive the ball, when the pressure is then increased.
We can see now that when the ball is thrown, the thrower is already covered and the lane to them can be cut off, while the ball carrier can be pressed by his initial marker and even potentially the spare player. As a result, it is unlikely the opposition can progress the ball or even retain possession. If the spare player keeps an optimal distance, they should allow the thrower to receive and still be able to press effectively. This video from Ajax shows them using the spare player concept, as they force the ball backwards.
As mentioned, this is a more explicit variation, with the opposition sometimes able to see what the structure is and how to react. With the thrower covered, the usual reaction is to play a first-time long pass away from the traffic, which if you have the players to deal with such passes should be deemed a success. Likewise, teams will often look to use longer throws to escape this area, with Borussia Mönchengladbach and Wolfsburg most notably using this method against RB Leipzig. It is therefore important surrounding players let players receive the ball before then pressing.
In this sense the concept is the same as pressing, if we commit to an area of the pitch and mark our opponent strictly and prevent them from receiving the ball, they will play direct. While this is usually a useful defensive tool, it ruins the opportunity to create any opportunities high up the pitch or in better areas through pressing. Therefore, if a more disguised structure is used within the same concept, the opposition can be tempted to play out, and if this structure has the ability to adapt, we can win the ball in good areas, AKA a pressing trap. Below we can see some reactions teams have had to a spare player.
Disguised spare player
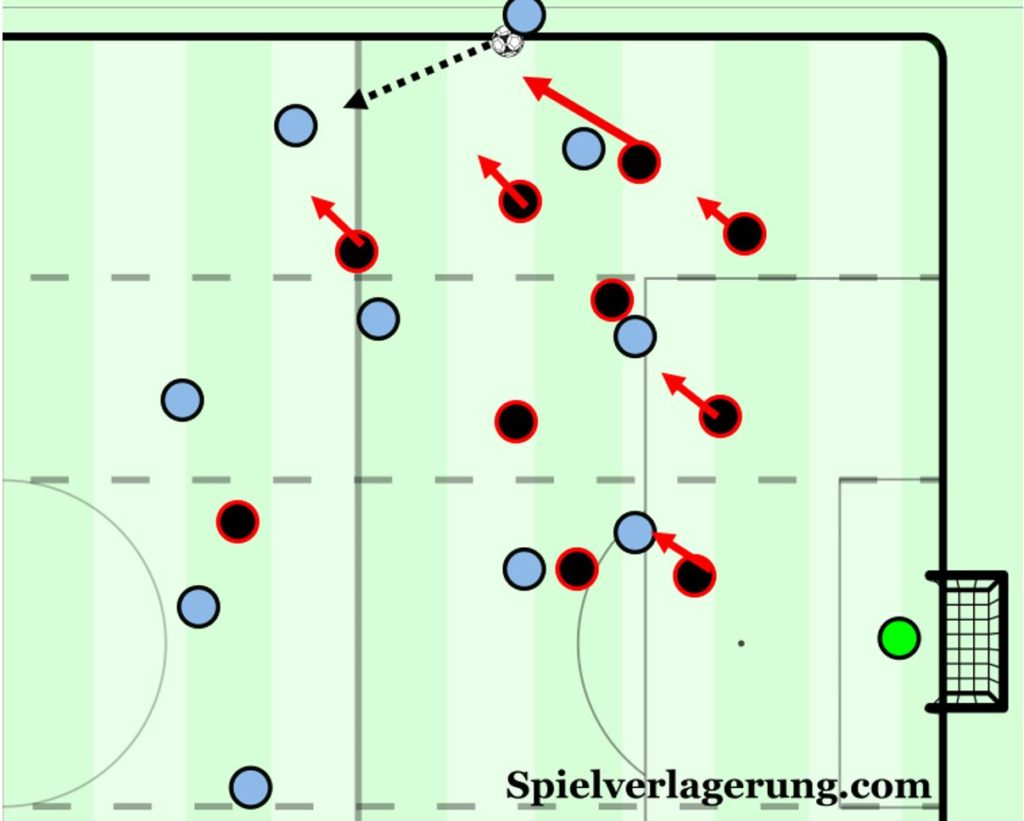
Again, there are multiple variations to how you can ‘disguise’ your spare player, which I will cover. The first and best example comes from Liverpool (shock) who here use the strategy of two players mark the same player. The player in front, who in this example is Wijnaldum, stays with this player and even makes contact with him to make it look like he is marking. Naby Keïta stays behind the marker ready. From this point before the throw is taken, Genk are in a shape that looks safe for them to play short into. The player down the line is allowed to receive and the thrower’s space is unoccupied. A player on the shortest option (centre back), guides Genk to play down the line.
As soon as the ball leaves the thrower’s hands, Wijnaldum jumps to now occupy the space near the by line and prevent the ball being played back. Keïta then easily takes over as the marker of that player. Joe Gomez obviously applies more pressure once the ball is thrown, and Wijnaldum jumps across and is able to win the ball from the player.
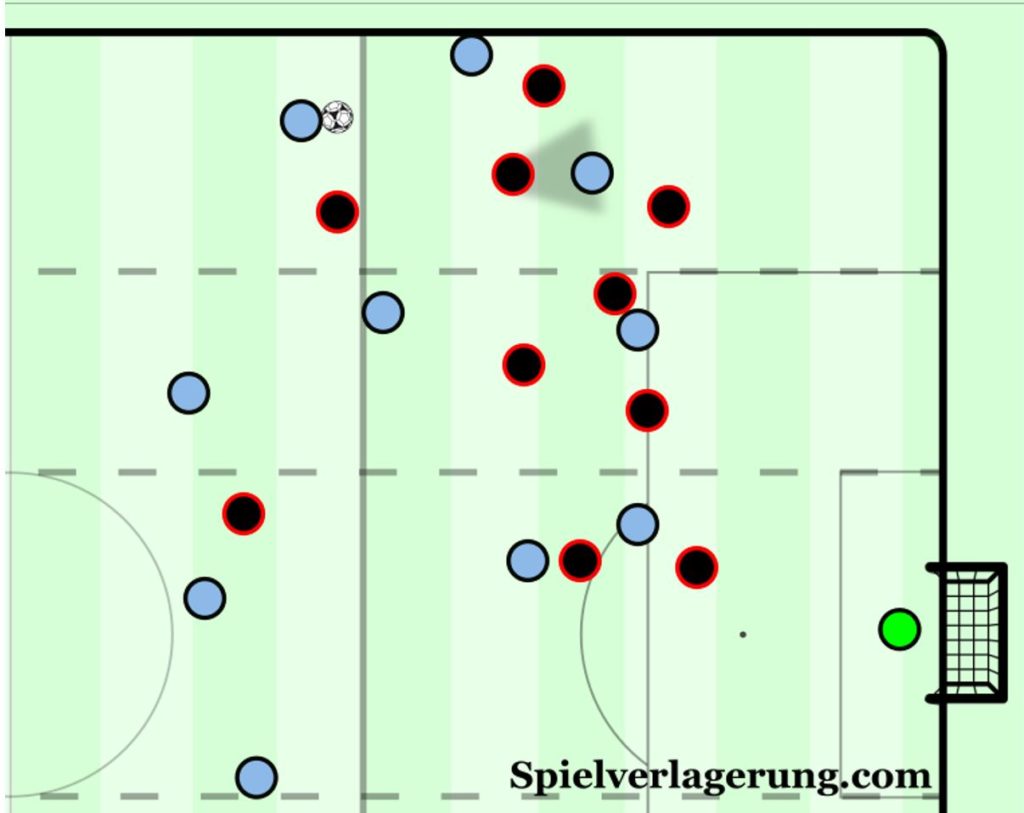
Liverpool have successfully lured Genk into trying to play short. But not only must they consider how they win the ball, but what happens once they have it, something which AO mentions extensively in his previous article. Notice Liverpool’s shape now once the ball is won. Mohamed Salah maintains the depth against the centre back, while Firmino initially occupies the centre giving various passing options, while Sadio Mané is also in a high position. Within nine seconds, the ball is in the net.
Methods of structuring traps and spare players
Forward jumping traps
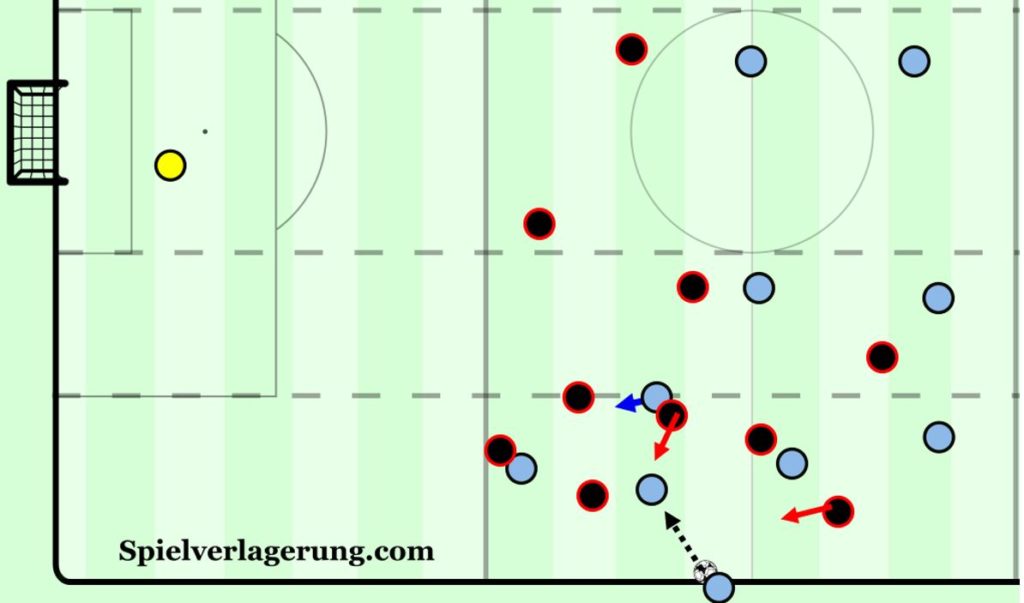
One method of structuring traps is through forward movements to recover a favourable structure. This example from FC Midtjylland shows how this can be done from throws, where here they structure themselves initially to leave the thrower and far player open. They then shift forward back into shape to cover the thrower and maintain a good defensive shape. The team uses its depth in order to adjust its shape and is well staggered in order to cover the positions it needs to. Before the throw, the player occupying the right full-back area marks a player, while a centre back remains behind him. A player who is initially a defensive midfielder is ahead of the current back three. The striker leaves the lane open back to defender and doesn’t get close, and so the ball is thrown to this player.
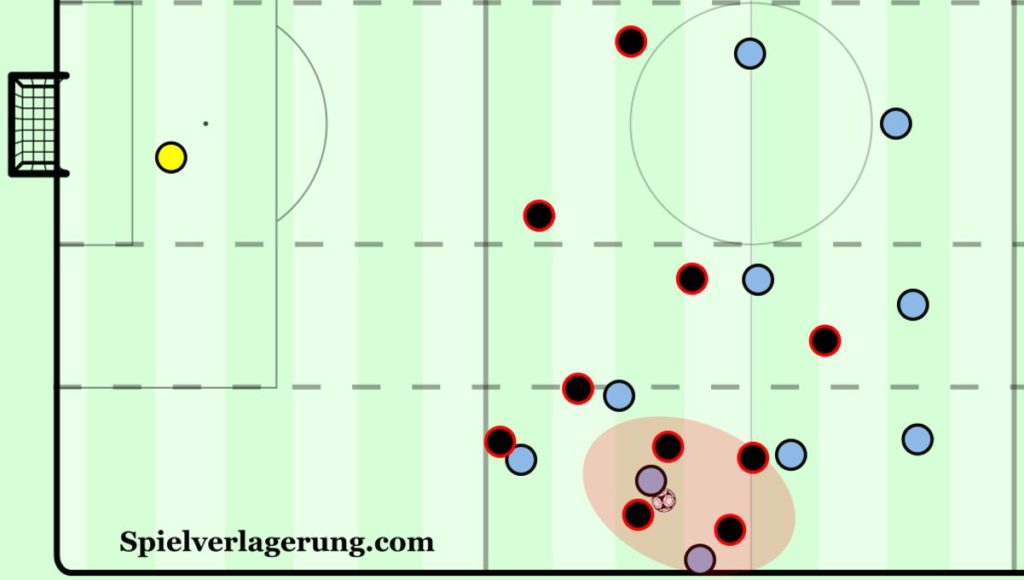
Once this throw occurs the players can jump forward and edit the structure, which now cuts off the thrower and presses the ball carrier. The previous right full-back jumps into midfield, while he is then replaced from behind. The defensive midfielder stays in order to then create a back four. Around the ball, the striker jumps to press the ball carrier, while the thrower is covered and the central option is in the cover shadow of a midfielder. If you then press correctly here, the opposition have no options and can be dispossessed. The offensive team has space in front to play into and have players in good body orientation to move and create angles quickly. This can of course change depending on the structure of the team.
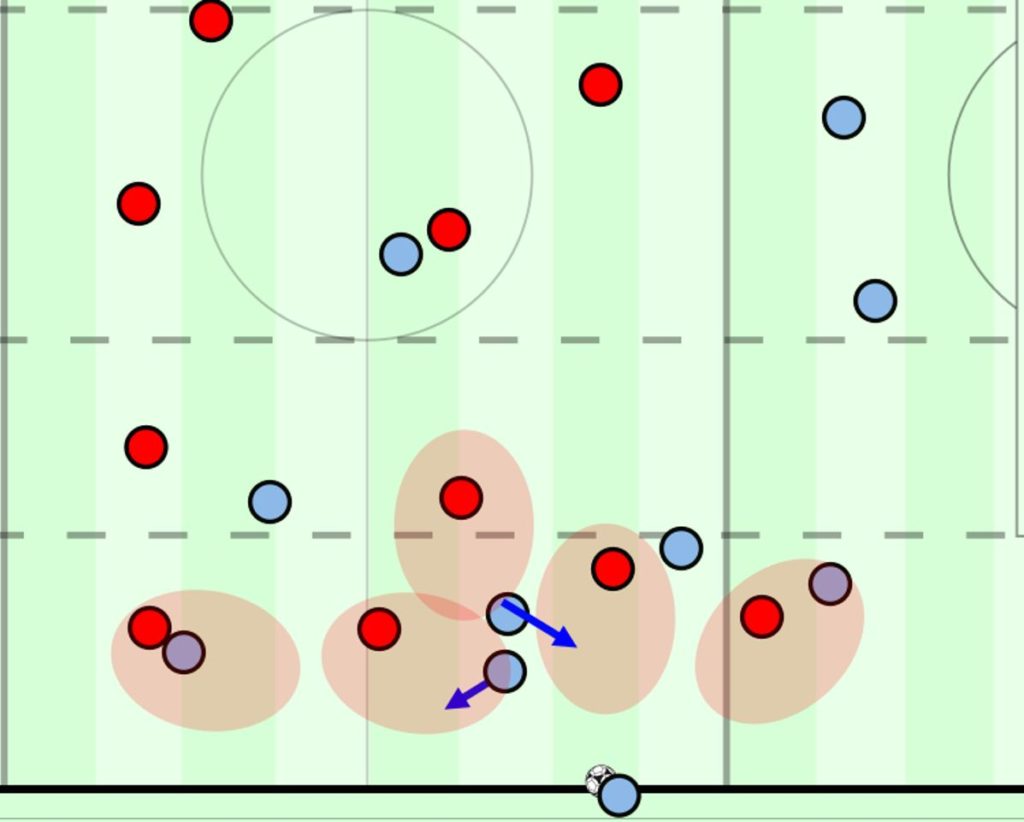
We can see another example of this concept being used here, with spare players involved again. This example is from Dortmund’s Bundesliga winning season of 2010-11 in a game against VfB Stuttgart. Here, the backwards pass is left open while all other options are crowded out. Dortmund have two nearby players who initially don’t mark from the throw, and instead become active once the ball is thrown.
When the ball is thrown, a player can jump to press the receiver, and the player he was marking can now be picked up by the spare player behind or to the side. The thrower is pressed by the wide spare player, who has time to press the player due to the longer backwards pass being forced. The distance also helps to disguise the spare player again, but it still has to be an achievable pressing distance. As a result of this, the opposition are forced back, where the striker has also come across and can press the centre back.
The striker presses the centre back from the centre outwards, and so cuts the angle for a central pass again. The diagonal pass into the centre is a difficult one and well covered, and the ball carrier is being pressed quickly, and is therefore forced to play a simple pass forward. Dortmund however have another trap within this area and can easily press to win the ball back.
When they do win the ball back, they are in an excellent shape to attack with height provided and forward runners from multiple angles. Stuttgart manage to foul Dortmund before they are away on the counter.
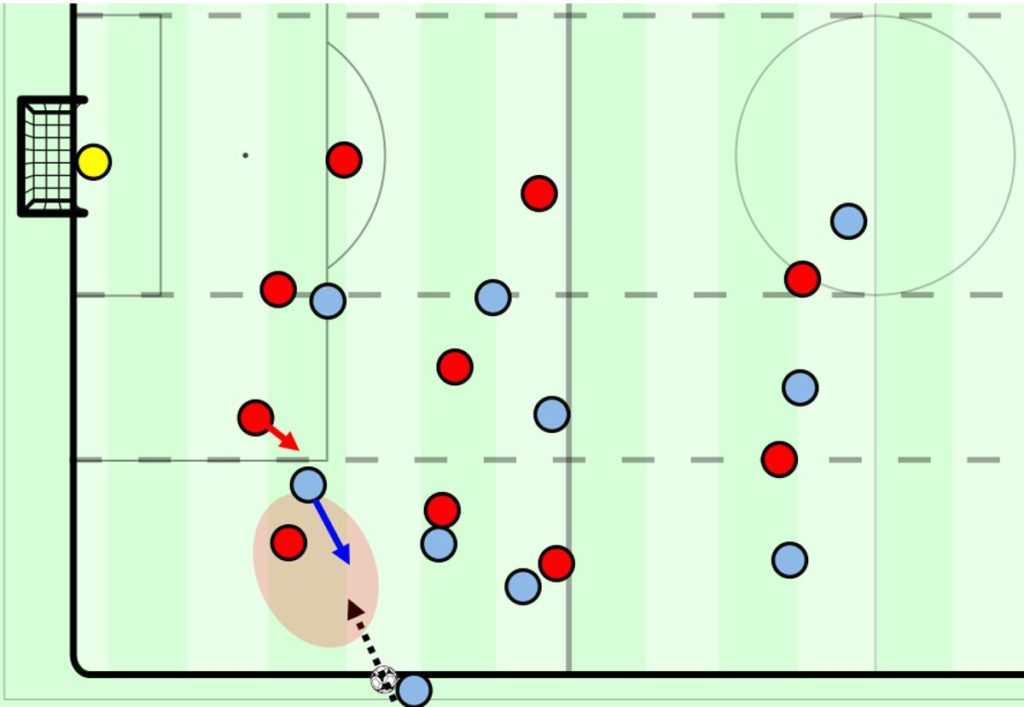
Unsurprisingly though, these kinds of movements and the spare player principle have to be well coached and executed, as if not you risk jumping and leaving spaces behind which can be exploited, with this example from Bournemouth a prime example. Here Bournemouth organise themselves similarly to how FC Midtjylland did in the previous example. They stay slightly deeper and allow their full-back to press the thrower, with a centre back positioned wide and behind to cover. A defensive midfielder stays deeper again, while the back line pushes up to him, creating a back four again while still having pressure on the ball.
A ball near player receives the ball and plays it back to the thrower, who is now behind the midfield line. The full-back jumps to press and the centre back moves wide to cover. The full-back presses quickly to cover the fairly large distance, and the opponent dribbles past him. The defensive midfielder does not drop to help create that back four, and therefore leaves space behind. Sheffield United’s structure here is excellent to now take advantage. They provide width which draws the covering full-back wide and increases the size of the half-space, and have a player within the half-space who recognises the opportunity created by the height of this defensive midfielder, and so remains high. They then have a player between the Bournemouth left full-back and centre back, who can receive a cross and score.
As a result of this, it is important teams are close enough to the ball and press well, and that players recover into the correct positions, otherwise space can be exploited. Again here if Bournemouth win the ball from the thrower, they have inside passing options to launch a counter, and could push their far winger higher.

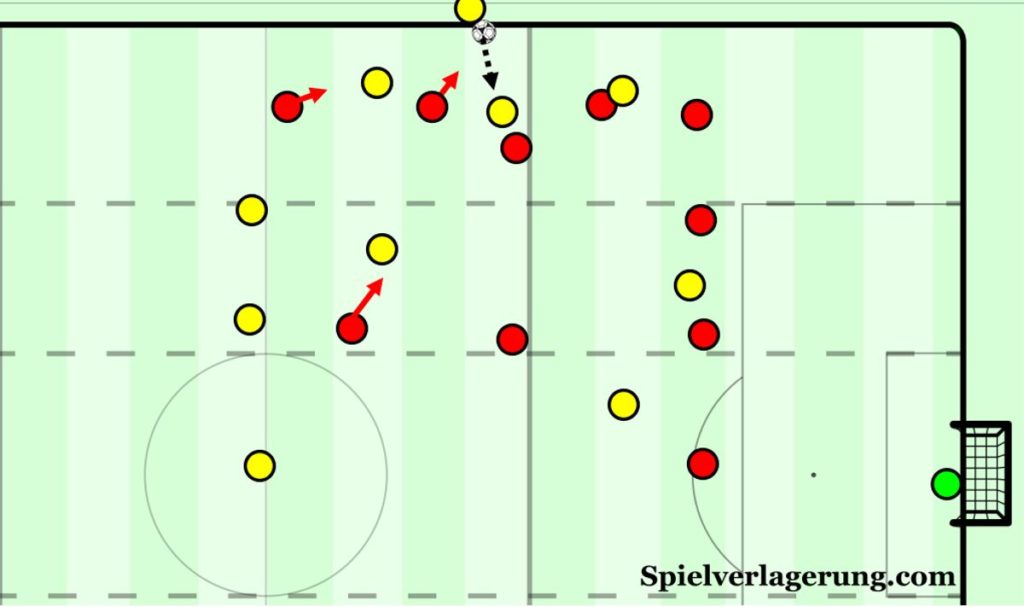
Traps involving furthest player
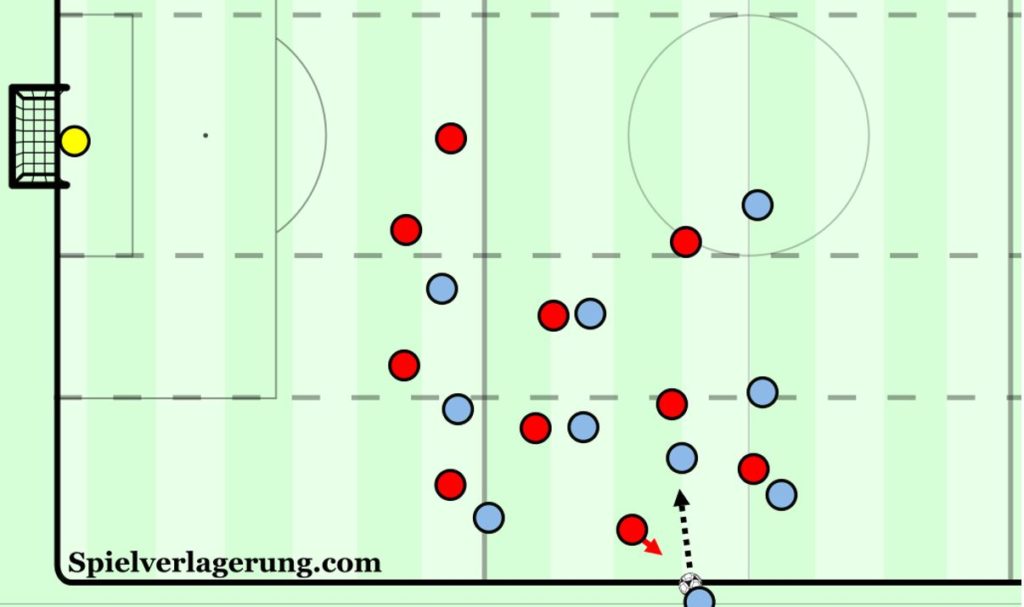
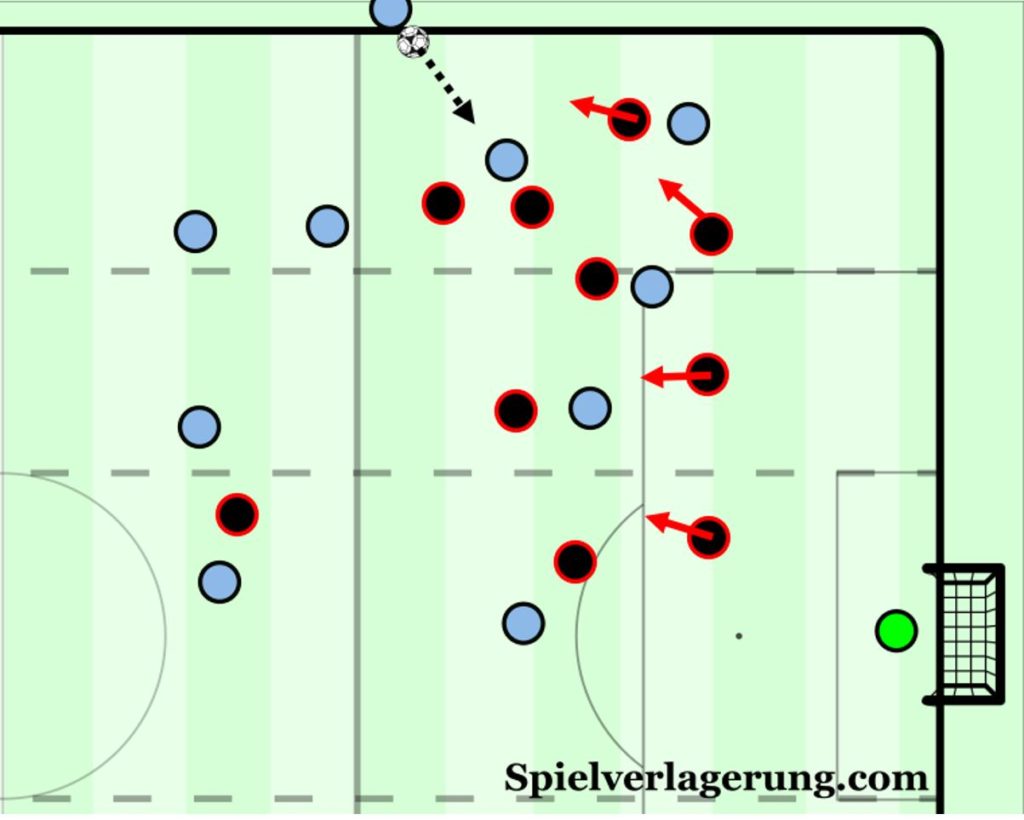
Another way a trap can be set is by using a player positioned highest from the initial throw. RB Leipzig use this often with one of the strikers initially cutting off a backwards option and then jumping to press the thrower. We can see an example of this below where Leipzig guide the opposition to play into this ball near player. They do not mark the player tightly and leave some space for him to receive, and also initially give the impression that the thrower will also be free.
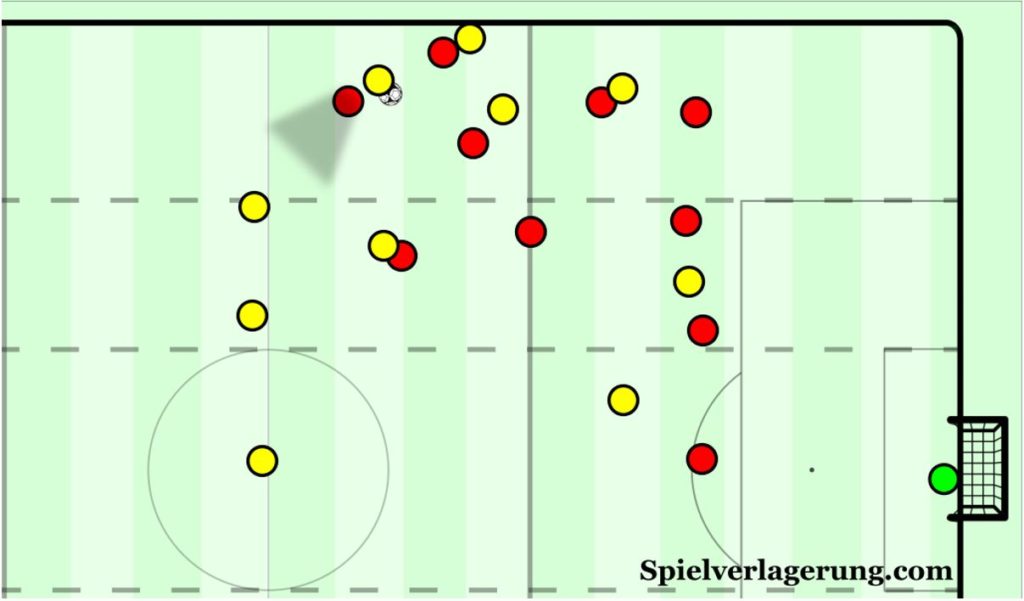
Once the ball is thrown, they edit their structure, with the nearest striker pressing onto the thrower, and a central midfielder looking to create e a 2v1 on the receiver. A centre back is positioned higher which allows for the midfielder to step forward without compromising the teams structure.
As a result, from what seemed like a fairly safe throw, the opposition are trapped into a compact area, with Leipzig creating a 4v2 around the ball. This method may slightly hinder the offensive side of the trap, as a player is committed backwards instead of forwards, but it is still possible to progress the ball, and the defensive aspect is much improved.
One of the key details is that we want teams to throw the ball short, as it gives us the opportunity to press in a good area. We want to be brave enough to challenge them to play through us, and then have the structure to adapt and trap the opposition and take the ball.
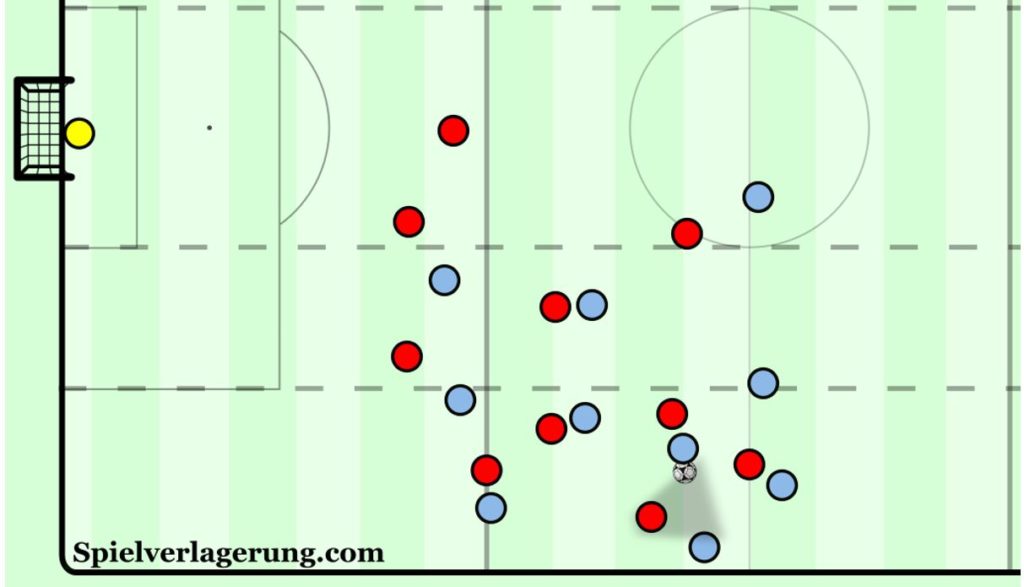
Here in an example from Norwich vs Liverpool, Liverpool react in order to use the furthest player. A player gets a run on his marker (Salah) and receives the ball. Once thrown, the other marker closest jumps to cover the thrower, leaving his marker. This leaves the passing lane open to the back option, who is then pressed by Roberto Firmino from behind. Sadio Mané moves across to cover the central option.
Therefore, when the ball is worked back to this player, Liverpool have squeezed the space around the ball and cut off the passing options. Firmino presses from front to back, therefore cutting the passing lanes backwards. Norwich cannot progress the ball as a result and the ball goes out for another throw.
Summary
It is worth noting that in many of these examples of ‘jumps’, the movements have been ball or man orientated, similar to the variants in counter-pressing. The moment the ball is thrown acts as the trigger for the defensive movement, the same way that losing the ball does. From throws, the press is usually man/access orientated (e.g. FC Midtjylland and RB Leipzig examples), with players jumping to mark the nearest player, but as the Dortmund example shows it can also be space orientated, with certain areas deliberately made tighter once the ball is played. Passing lane orientated pressing is rare from throws, as teams look to reduce the space immediately to prevent a switch in play, and do not take the risk of using interceptions to win the ball.
It is also worth noting the common denominator in many of these examples, with Liverpool, FC Midtjylland, RB Leipzig and Ajax all used as ‘good’ modern day examples. Thomas Grønnemark has worked at four of these teams, which isn’t to say this is exclusive just to these clubs, but certainly shows a trend in what is being coached.
As you can see from the examples within this article, the location of the throw affects how the team is structured. Simply, in deeper areas forward jumps allow for the best offensive opportunities, as they lend themselves to a team setting up with depth and give a dynamic superiority if the ball is won, as the team is already moving forward. The middle third generally gives the best opportunities to win the ball and attack effectively, as it allows for compactness around the ball and teams will often look to play short in this area in order to build an attack themselves. The final third doesn’t allow for the same compactness usually, and teams are more reluctant to play out. Depending on the priorities of your team, the structure can change. But in summary, each trap involves at least one spare player no matter how they are used, and if you create at least numerical equality around the ball once it has been thrown, teams will struggle to get out of the tight wide areas where throws are taken. Therefore, use these situations of offensive opportunities.
Writing by Cameron Meighan; Editing by Constantin Eckner.
1 Kommentar Alle anzeigen
Brian Muturi December 11, 2024 um 7:26 pm
Most if not all football analysts on YouTube took ideas developed on this website and they couldn’t be bothered to tag or reference/credit the writers who worked tirelessly to make such quality content for us. I miss the times I would without fail, get access to such amazing literature.