Tottenham’s Adaptive Pressing Strategies
The 2019/20 season was a turbulent one for Tottenham, fresh off the back of a Champions League run that saw them beaten by Liverpool in the final, there was lots to be hopeful for with a young Spurs side that was surely going to push once again to gain that ever illusive trophy.
Though this was not to be, Mauricio Pochettino was sacked a mere two months into the season and replaced by Jose Mourinho, bringing with him the ever-growing media presence and scrutiny that follows him. This was not the only change during the season, Tottenham’s pressing strategies changed a plenty throughout the season under both Pochettino and Mourinho which makes for a perfect analysis of the different key tactics employed, from using their favoured 4-2-3-1 to pressing using a whole host of adaptive strategies, it’s all below!
The Favoured 4-2-3-1
Throughout the 2019/20 season (so far), Tottenham’s favoured approach has been when lining us as a 4-2-3-1, used 32% of the time during matches this season and most often against an opponents back 4 and midfield three.
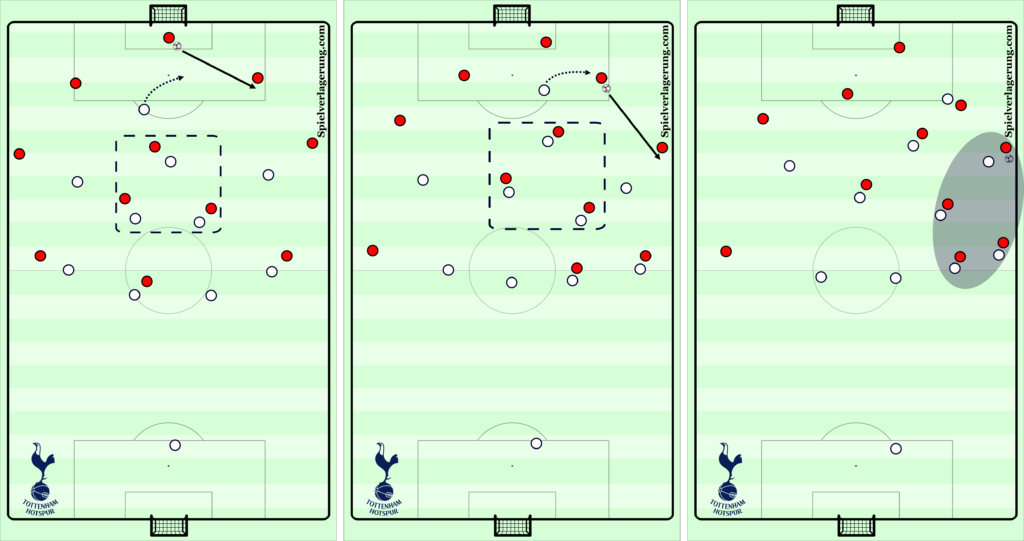
As shown above, this is a fundamental component of Spurs’ attempt to regain possession in the opposition’s half and was deployed under both Pochettino and Mourinho, though whether the latter would have wished to change it more may have hinged on Kane remaining injury free.
The striker begins by splitting the opposition’s central-defenders, often restricting the stronger from receiving in the first phase if a weakness can be identified or alternatively forcing a player onto their weak foot to force mistakes if the opposition are playing a right-footed centre-back on the left or vice-versa. Upon the trigger of the first pass, they engage and force play into the full-back, though the job doesn’t stop there, they remain screening play once it has reached the full-back to ensure play cannot go backwards and prevent the opposition from recycling possession.
The attacking-midfielder drops onto the deepest opposition midfielder, creating a box midfield three which proved to be successful throughout the season, and thus forcing play out wide into full-backs. Alli’s role in the attacking-midfield slot was pivotal. Dependent upon the opposition determined his level of aggression, against weaker opposition he stepped in-front of his man, screening from the front to apply extra pressure on opposition centre-backs, whereas against stronger opposition he remained behind his man and looked to intercept upon passes into central areas to retain structure. Meanwhile, the remaining midfield two remained locked-on, following their men whenever rotations occurred, combining with Alli in an almost Bielsa-esque midfield box.
Wingers began slightly deeper, teasing a pass into the full-back whilst front-screening any passes into the opposition’s wingers so that full-backs could remain compact. Upon the trigger of a pass into the centre-back on their side, they began to tuck narrower and allow the pass into the full-back, once this pass had been played as a trigger, they engaged with the first priority of regaining possession whilst forcing play outside.
The final facet of the strategy is the passing options that the opposition full-back has. With the winger showing play outside, Spurs’ full-back is aggressive and locked on, as is the relevant sided centre-back and near-side central-midfielder. This leaves no options for the isolated opposition full-back, he either plays into the congested area highlighted above or attempts to play long – neither of which are frequently successful.
Tweaking the Approach
However, Spurs’ have tweaked this system throughout the season – most notably in one of the early season games against Manchester City, tweaking their line of engagement and the roles of players to change where possession should be forced.

Recognising City’s dangerous midfield three of Rodri, Gundogan and De Bruyne and not mentioning the frequent tucking in of Zinchenko and Walker into the half-spaces, Spurs aimed to frustrate City by preventing passing lanes and keep central areas congested to force regains upon bad passes/touches as a trigger or even forcing play long from which they could utilise the speed of Rose and Walker-Peters at full-back and the aerial prowess of Alderweireld centrally.
First of all, compared to Spurs’ favoured press within a 4-2-3-1, their line of engagement dropped significantly deeper as to congest central space and restrict opportunities to penetrate centrally. Upon Otamedi or Laporte stepping past the line of engagement shown above (Outside Red Shading), Kane would press conservatively, ensuring he was screening the near-side midfielder as shown – his first priority within this system is not to regain possession but prevent forward passes into midfield.
The wingers, who in this game were Sissoko and Eriksen forced play inside, curving their runs to restrict passing options to Zincehnko or Walker at full-back, whilst the near-side central midfielder of Winks or Ndombele screened passes into City’s wingers who frequently dropped into half-spaces and became inverted. The other central-midfielder looked to retain balance and attempted to mark De Bruyne out of the game.
The back four had easier roles, simply to retain compact shape and ensure that they kept the 4v3 they had against City’s front three from influencing the game.
The strategy was effective against City in the opening stages and limited the opportunities to play through, though it did give up a vast amount of possession and perhaps contributes to increased fatigue as the game progresses – perhaps this is why Pochettino switched to a two-man press in the second-half, a strategy to be further explored later on.
Asserting Midfield Dominance against 2 Man Midfields
Tottenham’s press within the 4-2-3-1 system has also adapted to assert dominance and force regains with dangerous central areas effectively when playing against two man central-midfields, such as against Bournemouth’s flat 4-4-2.
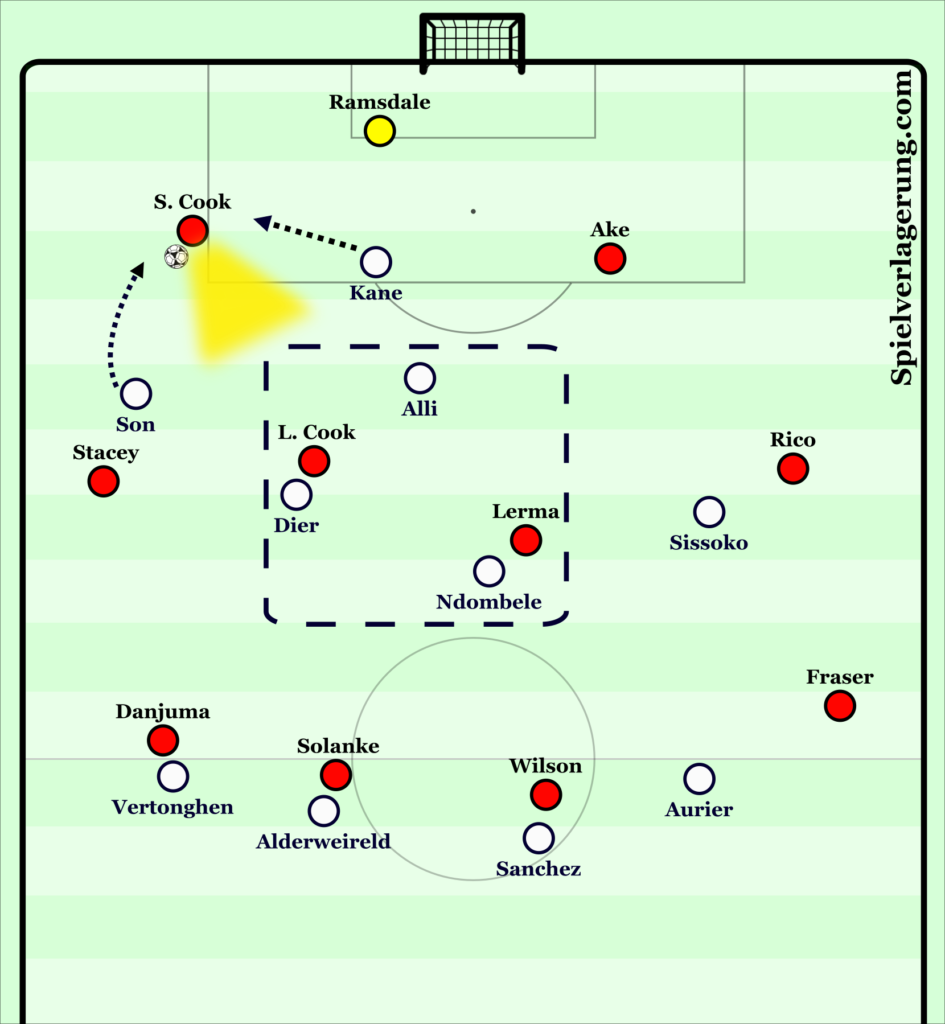
As shown above, as soon as Ramsdale played out from goal-kicks, Kane arched his pressing run to prevent play back to Ramsdale or across to Ake. Though, prior to this it must be highlighted that play was forced to Cook, with Alli starting closer to Ake to prevent passes into him as he is much superior on the ball. Upon Cook receiving as a trigger and with Kane applying pressure as well, Son arched his run to cut out play to Stacey and force play inside. In this is where the success lay.
Within central areas, Spurs had a 3v2 due to the 4-4-2 approach from Bournemouth. Alli was able to drop into central areas upon Ramsdale’s initial pass to Cook and combine with Dier and Ndombele to create a point-up midfield three. Meanwhile, Ndombele and Dier were able to lock-on to Lerma and Cook.
Beyond this within the tertiary unit, Vertonghen, Alderweireld and Sanchez marked Danjuma, Solanke and Wilson respectively, whilst not being completely locked-on but being close enough to travel to intercept or apply pressure. Aurier provided cover by tucking in, but being open and ready to travel to press should Cook attempt a Beckham-esque 60 yard switch to Fraser.
The intention was evident, Spurs were looking to regain possession in the central zone highlighted above and in turn create a number of scoring opportunities high up the pitch. In reality, it didn’t quite play out in this manner, following the failure of the first few attempts to play out with lucky escapes as Cook and Lerma in central areas managed to scramble the ball out wide to Danjuma or in –behind Son with a bounce pass into Stacey, Cook and Ake when he had the ball from open possession looked to increasingly look to play into Solanke and Wilson’s feet.
Although, the outcome remained the same, Spurs continuously managing to regain the ball quickly from Bournemouth, albeit a little deeper than intended. The simple aspect that ensured success was Solanke and Wilson inability to cope physically and aerially with Alderweireld and Sanchez. Compounding this, even when Solanke or Wilson did manage to hold up play and secure possession, supporting runs were often slow from Cook and Lerma who were still outnumbered centrally and often play turned into hopeful channel balls to Danjuma or Fraser.
Pressing against a Back 3
Spurs’ press has also changed when playing against a back 3, as would be expected – though it remained consistent with some of the aspects previously demonstrated.
As shown below with the example showing the most prolific user of a back 3 in Wolves, Spurs set up with Kane splitting the back 3 and allowing Coady to receive, using his angle of approach to once again curve his run and force play out to Dendoncker.
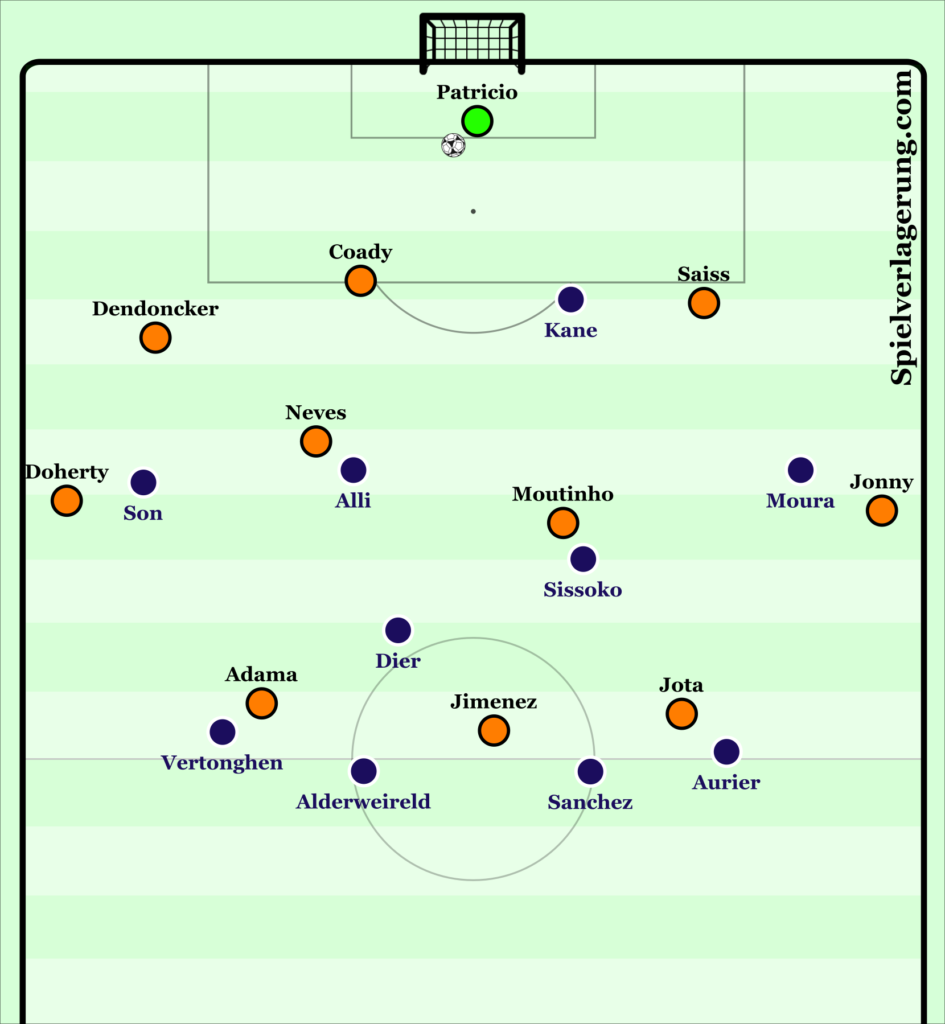
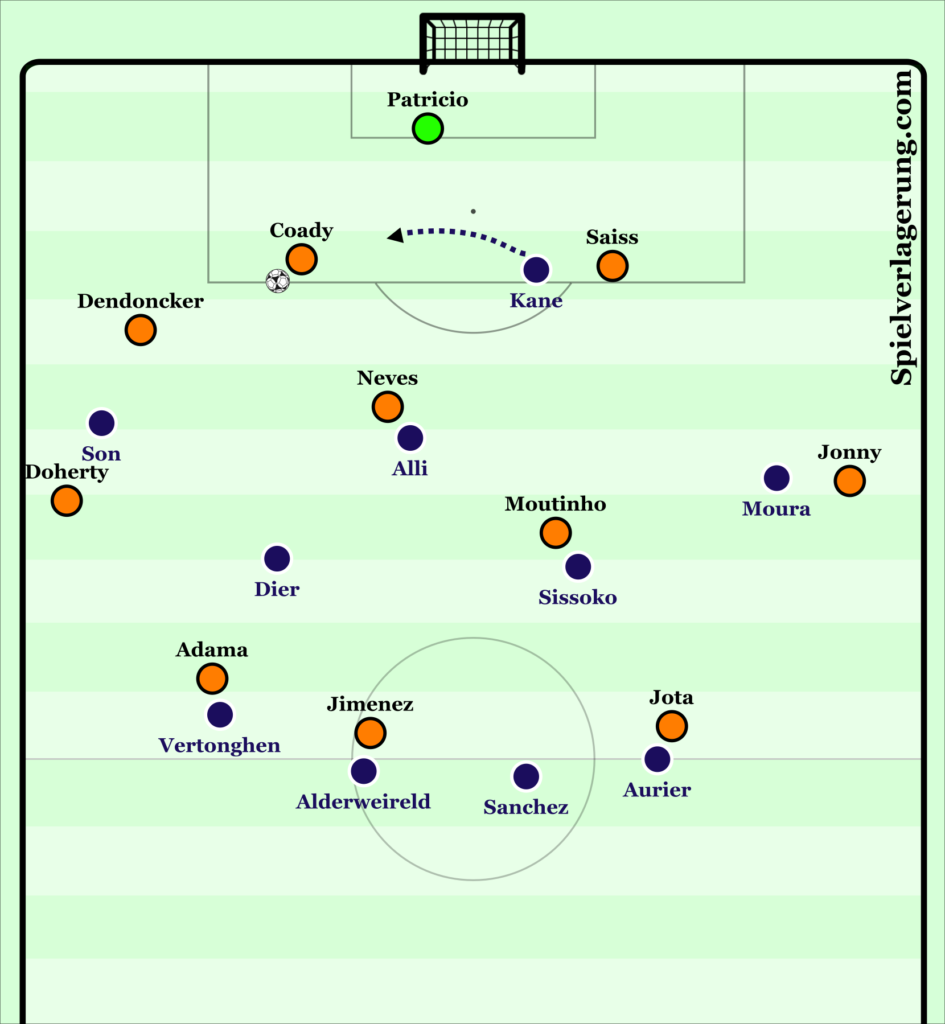
Upon the pass into Coady, Kane applies pressure whilst curving his run to prevent the recycling of possession back to Patrico or Saiss, this forces play out to Dendoncker.
The near-side winger, Son in this instance will force play back inside by curving his run to cut off Doherty, coupling with Kane this provides a narrow area for Dendoncker to play. Meanwhile, Moura remains ready to travel and press Saiss should the ball be attempted to switch across.
In midfield, Sissoko and Alli are locked on, ready to regain should play be attempted through Neves or Moutinho, with Dier providing cover and also screening any passes into Wolves front-three.
The back four remain secure with a 4v3 overload against Wolves’ front-three of Jimenez, Jota and Adama.

Therefore, with the numerical advantage in central areas, Wolves are forced to play long and Spurs again demonstrated their effectiveness in choice of pressing strategy with Wolves progressively looking to go more and more direct as the game progressed. However, they did expose some weaknesses within Spurs’ 4-2-3-1 when pressing.
The 4-2-3-1 Press Exposed
Despite Tottenham’s widespread implementation of a variety of strategies to dictate the opposition, there have been occasions where they have been exposed and their favoured 4-2-3-1 has been broken down.
As shown below, opponents have exposed Spurs’ preferred system through re-positioning players and creating overloads to allow opportunities to break, Manchester City used this most potently following initial stifling by Spurs’ approach.
Opposition full-backs push high & wide, wingers become inverted. If followed by wingers, the opposition have a central 3v2 excluding GK against Spurs’ 9 & 10. Also, providing space for midfielders to drop into wide areas whilst full-backs could tuck into half-spaces or even midfield.
Consequently as shown, this creates a central 3v2 for the opposition and even a 4v2 when adding in a top-quality goalkeeper such as Ederson. This fundamentally creates the opportunities to play out and central-defenders can drive forwards out of the defensive third with secure possession.
Upon reaching this area, Spurs’ structured approach begins to unravel as one of their midfielders are drawn out of shape, allowing the inverted wingers and striker to drop in-between Tottenham’s defensive and midfield line to receive and put Spurs’ on the back foot.
Although, even if Spurs’ wingers don’t drop back with opposition full-backs, they remain exposed as there remains a 2v1 in wide areas with the opposition’s full-back and winger up against Spurs’ solitary full-back, making it even simpler for one direct pass to break down the press.
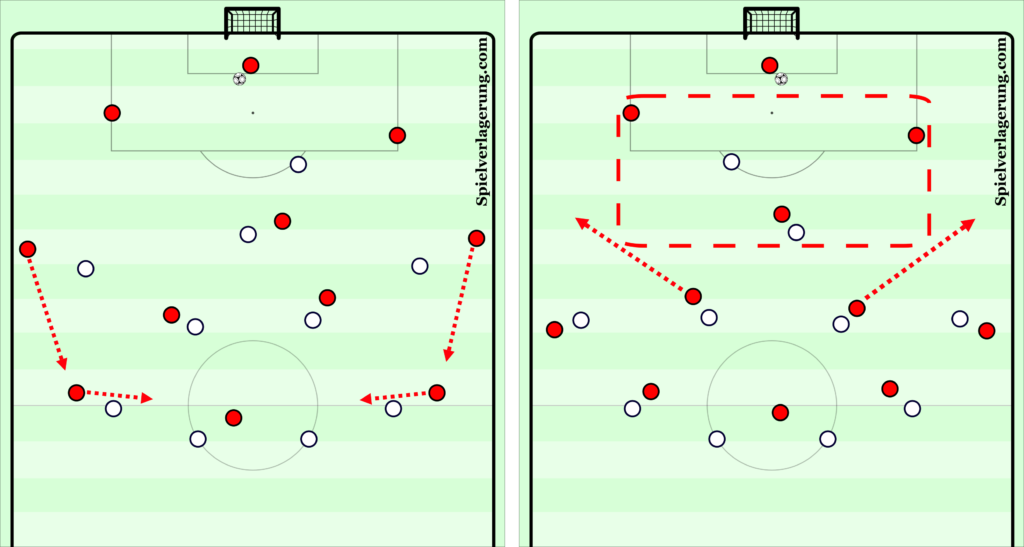
Further to this, rotations between units have also caused Tottenham trouble. As Spurs use such a man-orientated pressing approach especially centrally, there is difficulty when primary, secondary and tertiary units rotate, with the most effective examples of un-balancing Tottenham shown below.

CB & CM / CM & FB / ST & CM / FB & W
Two Striker Press
Tottenham have also employed a two-man press at times during this season, with flexibility to switch during the game, or using it from the start as was the case in the example below against Bayern Munich. For contextual understanding, Spurs’ lined up with a 4-3-1-2 against Bayern’s 4-2-3-1.
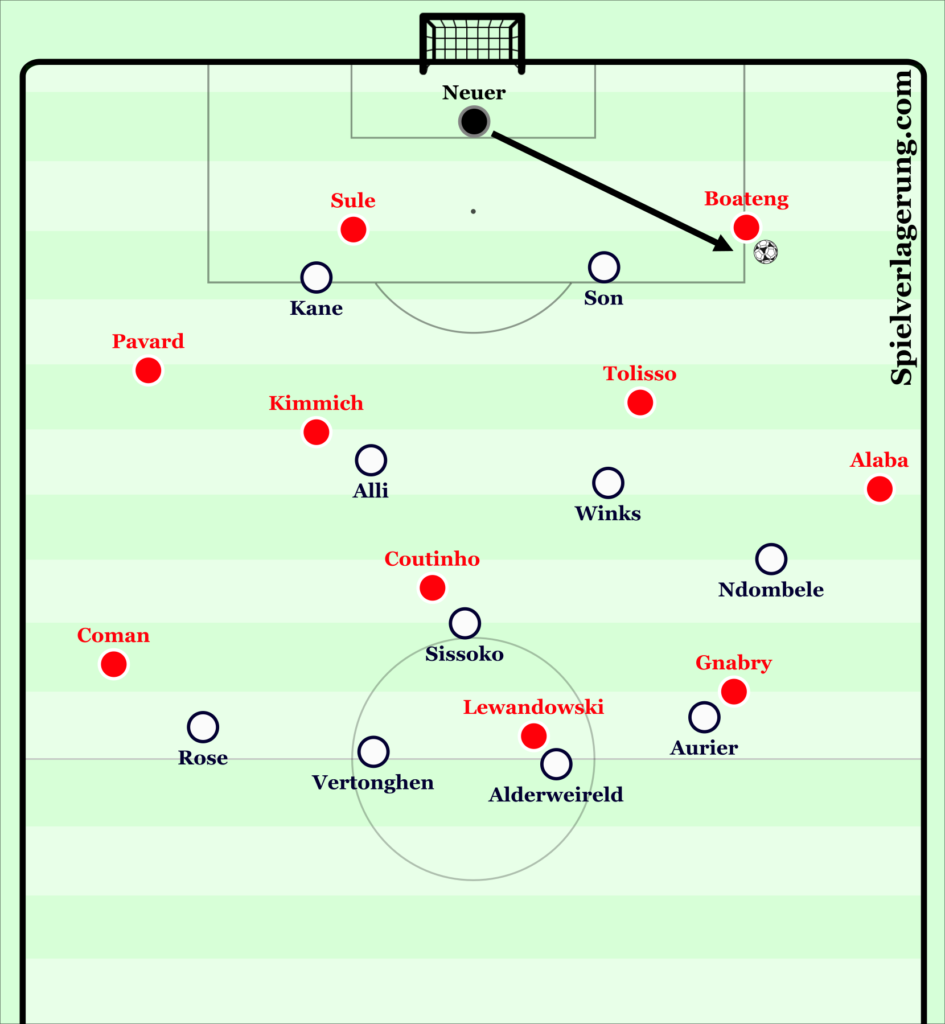
A slightly different scenario than previously shown when using the 4-2-3-1, with no natural width when using the 4-3-1-2 as above, significant physical demands are placed upon the midfield three of Ndombele, Winks and Sissoko in particular, resulting in the two-man press becoming a much more aggressive approach. The energy brought by Son and Kane in this approach is vital to force the opposition under pressure and create errors of judgement.
Within this system as shown above, Kane and Son split whilst still allowing the centre-back on either side to receive as the trap isn’t set off the initial pass. Upon the trigger of this first pass, they press with an intention to force play onto the full-back whilst ensuring play cannot return back to Neuer.
Deeper, Alli locks onto the deepest central-midfielder in this case Tolisso, whilst Ndombele shifts to prevent an unopposed pass into the full-back, Winks and Sissoko ensure Coutinho and Kimmich cannot receive in central areas.
Further back still, the back four are occupied with Bayern’s front three, creating the 4v3 overload as we’ve seen before.
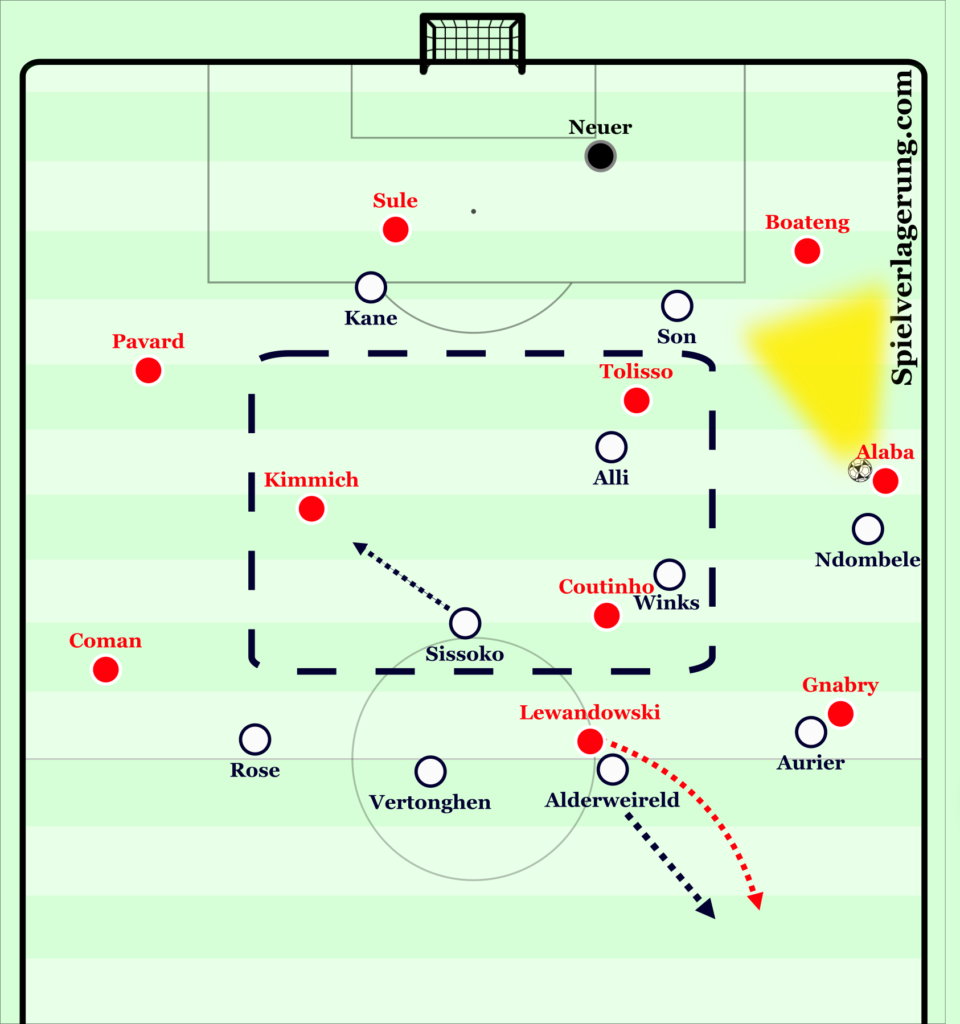
In here lies the first opportunity to win possession, there is no doubt that within the system employed the first priority is to regain on Alaba or Pavard at full-back, as Ndombele presses with an aggression to regain immediately as the ball is passed from Boateng. Although, caution is applied, with Ndombele strictly screening any pass into Gnabry by curving his pressing angle, whilst Aurier also steps up and locks-on to provide a buffer.
In midfield there is an equal 3v3 and although Bayern could have been successful when playing inside, they opted against it, as have the majority of opponents when coming up against Spurs.
This is due to the cleverly laid plans to allow a pass back into Boateng by Son, as whenever play goes out to the full-backs there is the freedom to play back to the centre-backs. Upon the pass back into Boateng, Son curves his run to force play back to Neuer once again, except this time as shown below he is under intense pressure from both off Spurs’ front two.
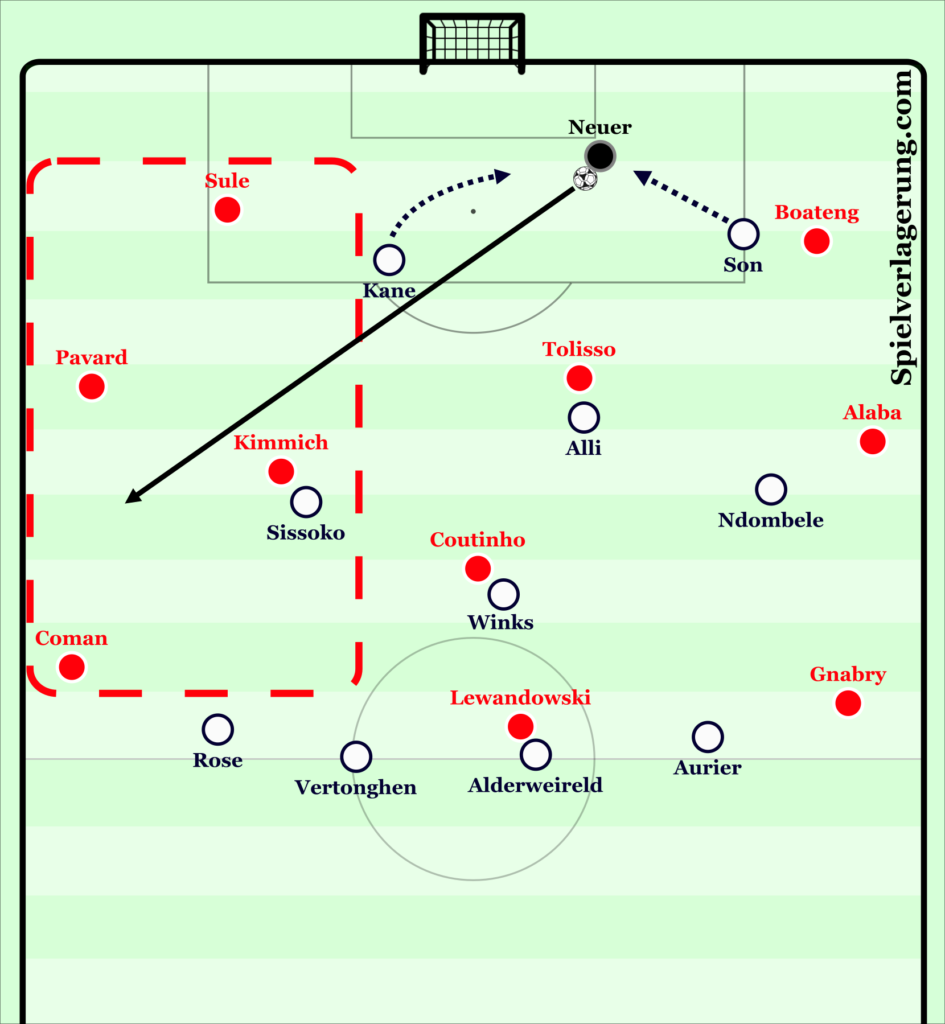
This intense approach problems caused problems, with Neuer, Boateng and Sule becoming flustered under intense pressure and in the first-half especially Spurs’ were using Alderweireld and Vertonghen to win aerial duels, regain possession and continue to attack the Bayern back-line. Even in wide areas, Gnabry and Coman were no physical match for Aurier and Rose respectively and Tottenham managed to significantly restrict the effectiveness of their German opponents.
Although, it wasn’t to last as the high-intensity pressing approach left gaps in Tottenham’s defensive approach. As shown above, Bayern began to figure out that a quick pass into Neuer followed by a direct pass into Pavard or Coman set them on a counter-attack and with devastating pace on the break with Coman and Gnabry down either side and the technical brilliance of Coutinho and Lewandowski centrally it was only a matter of time before Spurs’ paid the price. A heavy 7-2 defeat was the result in this game, though the pressing approach showed promise and would more than certainly pay off against lesser opposition.
Conclusion
Overall, Spurs’ have demonstrated a variety of strategies to press and limit their opponents throughout the season with varied success. The flexibility of the 4-2-3-1 is where they have found the most consistency and effectiveness, though the fluidity of their press to adapt to new opposition is integral to success. As displayed, Mourinho hasn’t had the chance to mould this Spurs’ team as of yet with many strategies sharing distinct similarities with Pochettino and it will take time. When we resume Premier League football, it will be intriguing to see if Spurs’ pressing strategies have remained the same or has the time off allowed Jose to develop new systems!
Keine Kommentare vorhanden Alle anzeigen