Arteta’s Arsenal Rebuild
Arsenal are in the midst of a rebuild, and since Mikel Arteta’s appointment in December 2019 a transformation of the Gunners playing style has taken place. Perhaps influenced by his shadowing of Pep Guardiola whilst at Manchester City, Arteta’s philosophy has turned the North London side into one of the most attractive and aesthetically pleasing teams in the Premier League, producing both an identity and improvement in results.
Although, after falling short in their pursuit of Champions League football, Arsenal must progress further still this season if they are to reach the pinnacle of European Football once again. With the 2022-23 season about to begin, this article will seize upon the apt opportunity to explore aspects of Arteta’s Arsenal in depth tactically, examining the Gunners key approaches in and out of possession during the 2021-22 season, whilst also investigating situations in which they have struggled in order to provide a holistic assessment of Arteta’s Arsenal Rebuild.
Build Up & Progression
Arsenal have used a variety of strategies when building and progressing possession, enabling them to make subtle tactical adjustments dependant upon their opposition. For example, against Aston Villa’s narrow 4-3-2-1, Arsenal utilised the width and height of their full-backs positioning to draw out Villa’s outside central-midfielders, exacerbating the natural vulnerabilities in a narrow 4-3-2-1 and creating opportunities to switch possession to progress.
As shown below (this scenario is in a more advanced area due to Villa’ deeper mid-block structure but maintains replicability to similar opposition mid-block structures higher up the pitch), with Gabriel in possession, Tierney positions himself to receive beyond the shoulder of Buendia with Smith-Rowe also providing higher width, initially allowing Arsenal to break Villa’s front-line. Meanwhile, Xhaka, Partey and Lacazette remain in narrow central positions to occupy and reduce the ability for Villa’s midfield three to shift across and adequately cover the subsequent actions. Further afield, Saka retains width on the opposite side, further stretching and causing issues for Villa’s narrow structure.
As a consequence, upon Tierney receiving, Ramsey is forced into a decision whether to stay in narrow structure (risking a more natural traditional 2v1 with Tierney and Smith-Rowe against Cash) or to press Tierney and attempt to prevent progression, either of which Arsenal would be able to exploit. Ramsey chooses the latter and is drawn out to Tierney as the ball-player, leaving Villa vulnerable to a subsequent switch of possession.
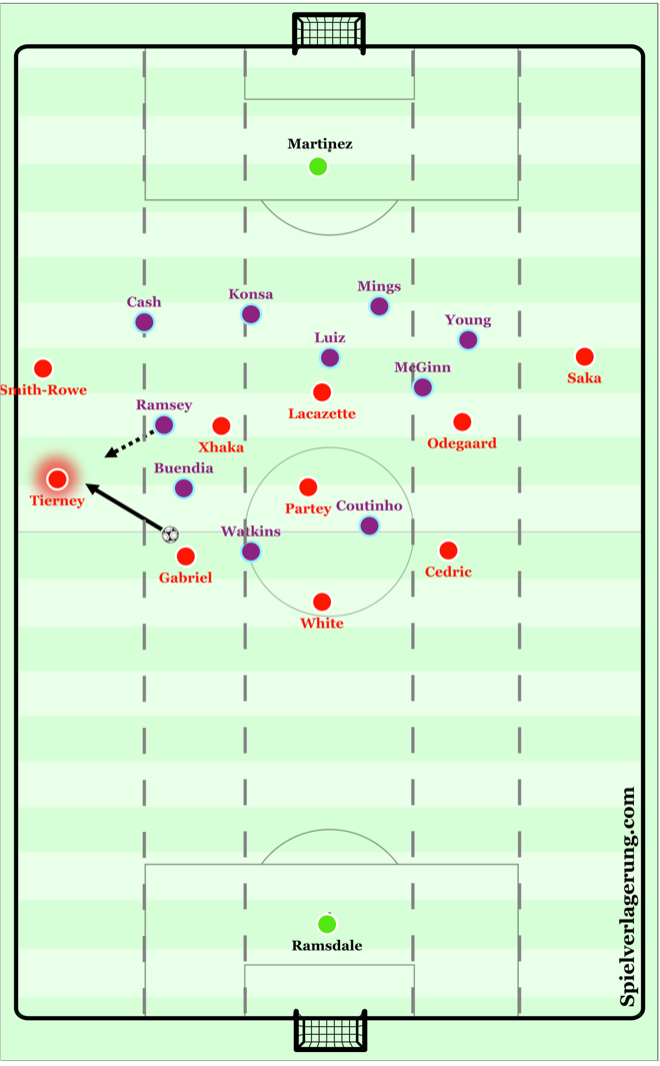
This allows Arsenal to manipulate Aston Villa’s structure momentarily, Tierney is able to progress whilst Ramsey presses, Smith-Rowe is able to support play with Cash unable to fully engage or risk being exposed beyond with a lack of midfield cover following Ramsey’s action and Xhaka makes a 3rd man run with Buendia unable to recover from his blind-side position to cover Ramsey’ press. Significantly, Douglas Luiz and McGinn are also drawn onto the half of possession in an attempt to cover Ramsey, as if they didn’t it would allow Arsenal to progress directly on the near-side of possession, leaving Odegaard and Saka on the far-side of the pitch.
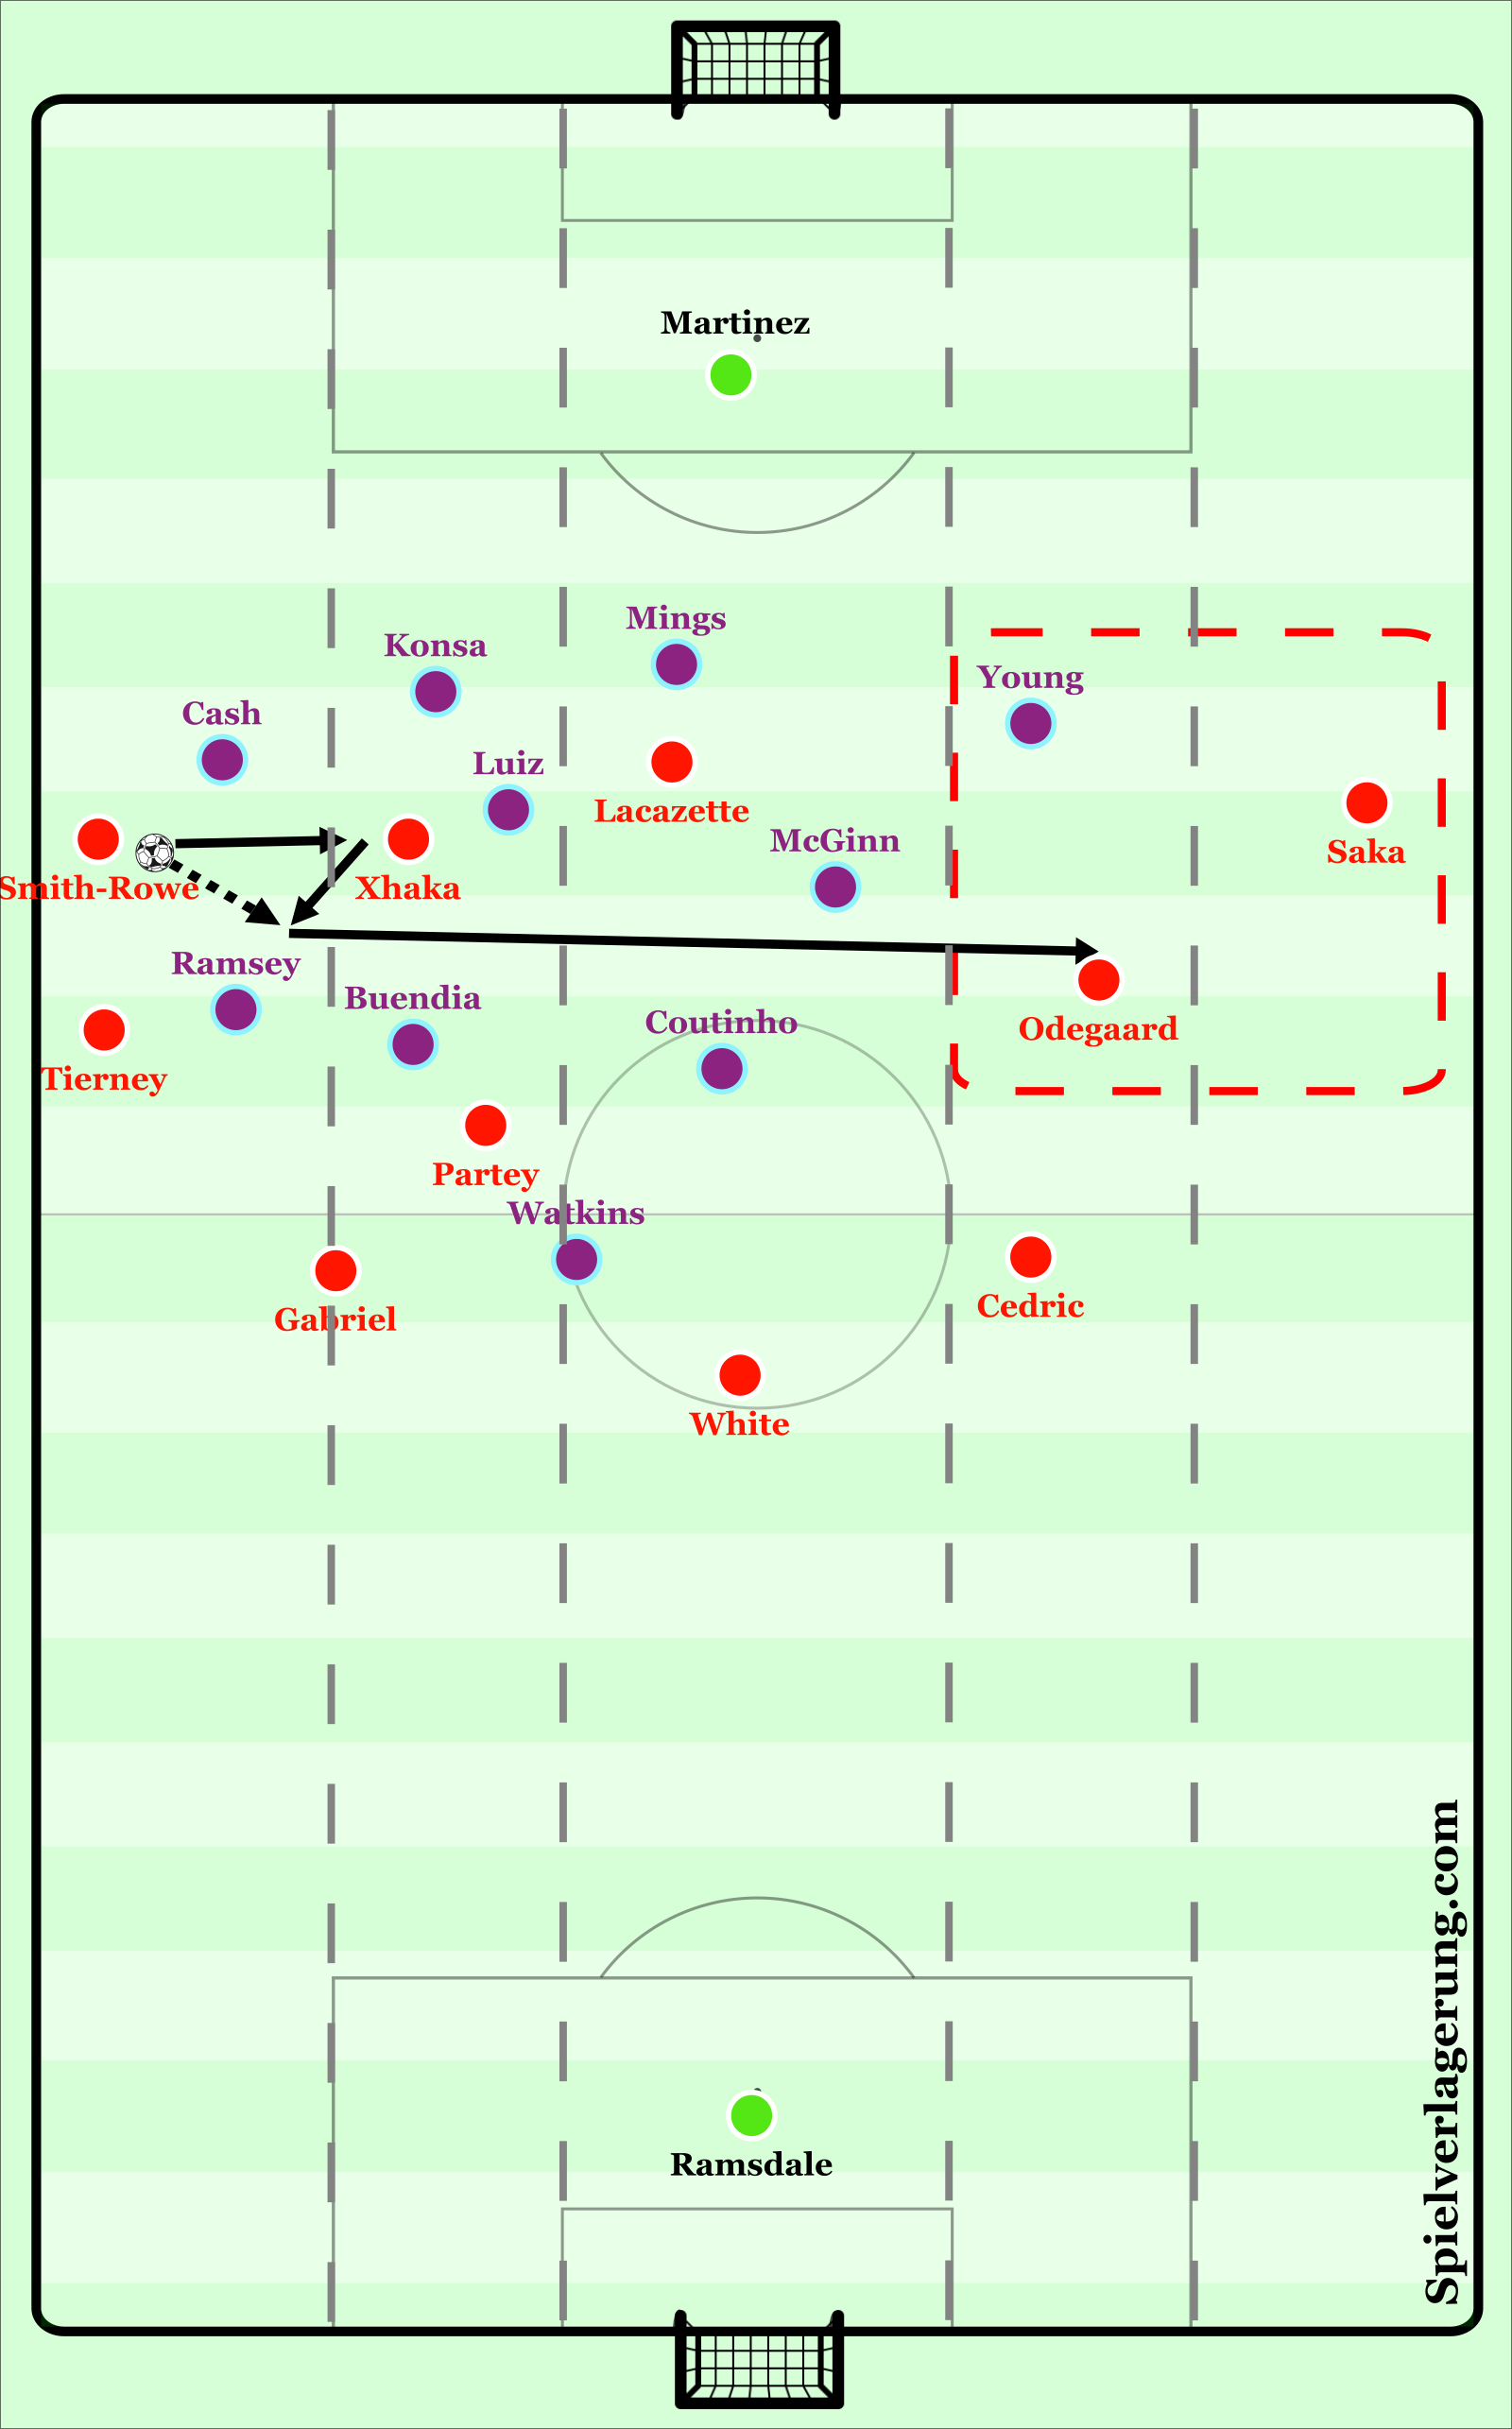
Consequently, Tierney plays into Smith-Rowe and following a quick combination with the Xhaka, Smith-Rowe switches possession into Saka on the far-side. As such, Odegaard and Saka find themselves with a direct 2v1 against Young and following yet another quick combination, that is a feature of Arsenal’s play, this results in progression beyond Young and a cut-back that Lacazette that should’ve been finished off.
Arsenal have also adapted their build-up against a back three, with full-backs taking up shallower positions in order to draw out wing-backs and create opportunities to play into the exposed space beyond in wide areas.
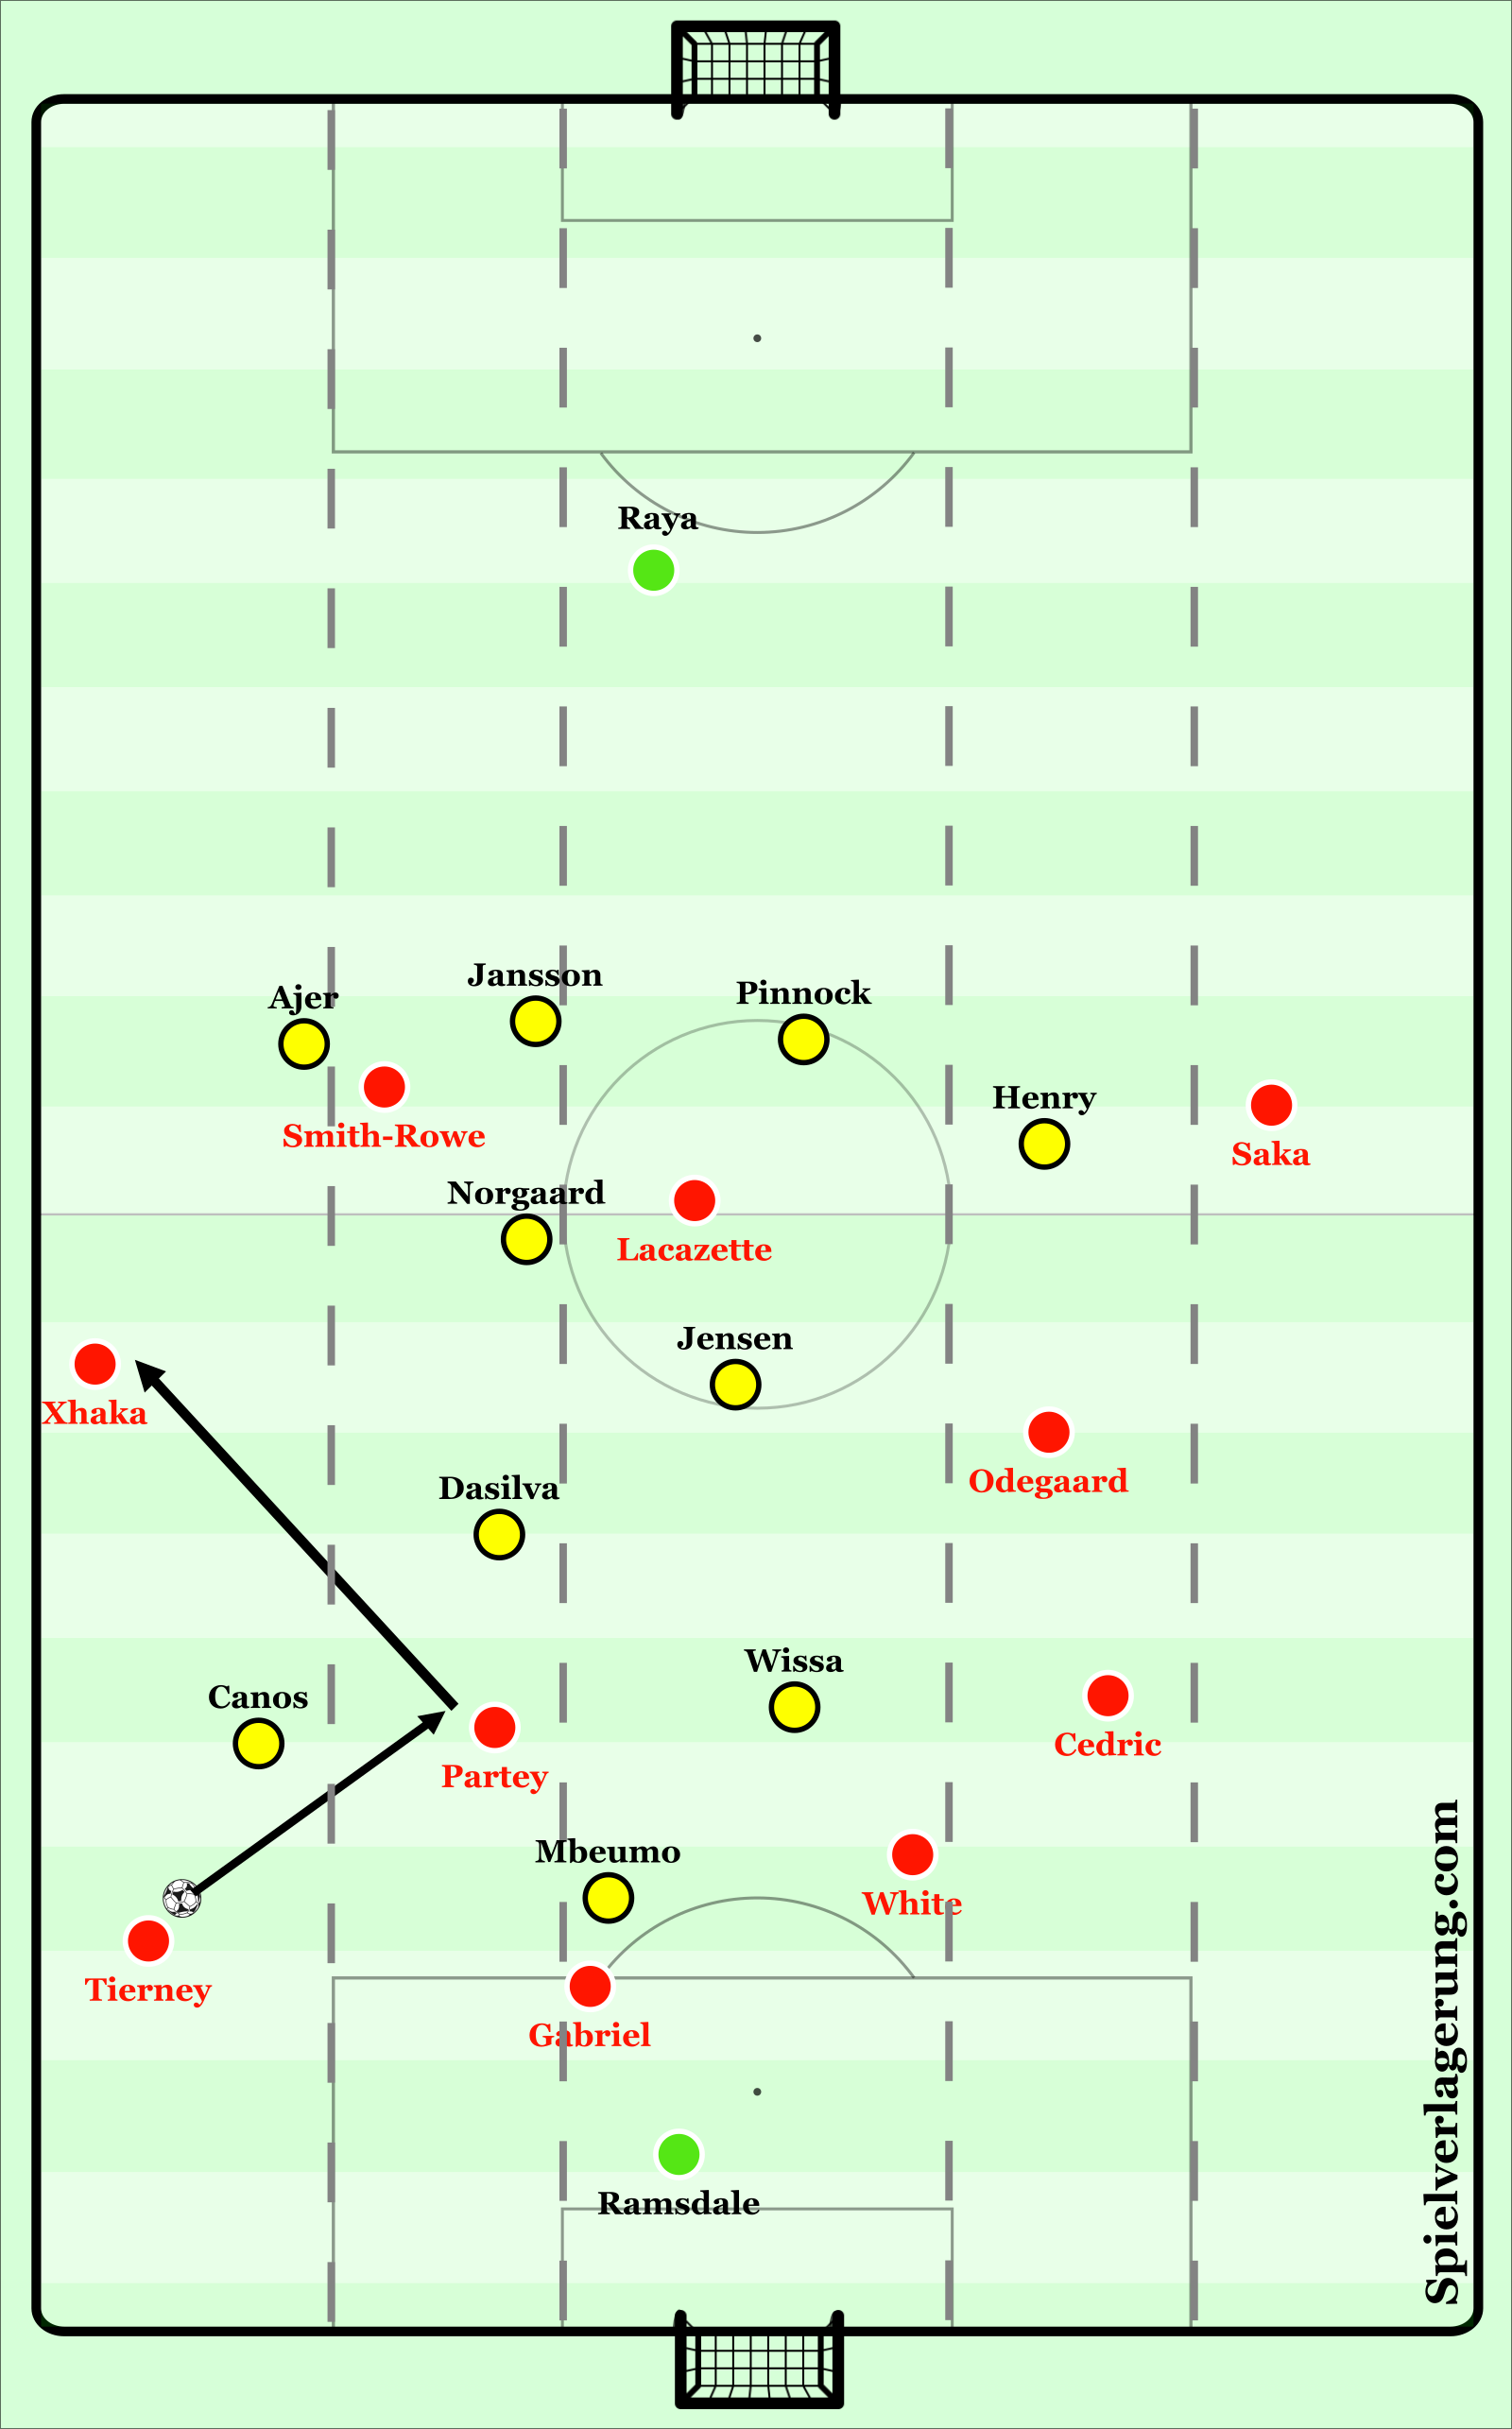
As shown below with Arsenal playing out from the back against Brentford’s 3-5-2, with Brentford’s front-two occupying White and Gabriel by pressing the centre-backs in a pivot structure, Tierney drops into a shallower position to receive from Gabriel thus drawing out Canos at right wing-back who presses him upon Gabriel’s pass. If Canos maintains his position and doesn’t press Tierney, he rather presents the opportunity for Tierney to travel and progress, although this would’ve maintained balance and delayed Arsenal’s progression to allow Brentford to regain a defensively solid structure. Partey positions himself on the near-side of possession, able to receive and combine on the near-side with his receiving position providing protection from any Brentford players pressing in to out and giving him the ability to play around the corner, whilst Xhaka plays on a higher line. Odegaard maintains a position in the opposite half-space to stretch Brentford’s midfield with the rest of Arsenal’s attacking line pinning Brentford’s defensive line as high as possible to create space within the 2nd line to build possession.
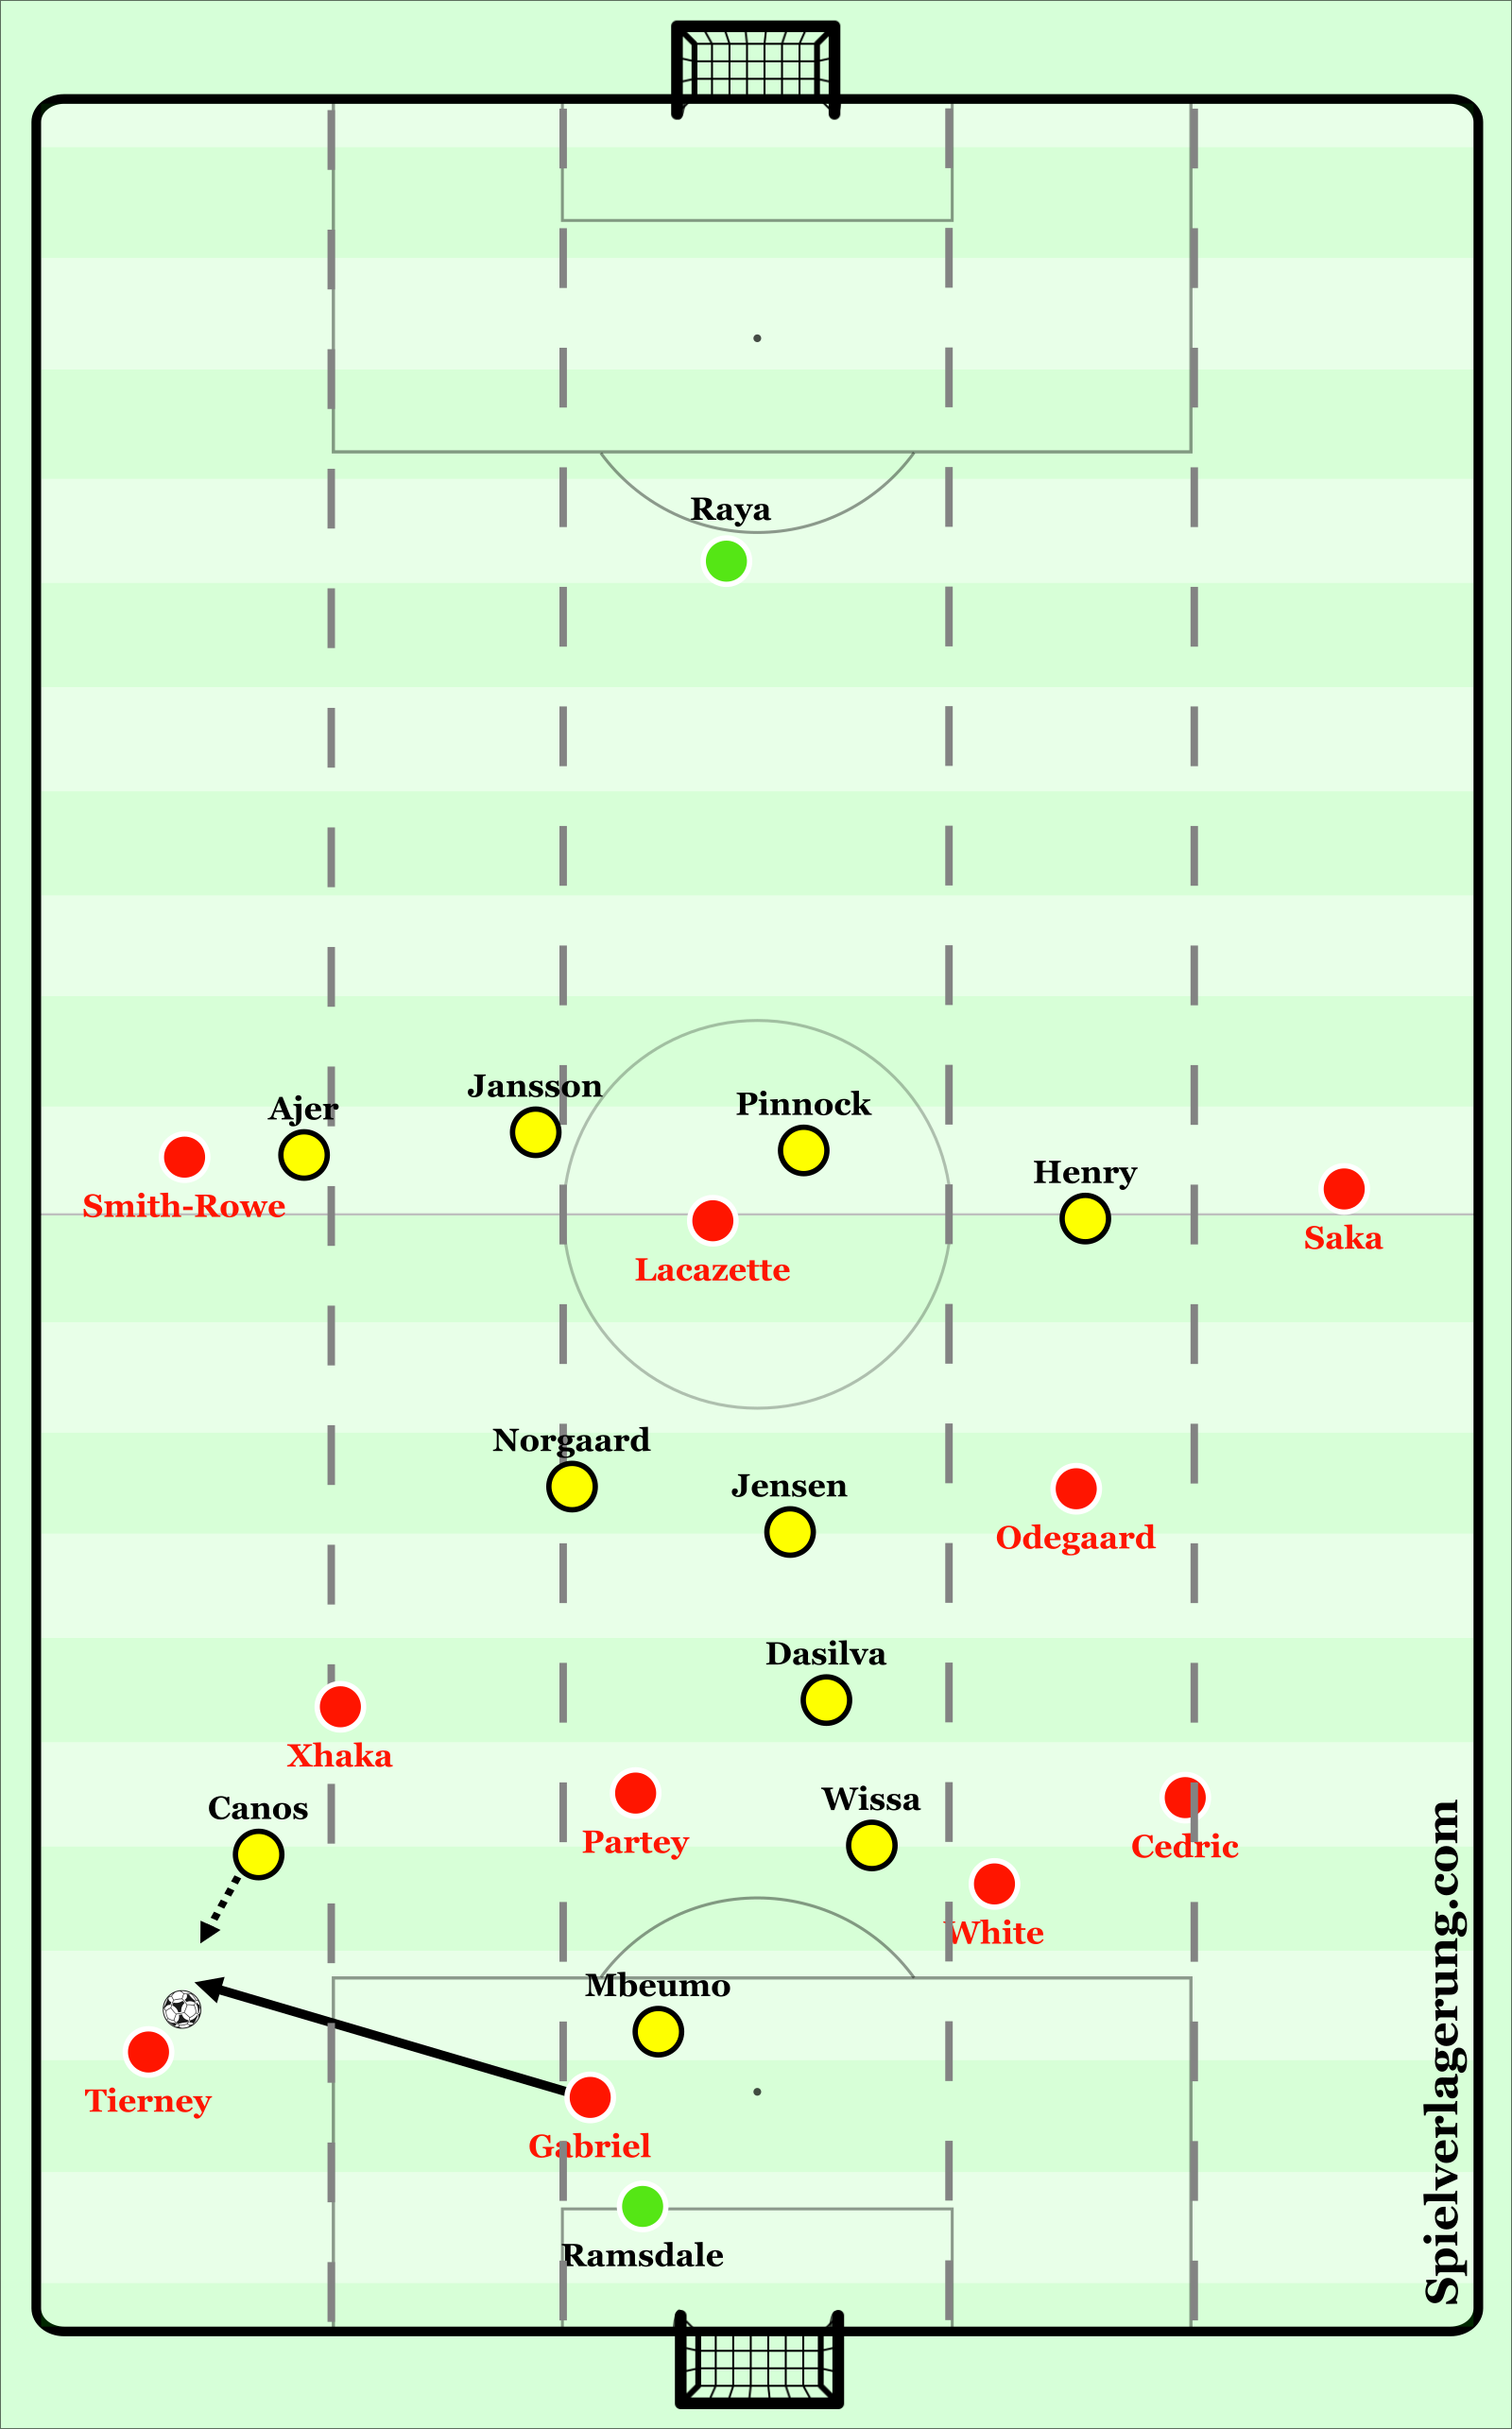
As Tierney receives, Xhaka makes a run into the widest left lane, in essence taking up a temporary position as a wing-back and creating a back 3/5 structure for build-up. This allows Tierney to play a simple pass into the previously mentioned Partey on the near-side who combines with a first-time pass into Xhaka, completing Arsenal’s progression into the midfield-third and more importantly beyond Brentford’s midfield line with a vast amount of space to exploit in wide areas.
Although, it must be mentioned that Brentford’s press was inefficient in this form, as there was no pressure upon the pass into Partey meaning the press was easily broken, as well as no provision made to track Xhaka’s runs into wide areas that really exposed Canos’ action, resulting in repeated targeted exploitation by Arsenal.
A further common theme in Arsenal’s build up and progression is the creation of central overloads through the utilisation of the striker (Lacazette) dropping in to create an extra man to aid progression.
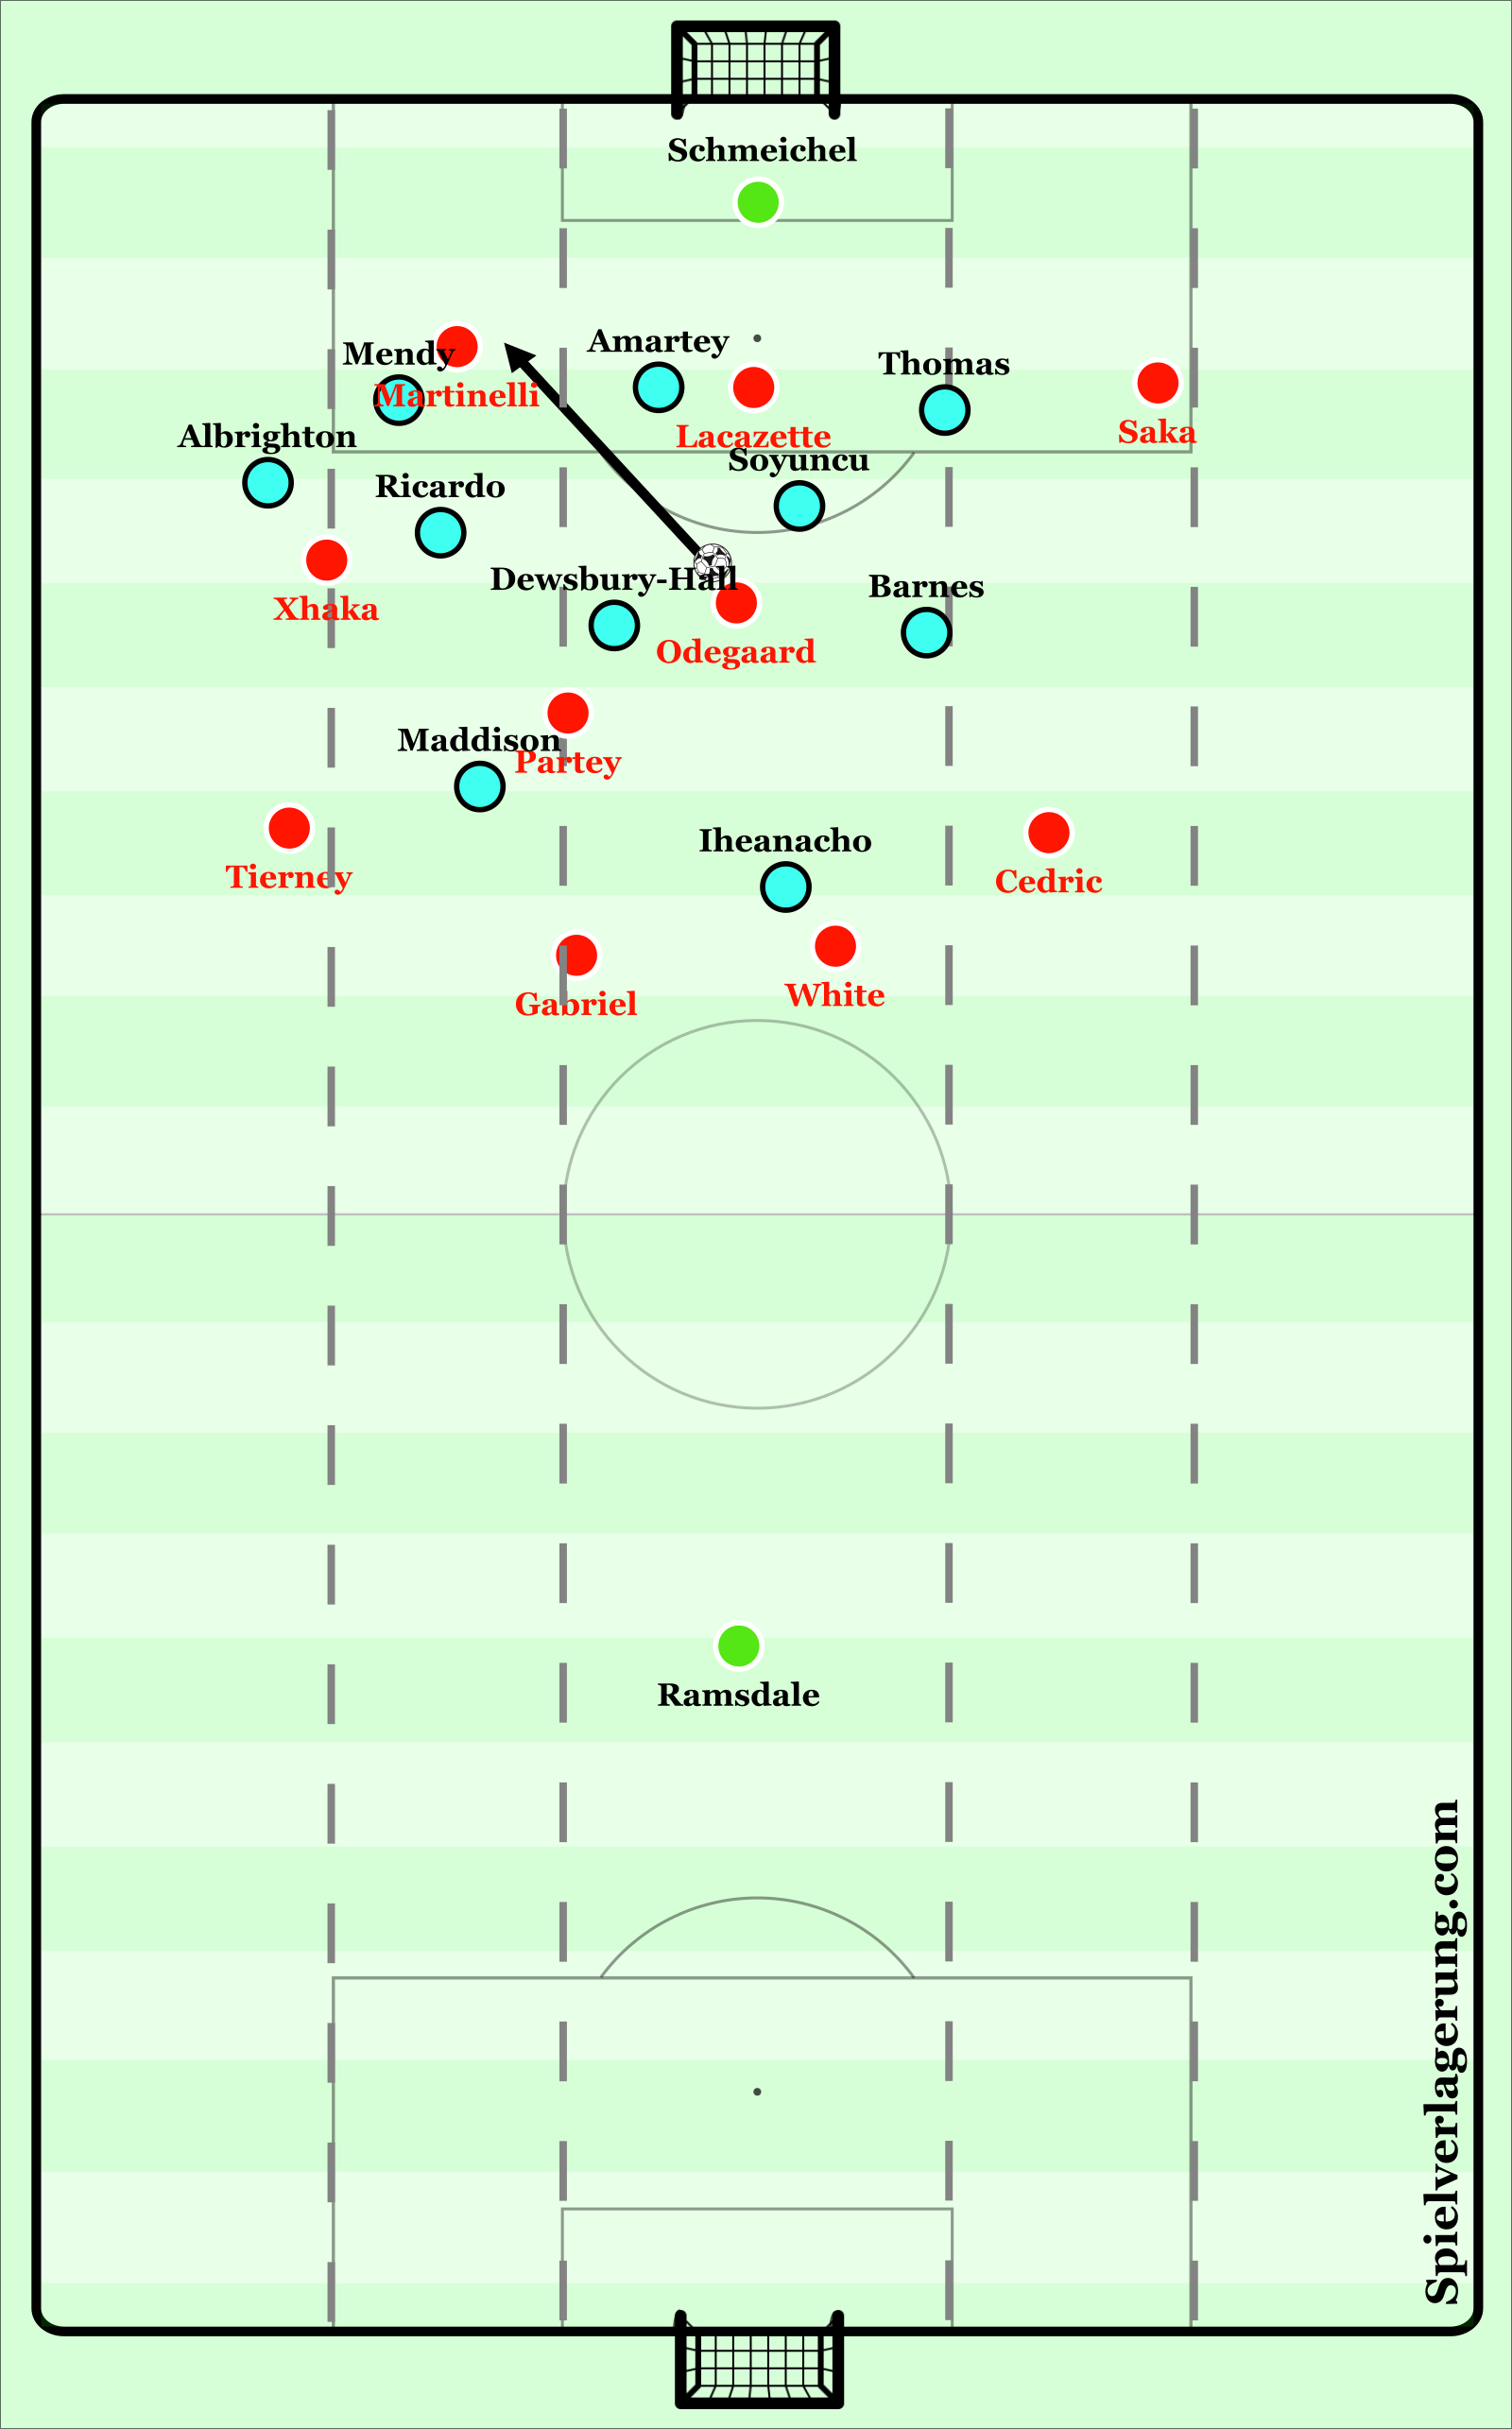
An example of this is shown below against Leicester, with Arsenal set-up in a conventional 4-3-3 build-up structure. Upon Ramsdale playing into White, Lacazette uses this as a trigger to drift into the vacant space between Leicester’s central-defenders and central-midfielders. To create the scenario for this, Xhaka and Odegaard position themselves wider within their respective half-spaces, ensuring that space is created between Mendy and Dewsbury-Hall, Mendy and Dewsbury-Hall could have remained narrower and more compact, and perhaps they should have, though Arsenal would have likely penetrated with a diagonal pass outside the duo or rather play around Leicester’s structure to progress. Further away from the ball, Saka and Martinelli position themselves high and wide yet again to stretch Leicester’s structure and create space for more direct runs in behind (to be covered later on). Meanwhile, Gabriel supports the ball-player White to play around Maddison if needed, whilst Tierney and Cedric retain width, again to stretch Leicester’s 4-4-2 out of possession structure horizontally.
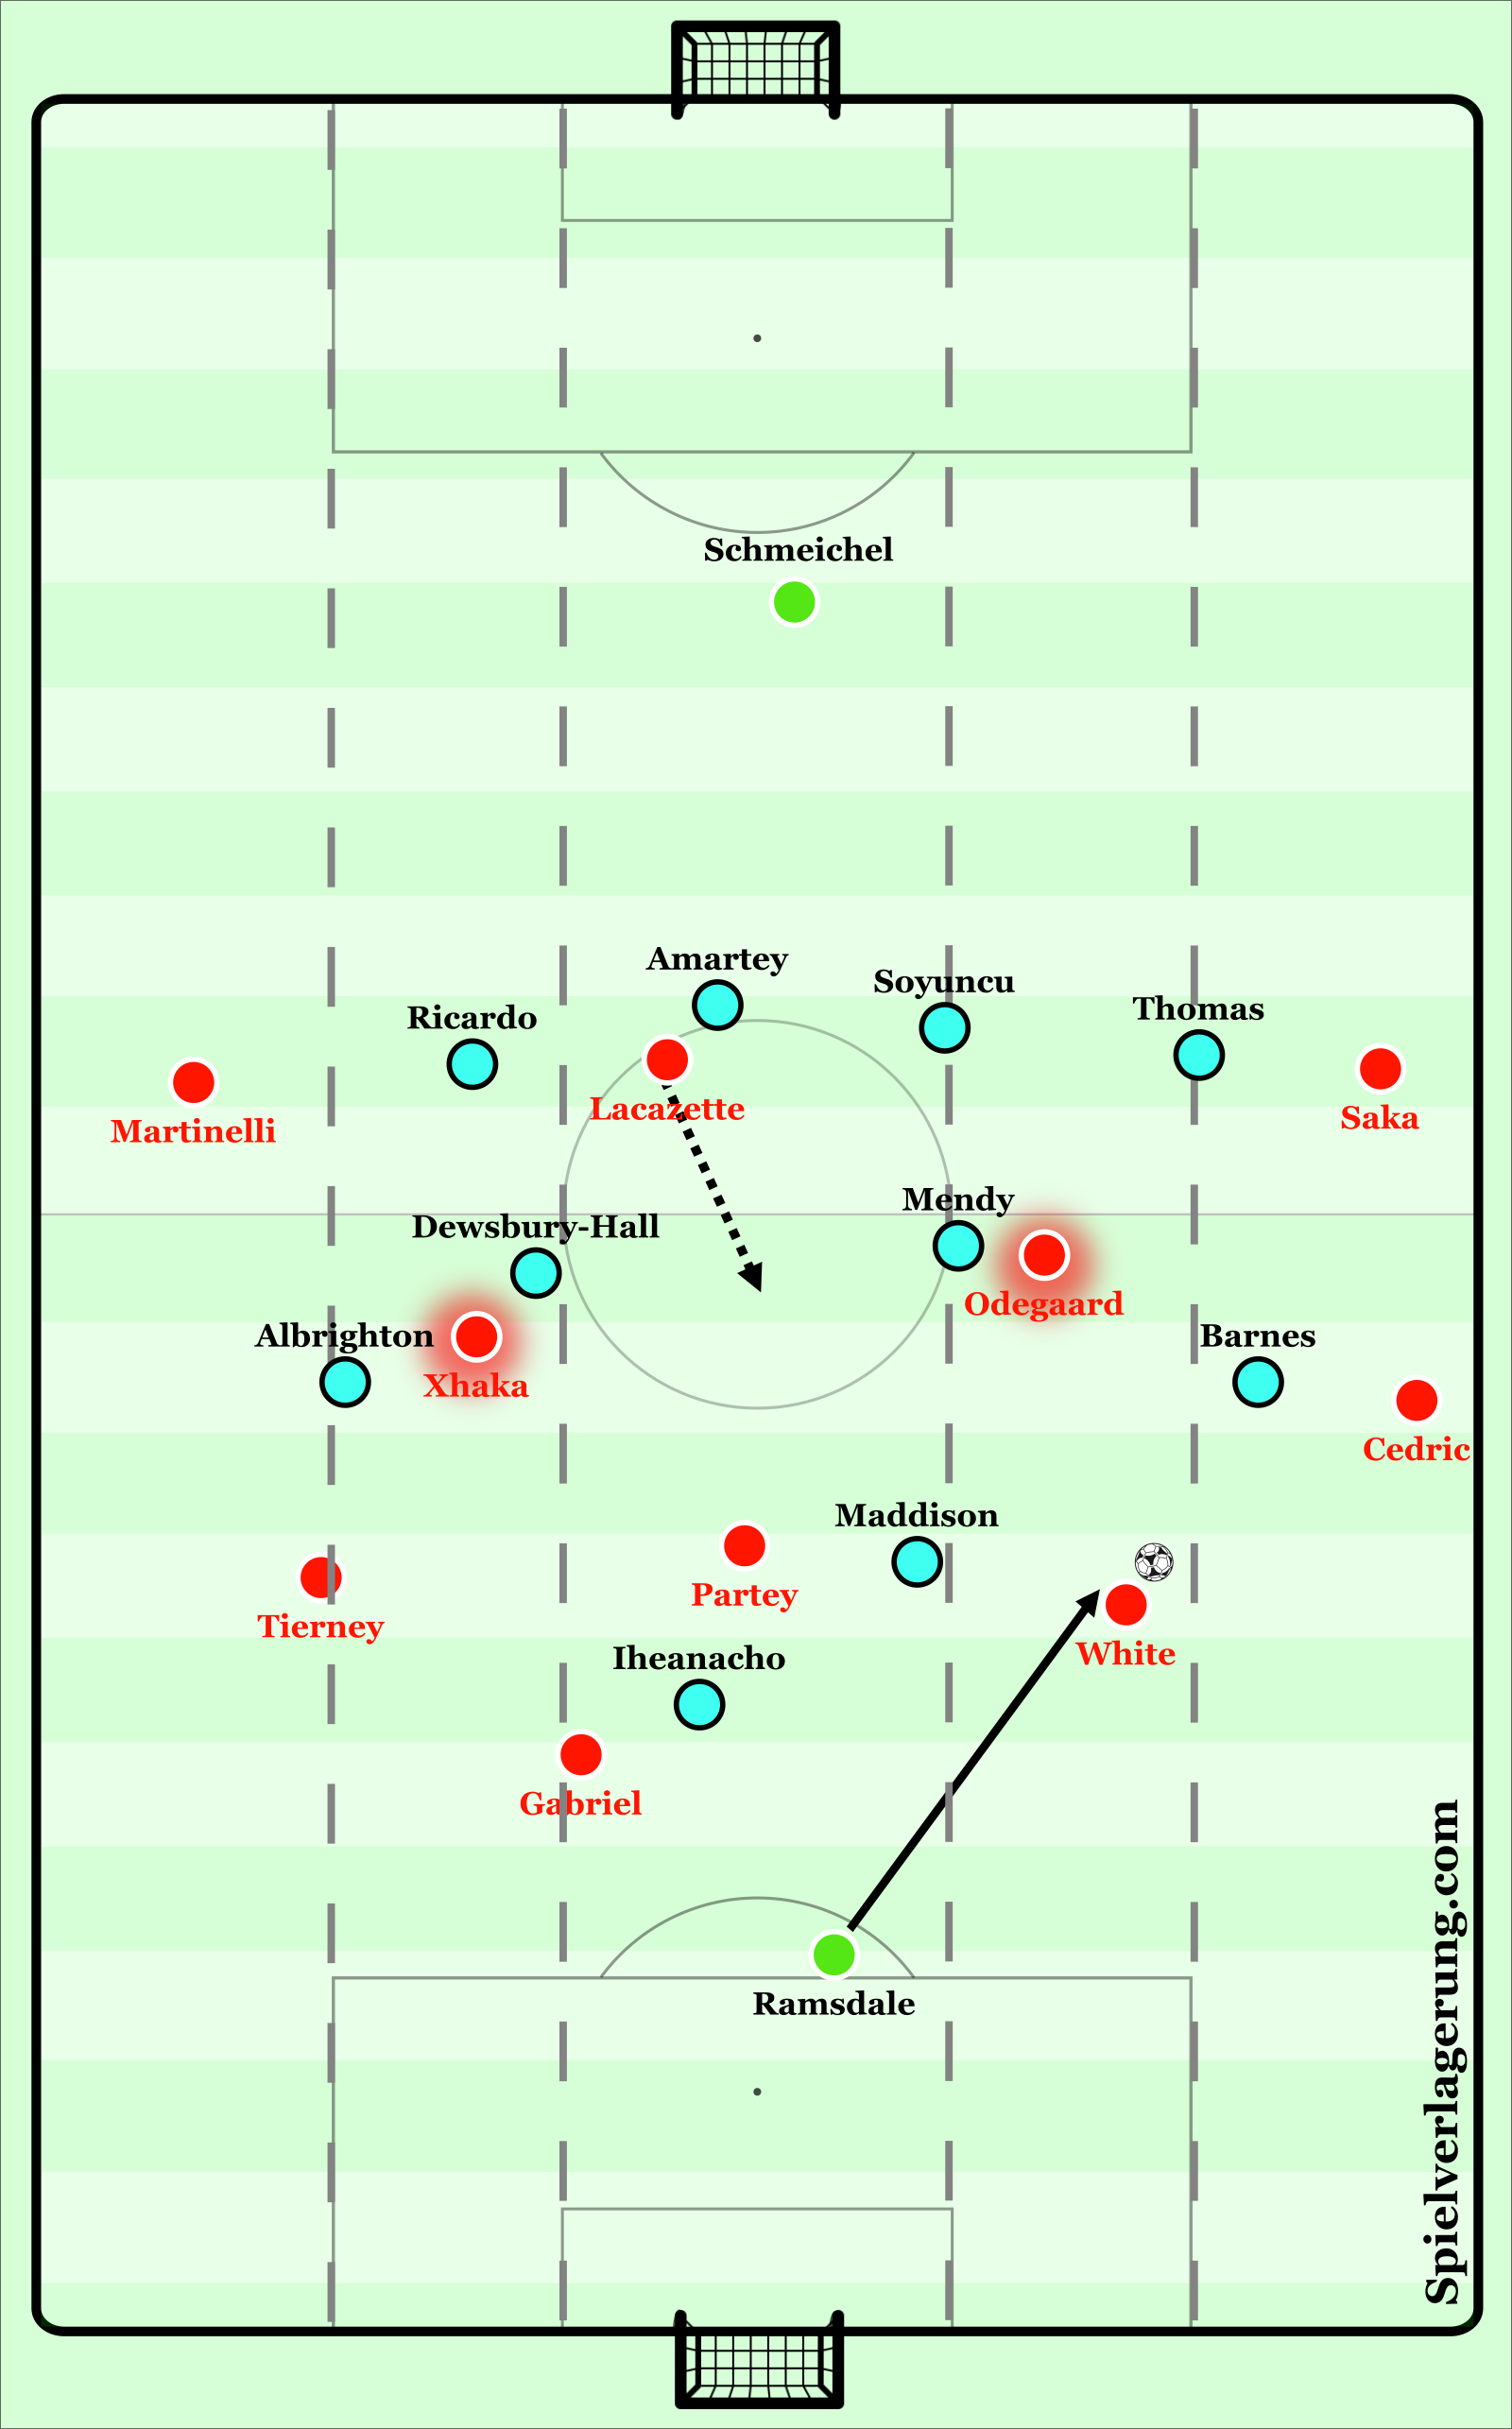
Therefore, upon Lacazette receiving Arsenal had successfully manipulated Leicester’s structure to play into and penetrate their midfield. Although, their progress in this example was limited due to Amartey’s aggressive pressing restricting the ability to immediately turn and progress. If Amartey had been more hesitant and remained alongside Soyuncu, it may have presented the opportunity for Arsenal to play directly into forward runs by Martinelli or Saka. This meant Arsenal were limited to a quick combination that allowed them to retain possession in the midfield-third in the immediate follow-up to this action.
However, Arsenal’s insistence on playing out under pressure has put them into some precarious situations at times, though the risks are most often worth the rewards in creating space within the second and third lines higher up the pitch. An unsuccessful example of this is against Manchester United, during one of the Red Devils more impressive and aggressive displays of Ralf Rangnick’s tenure.
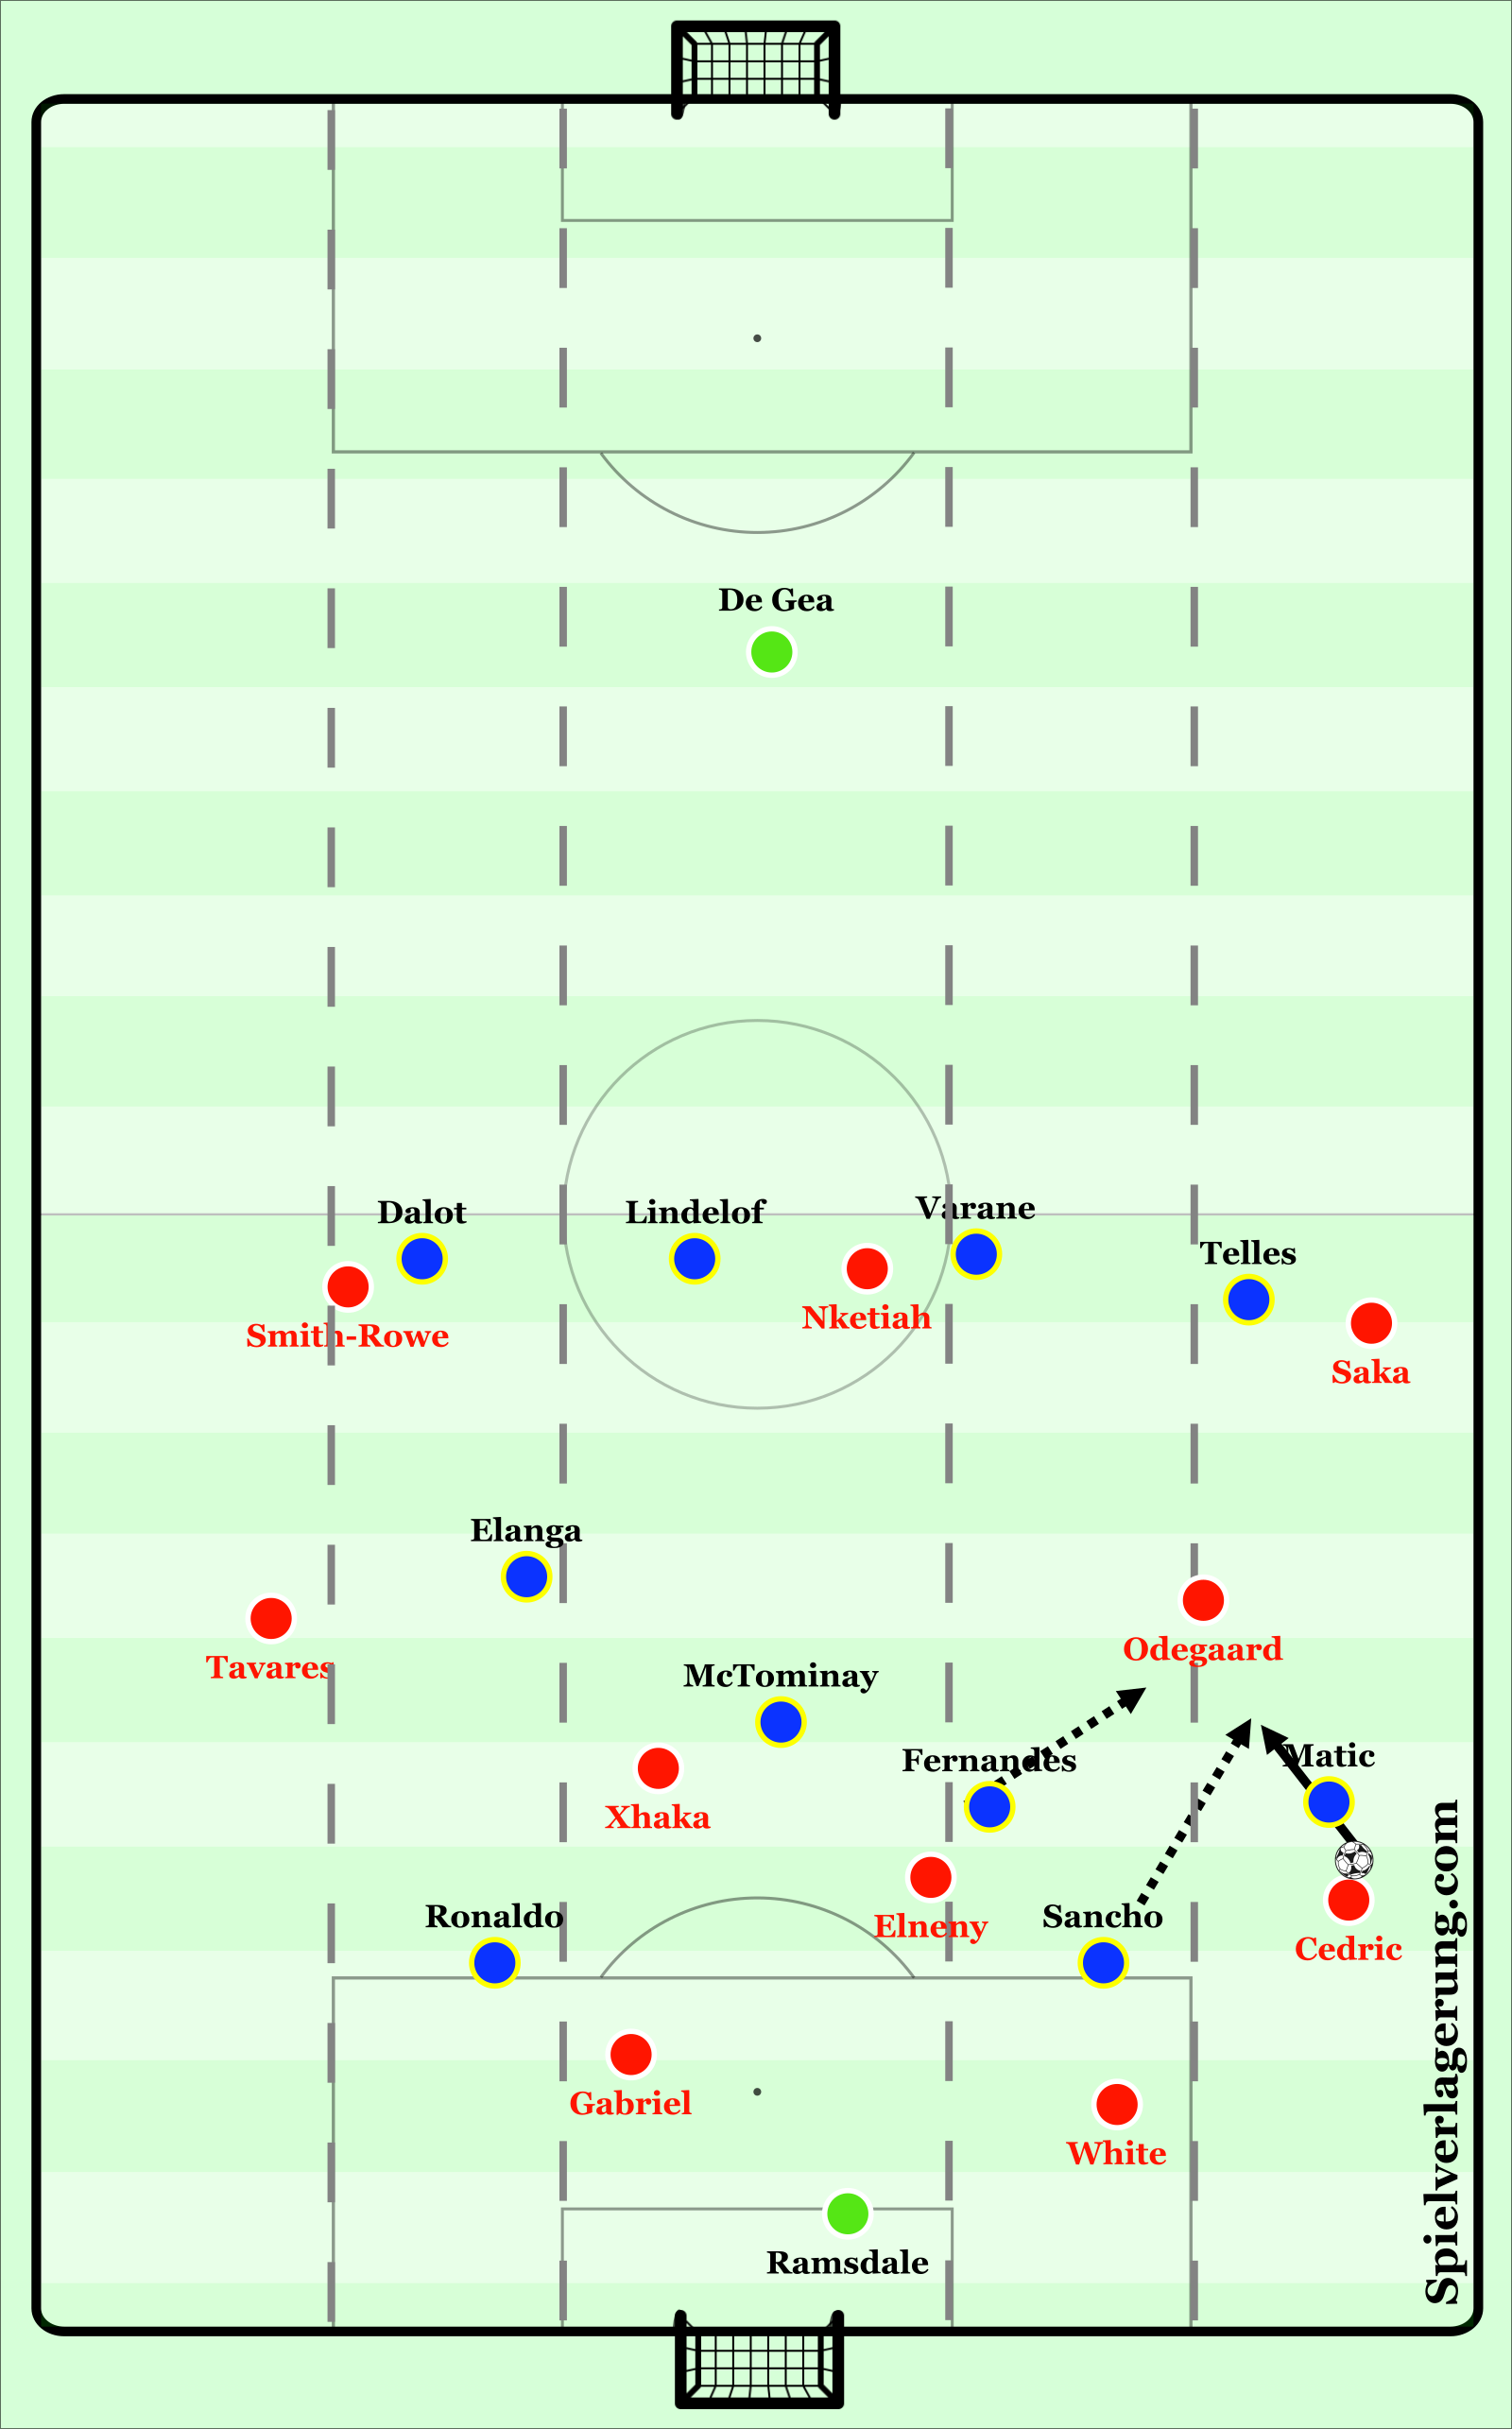
As shown below, Arsenal set-up in an expected structure; White and Gabriel split to receive, Cedric drops in on the near-side whilst Tavares pushes high and wide, Elneny drops in as the point-down to link play with Xhaka and Odegaard higher in their respective half-spaces, Saka, Nketiah & Smith-Rowe remain high to pin back United’s defensive line. Against, this United set up in an aggressive pressing structure, with their success residing in their ability to press intelligently upon triggers with key players both pressing and keeping higher passing options in their cover shadow. As shown below, following a prior bounce pass with White, Ramsdale again looked to play into White under intense first-man pressure from Fernandes. Upon the pass into White as a trigger, Sancho presses aggressively with a straight pressing run, ensuring that passing options into Odegaard and Cedric beyond are unavailable. Consequently, this forces a pass into Elneny, who is immediately pressed by McTominay in a similar fashion with Matic also providing second man pressure whilst maintaining Odegaard in his cover-shadow, only providing Cedric as an option to attempt to escape the press.

As the ball travels to Cedric, Matic presses as the nearest man with a curved pressing run to cut out Odegaard as a higher passing option. Similarly, Sancho and a slightly more delayed Fernandes recover directly to intercept this pass should Cedric be able to find a way to play into Odegaard. It is within this aspect that United’s press is effective, with the first phase of the press being efficient by cutting off passing lanes and forcing immediate pressure onto Arsenal’s back-line, though this is irrelevant should these secondary actions not be undertaken, as Arsenal would be able to escape as they intend to do.
However, Sancho does indeed intercept the attempted pass into Odegaard that just bypasses Matic and United successfully regained possession, launching a counter-attack with Ronaldo getting a shot away that could’ve led to a goal. Although, it should be raised that Cedric could have perhaps recognised the intentions of United’s press and disguised a pass back into White to escape this immediate pressure. In essence though, this captures the wider risks of playing out under intense pressure as presented, with the potential to concede possession in areas that quickly lead to opportunities for the opposition, yet it also highlights the benefits, as if the pass into Odegaard is successful it is clear the vast space Odegaard has to progress, which would create a dangerous attacking scenario (a 5v5 if you literally take the players on-line and in-front of Odegaard).
Favoured Attacking Patterns
As can be envisaged, Arsenal are fluid and flexible with their approaches to attacking play, with a large proportion of their favoured attacking patterns focused upon penetrating into the half-spaces through aptly positioned wide-triangles and overloads across the half-spaces and widest lanes of the pitch.
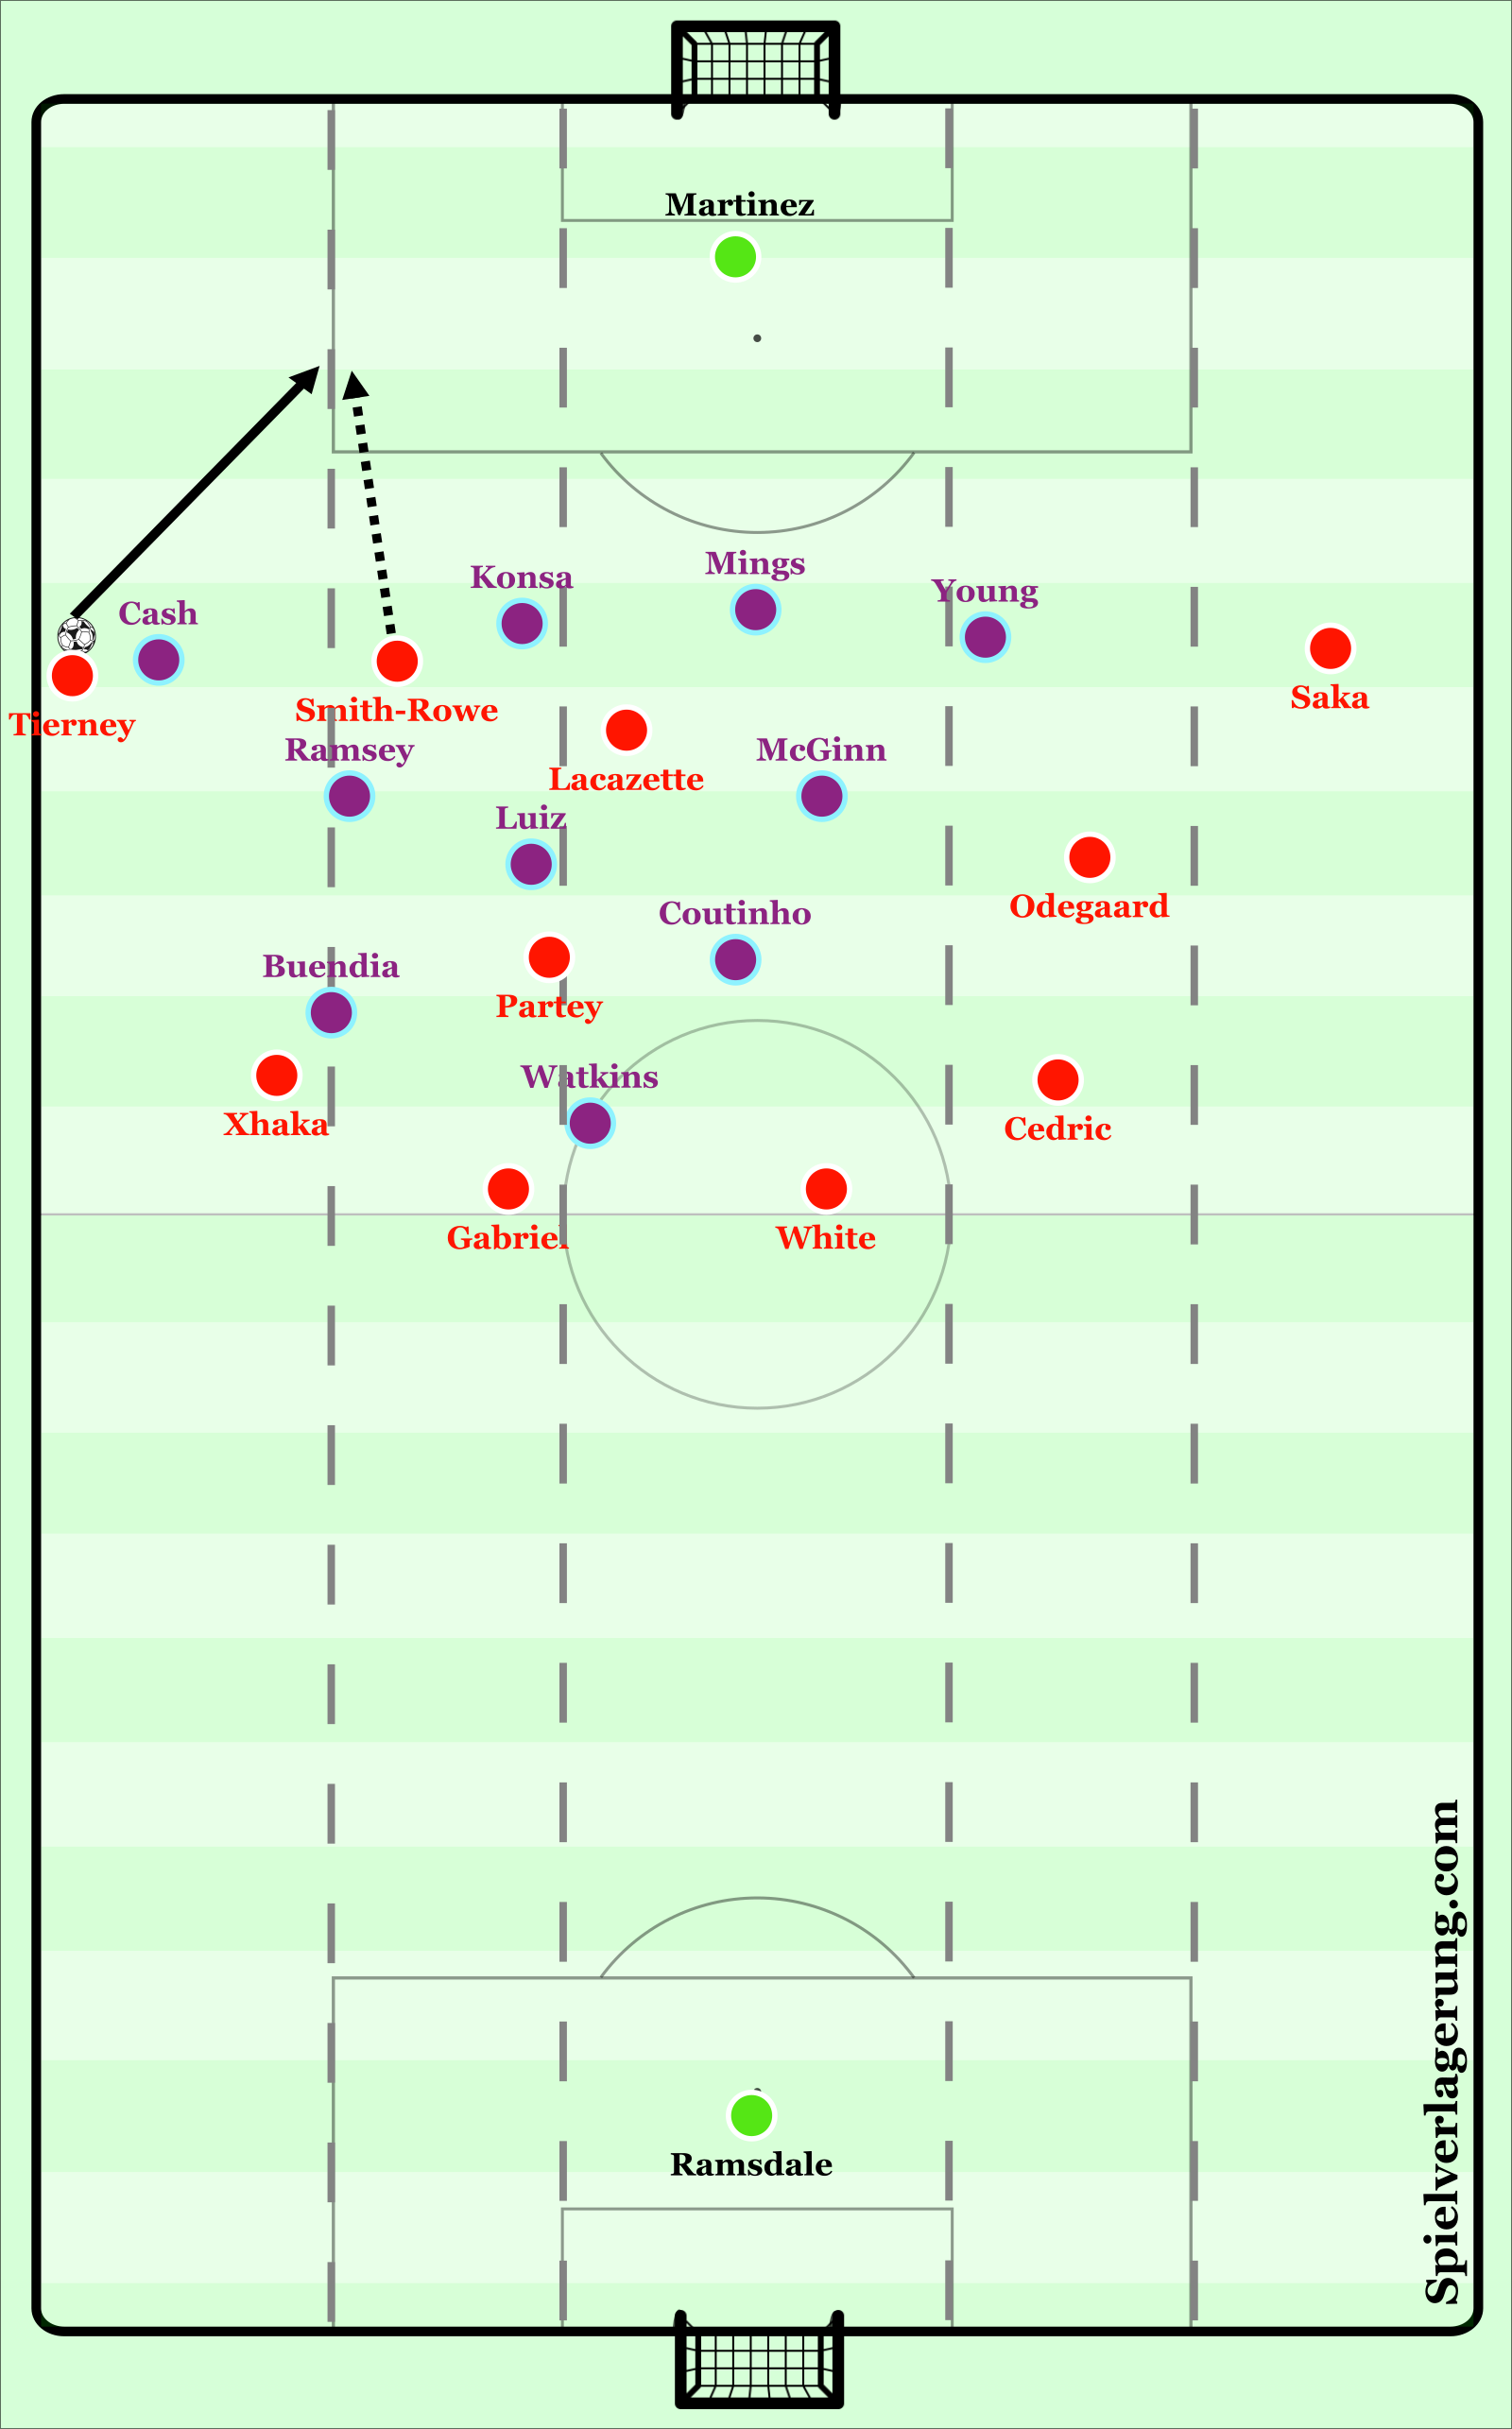
One of the most simplistic examples of these movements and rotations in wide areas to penetrate half-spaces (outside of the basic forward runs into half-spaces from central players, e.g. Odegaard) can be seen against Aston Villa below. Following a pass from Gabriel into Xhaka who has dropped into a temporary full-back role, rotating with Tierney as a trigger, Tierney makes a forward run to take up a position high and wide within the widest lane beyond the shoulder of Ramsey, whilst Smith-Rowe rolls inside into the half-space to ensure he remains on a different line to Tierney as another option to penetrate Villa’s midfield line. This enables Arsenal an opportunity to progress and similarly to Arsenal’s build-up against Villa poses a problem for Ramsey, as if he follows Tierney’s run, Xhaka can play directly into Smith-Rowe within the half-space to penetrate and allow progression towards Villa’s defensive line, whereas if he remains, which subsequently occurs, Xhaka’s pass into Tierney will create a 2v1 against Cash as Tierney’s receiving position beyond Ramsey’s shoulder will ensure Villa’s midfield line will be bypassed with a successful pass into Tierney.

Upon Tierney receiving, Cash is drawn towards possession, and this allows Smith-Rowe to make a forward run inside and beyond Cash to successfully penetrate the half-space within the penalty area upon Tierney’s pass into him, completing this very basic example of Arsenal’s movement to penetrate beyond Villa’s defensive line within the half-space. This consequently allows Smith-Rowe to cut-back to Lacazette, who unfortunately struggles to get his shot away, losing a good opportunity for Arsenal to create and/or score.
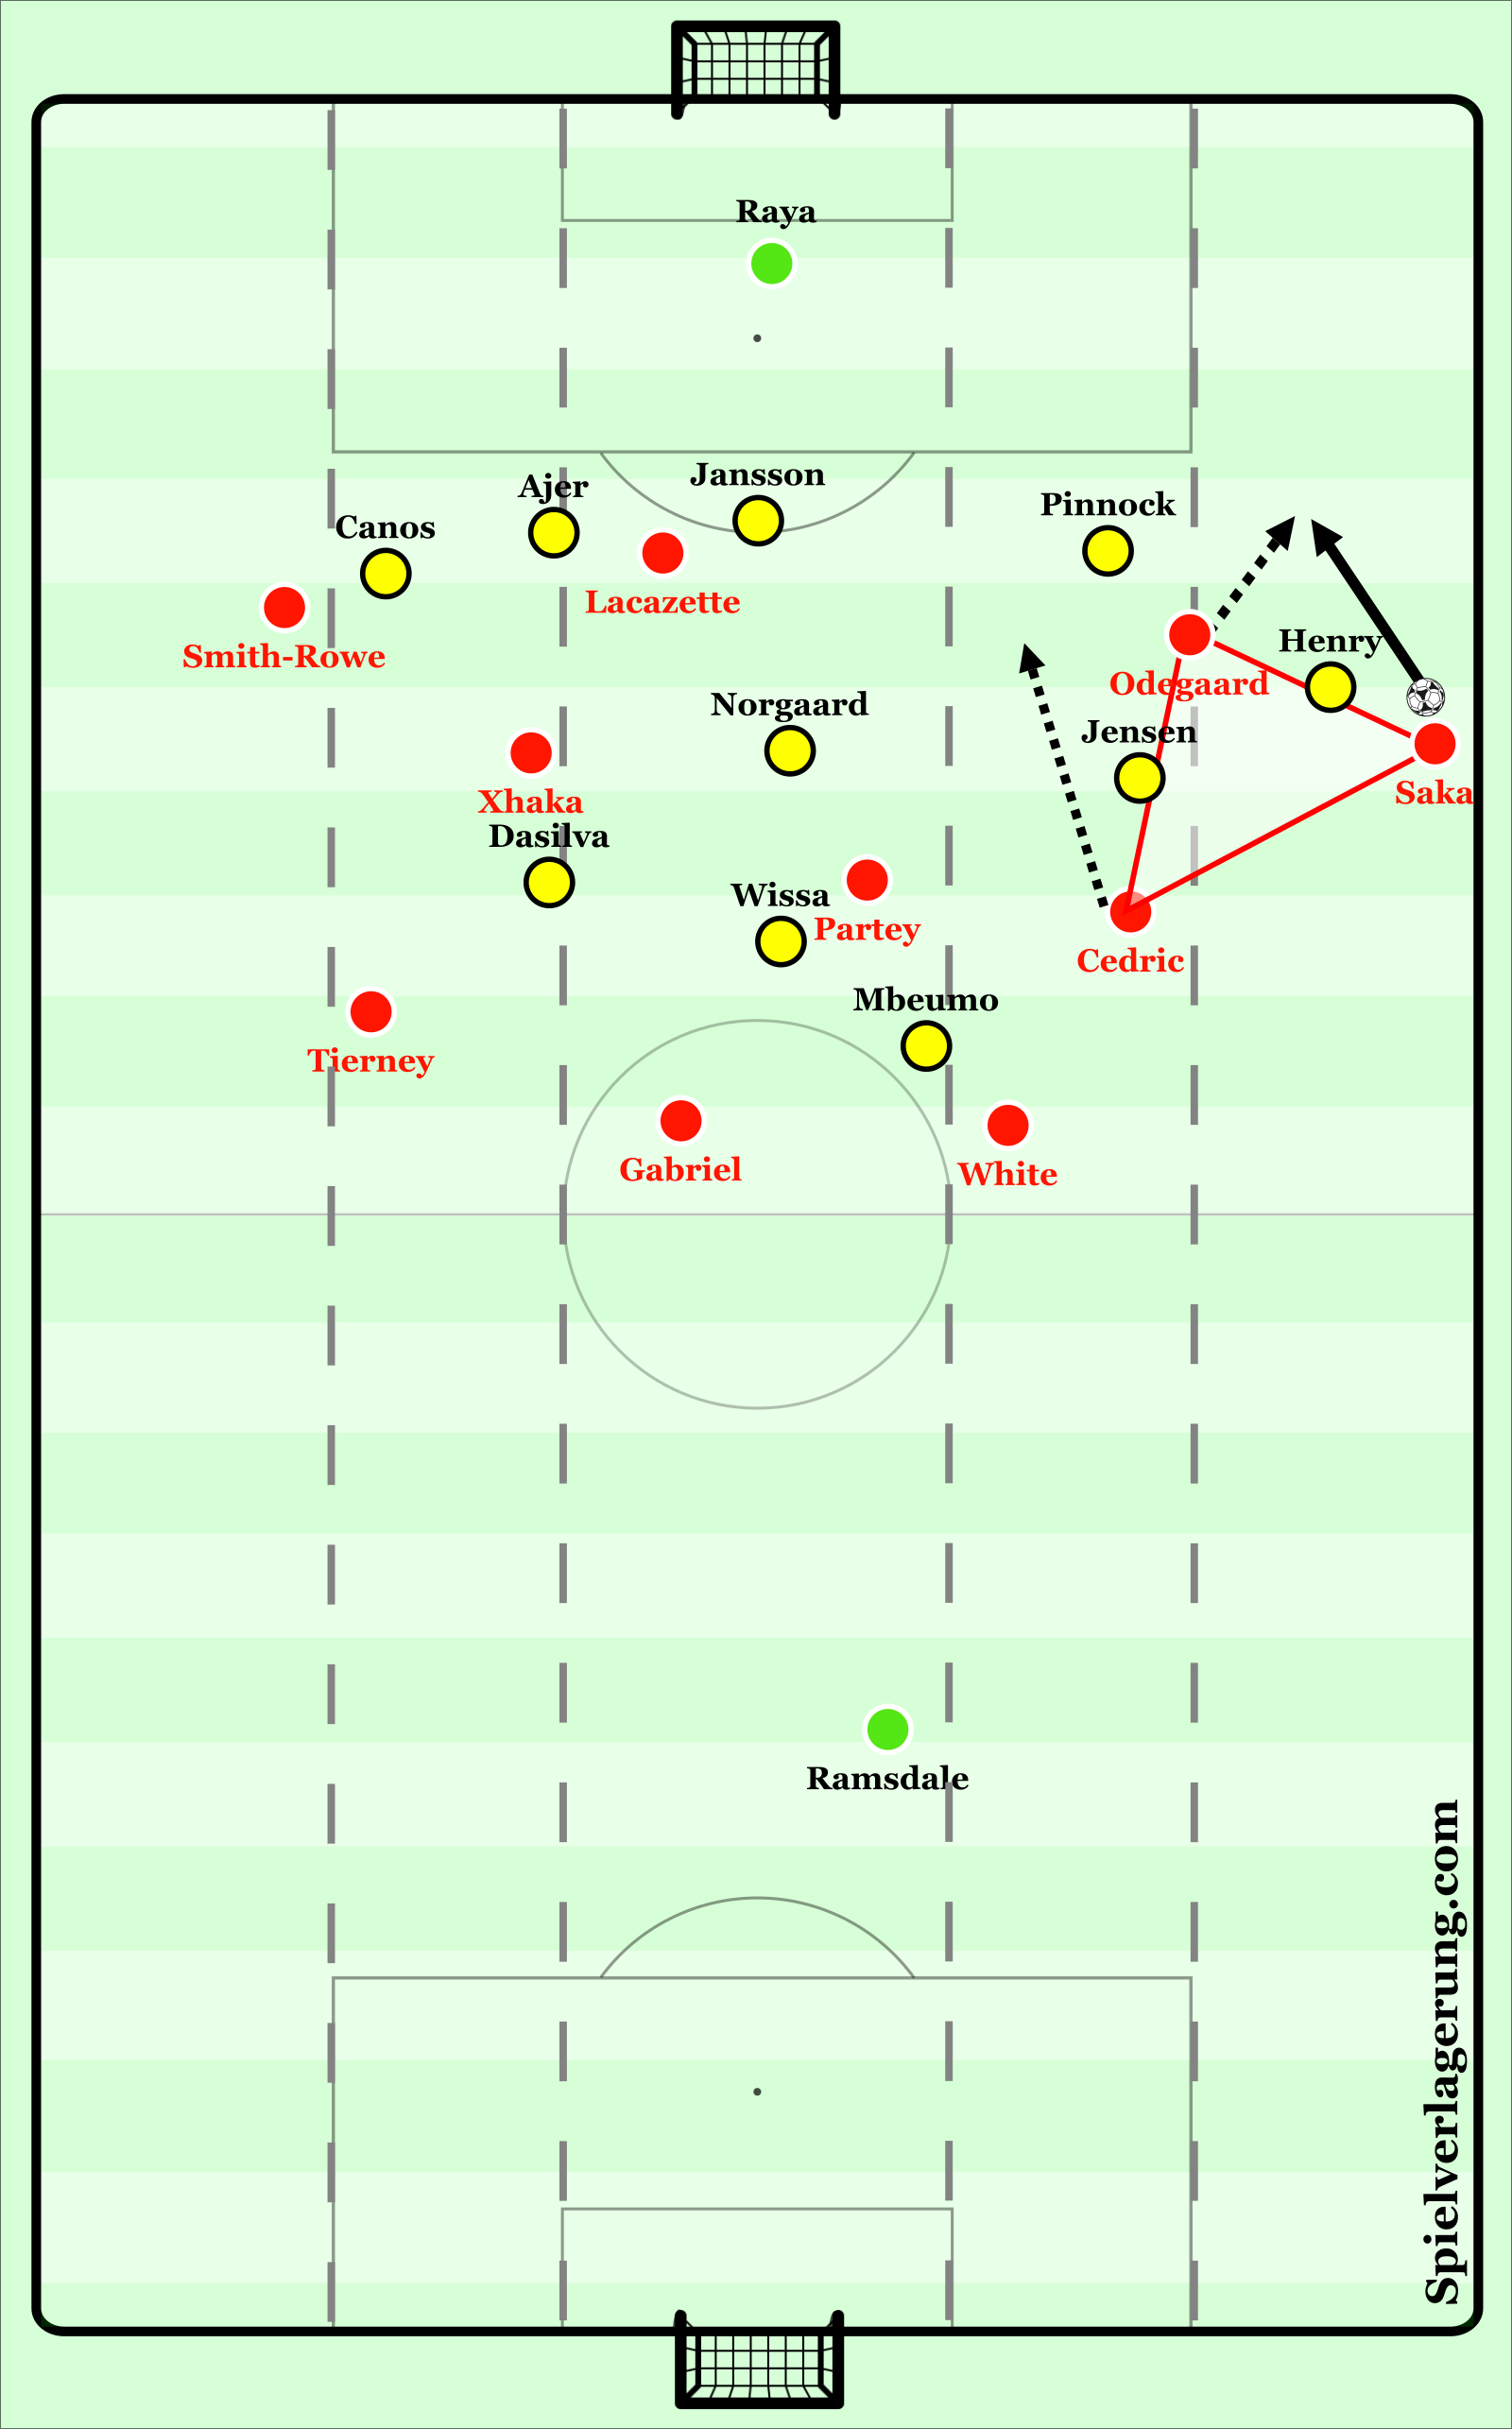
Another prime example of this initial structure is shown against Brentford below. With Saka in possession in the widest lane, Odegaard takes up a position as the higher player on the cusp on the half-space and widest lane, whilst Cedric completes the wide triangle in a deeper position within the half-space. When possession is on the opposite side, this wide triangle is created by Tierney, Xhaka and Smith-Rowe (LB, LW & LCM). Meanwhile, Gabriel and White secure defensive cover centrally (squeezing as high as possible in rest-defence, often deep into the opposition half when the situations are allowed by opposition ST’s dropping deeper), Partey sits as a point-down as an option to switch play, whilst Lacazette retains an option for central combinations on the opposite side of the second central-defender to isolate the nearest central-defender to the ball, retaining flexibility to drop in and combine as shown in the prior section.
Although taken literally in this example it creates a 3v3, it allows for fluidity and rotations to create a variety of follow-up actions enabling temporary overloads and aid penetration into the half-spaces within the final third. In this situation, Odegaard makes an underlapping run inside Henry, creating a temporary 2v1 against him, whilst Cedric makes a blind-side run as the 3rd man beyond Jensen. If Henry attempts to follow Odegaard, it provides a vacant passing lane to slide Cedric directly into the half-space, whilst if he faces up Saka it allows Odegaard to progress in the widest lane, of which the latter takes place with Saka playing into Odegaard beyond.
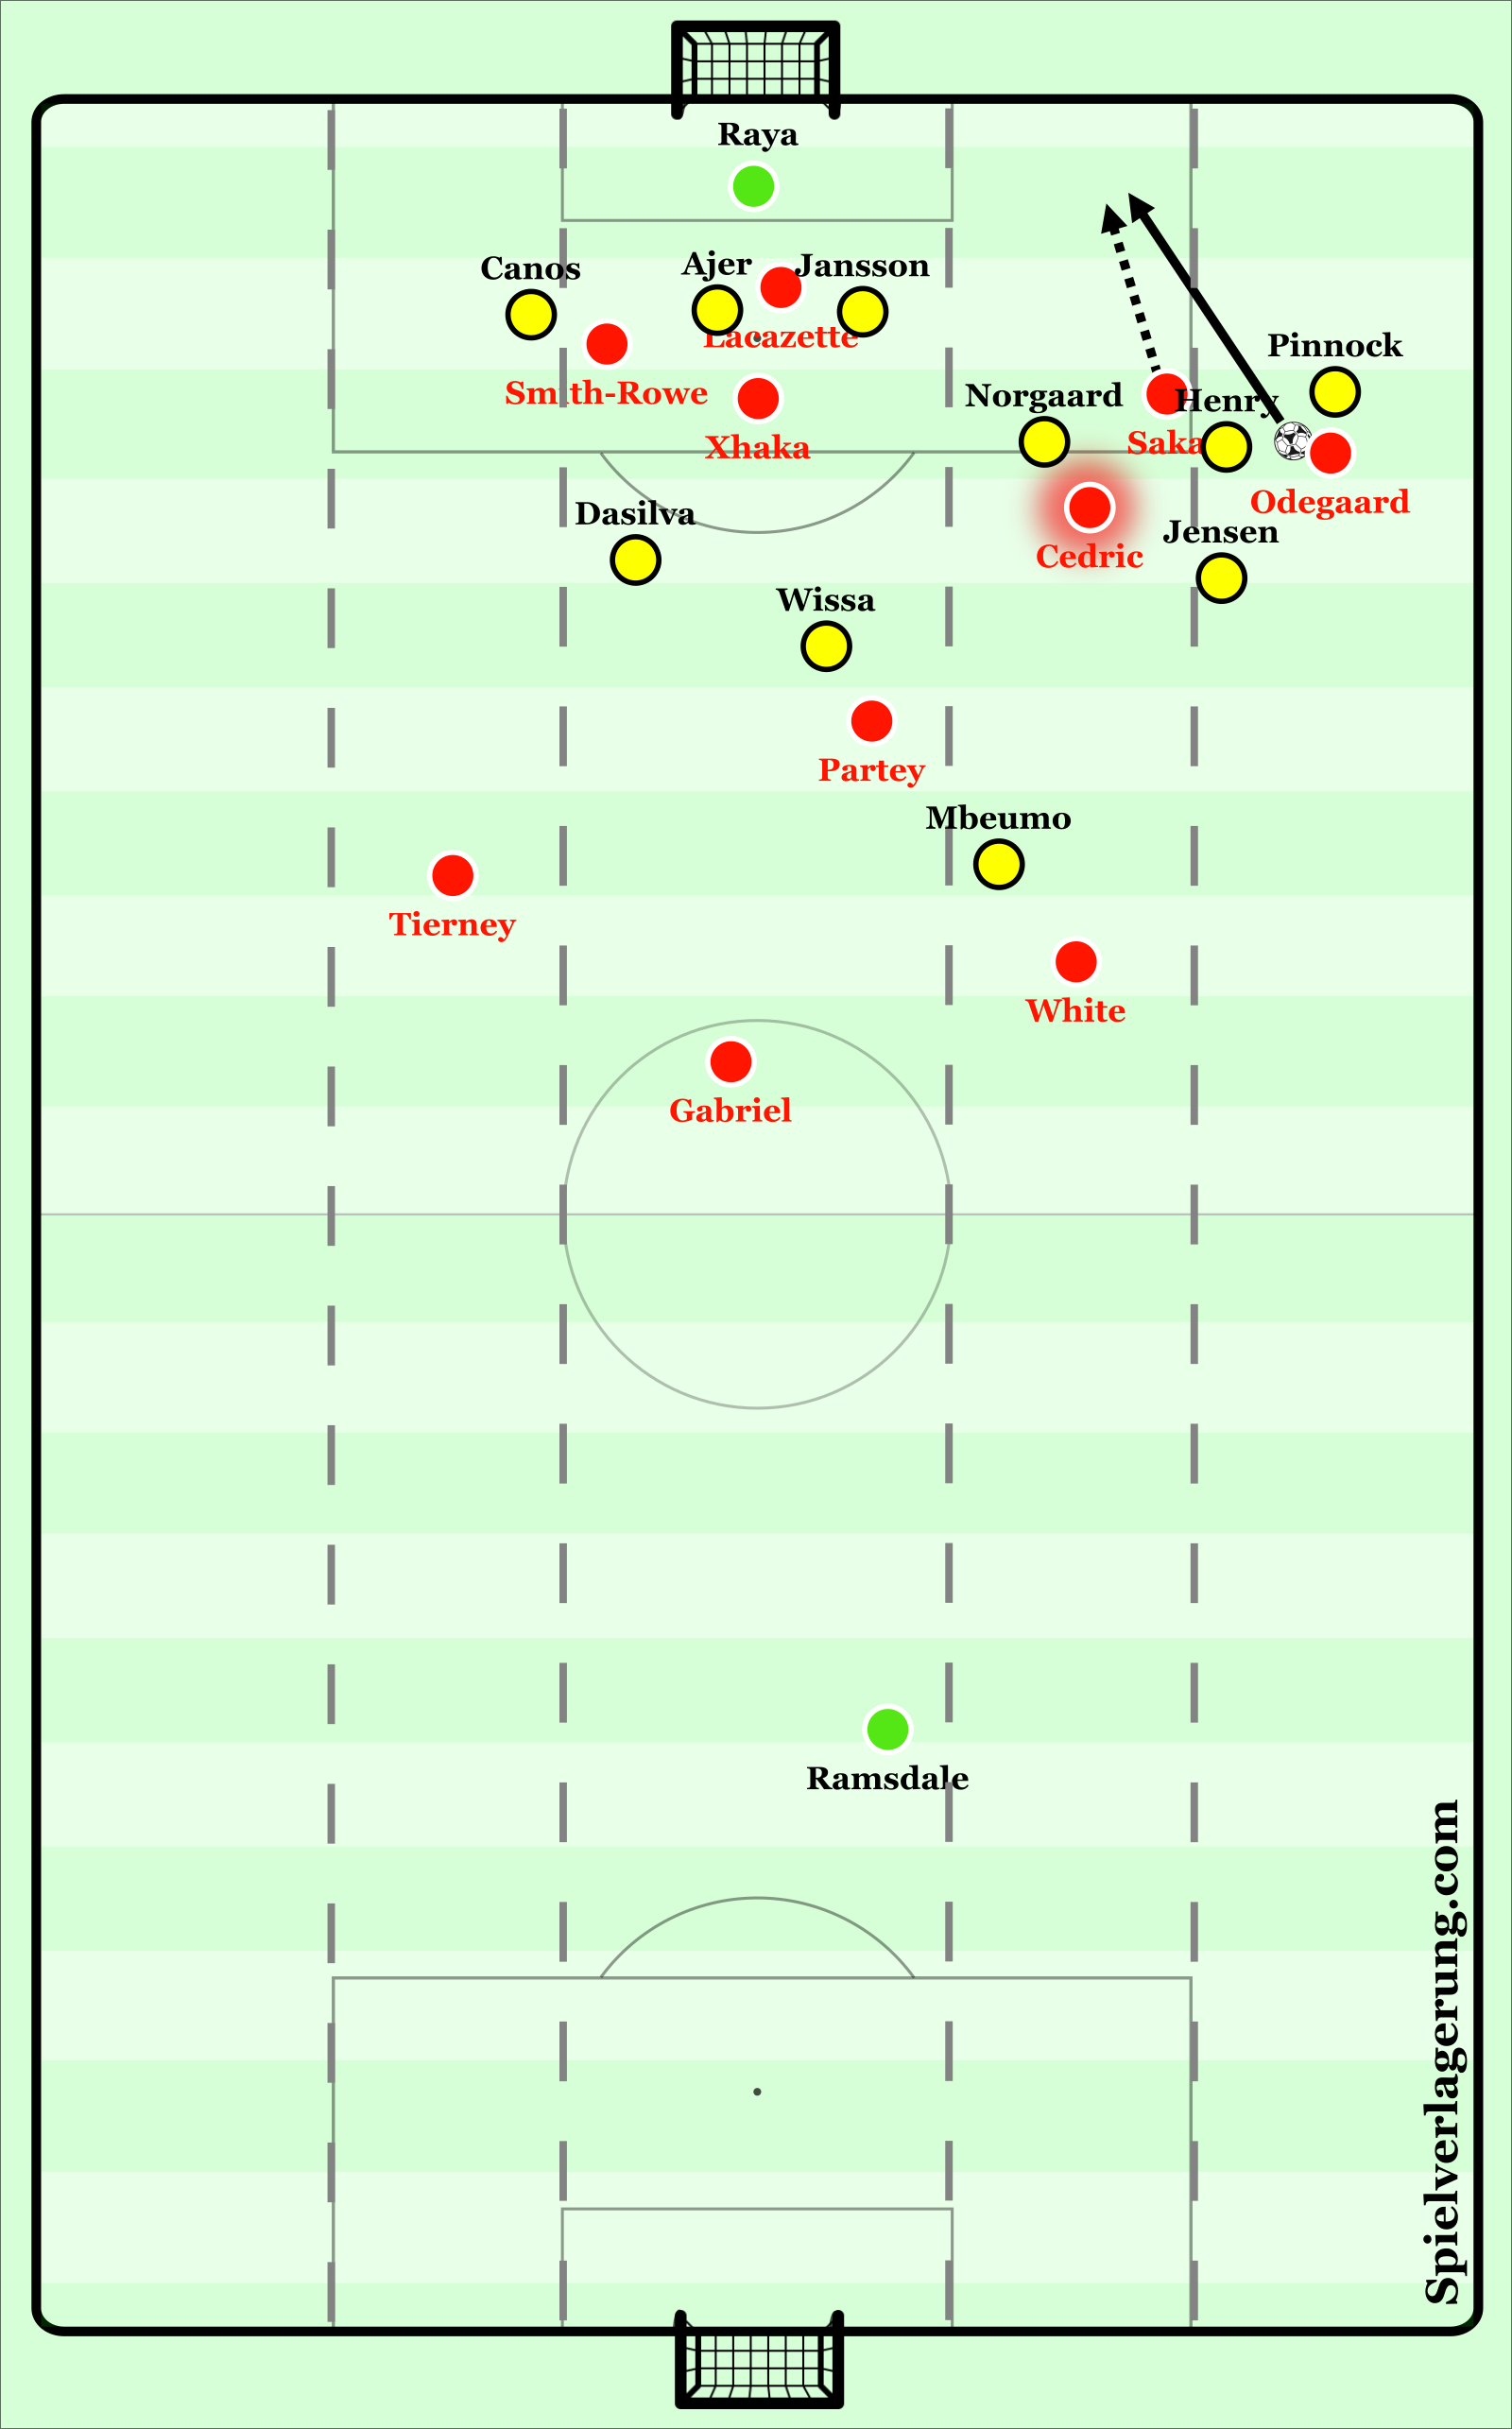
Using this as a trigger, Saka immediately makes a direct run inside Henry, using Henry’s hesitation following the pass into Odegaard as an opportunity to penetrate inside the half-space. Meanwhile, Cedric slows his run to avoid condensing the space Saka is looking to exploit and retains a position inside for a pass around the corner if Odegaard uses him as a combining player to play into Saka beyond. This allows Arsenal to progress into the penalty area, with Saka driving towards the byline before cutting back to Lacazette who’s shot is just blocked by Ajer. Likewise, this combination could have also been completed by Cedric making the highest run and Saka providing the supporting option inside, emphasising the flexibility within these wide triangles to progress and penetrate within the half-space. Upon Saka’s delivery, Xhaka and Smith-Rowe’s depth of attacking runs also highlight Arsenal’s attacking intent, with options at the near-post (Lacazette), centrally (Xhaka) and at the far-post (Smith-Rowe), presenting various options for the ball-player.
Arsenal have also utilised their wide players to make narrower 3rd man runs to penetrate within the half-spaces, as an alternative option to penetrate opponents’ defensive lines through more central combinations.
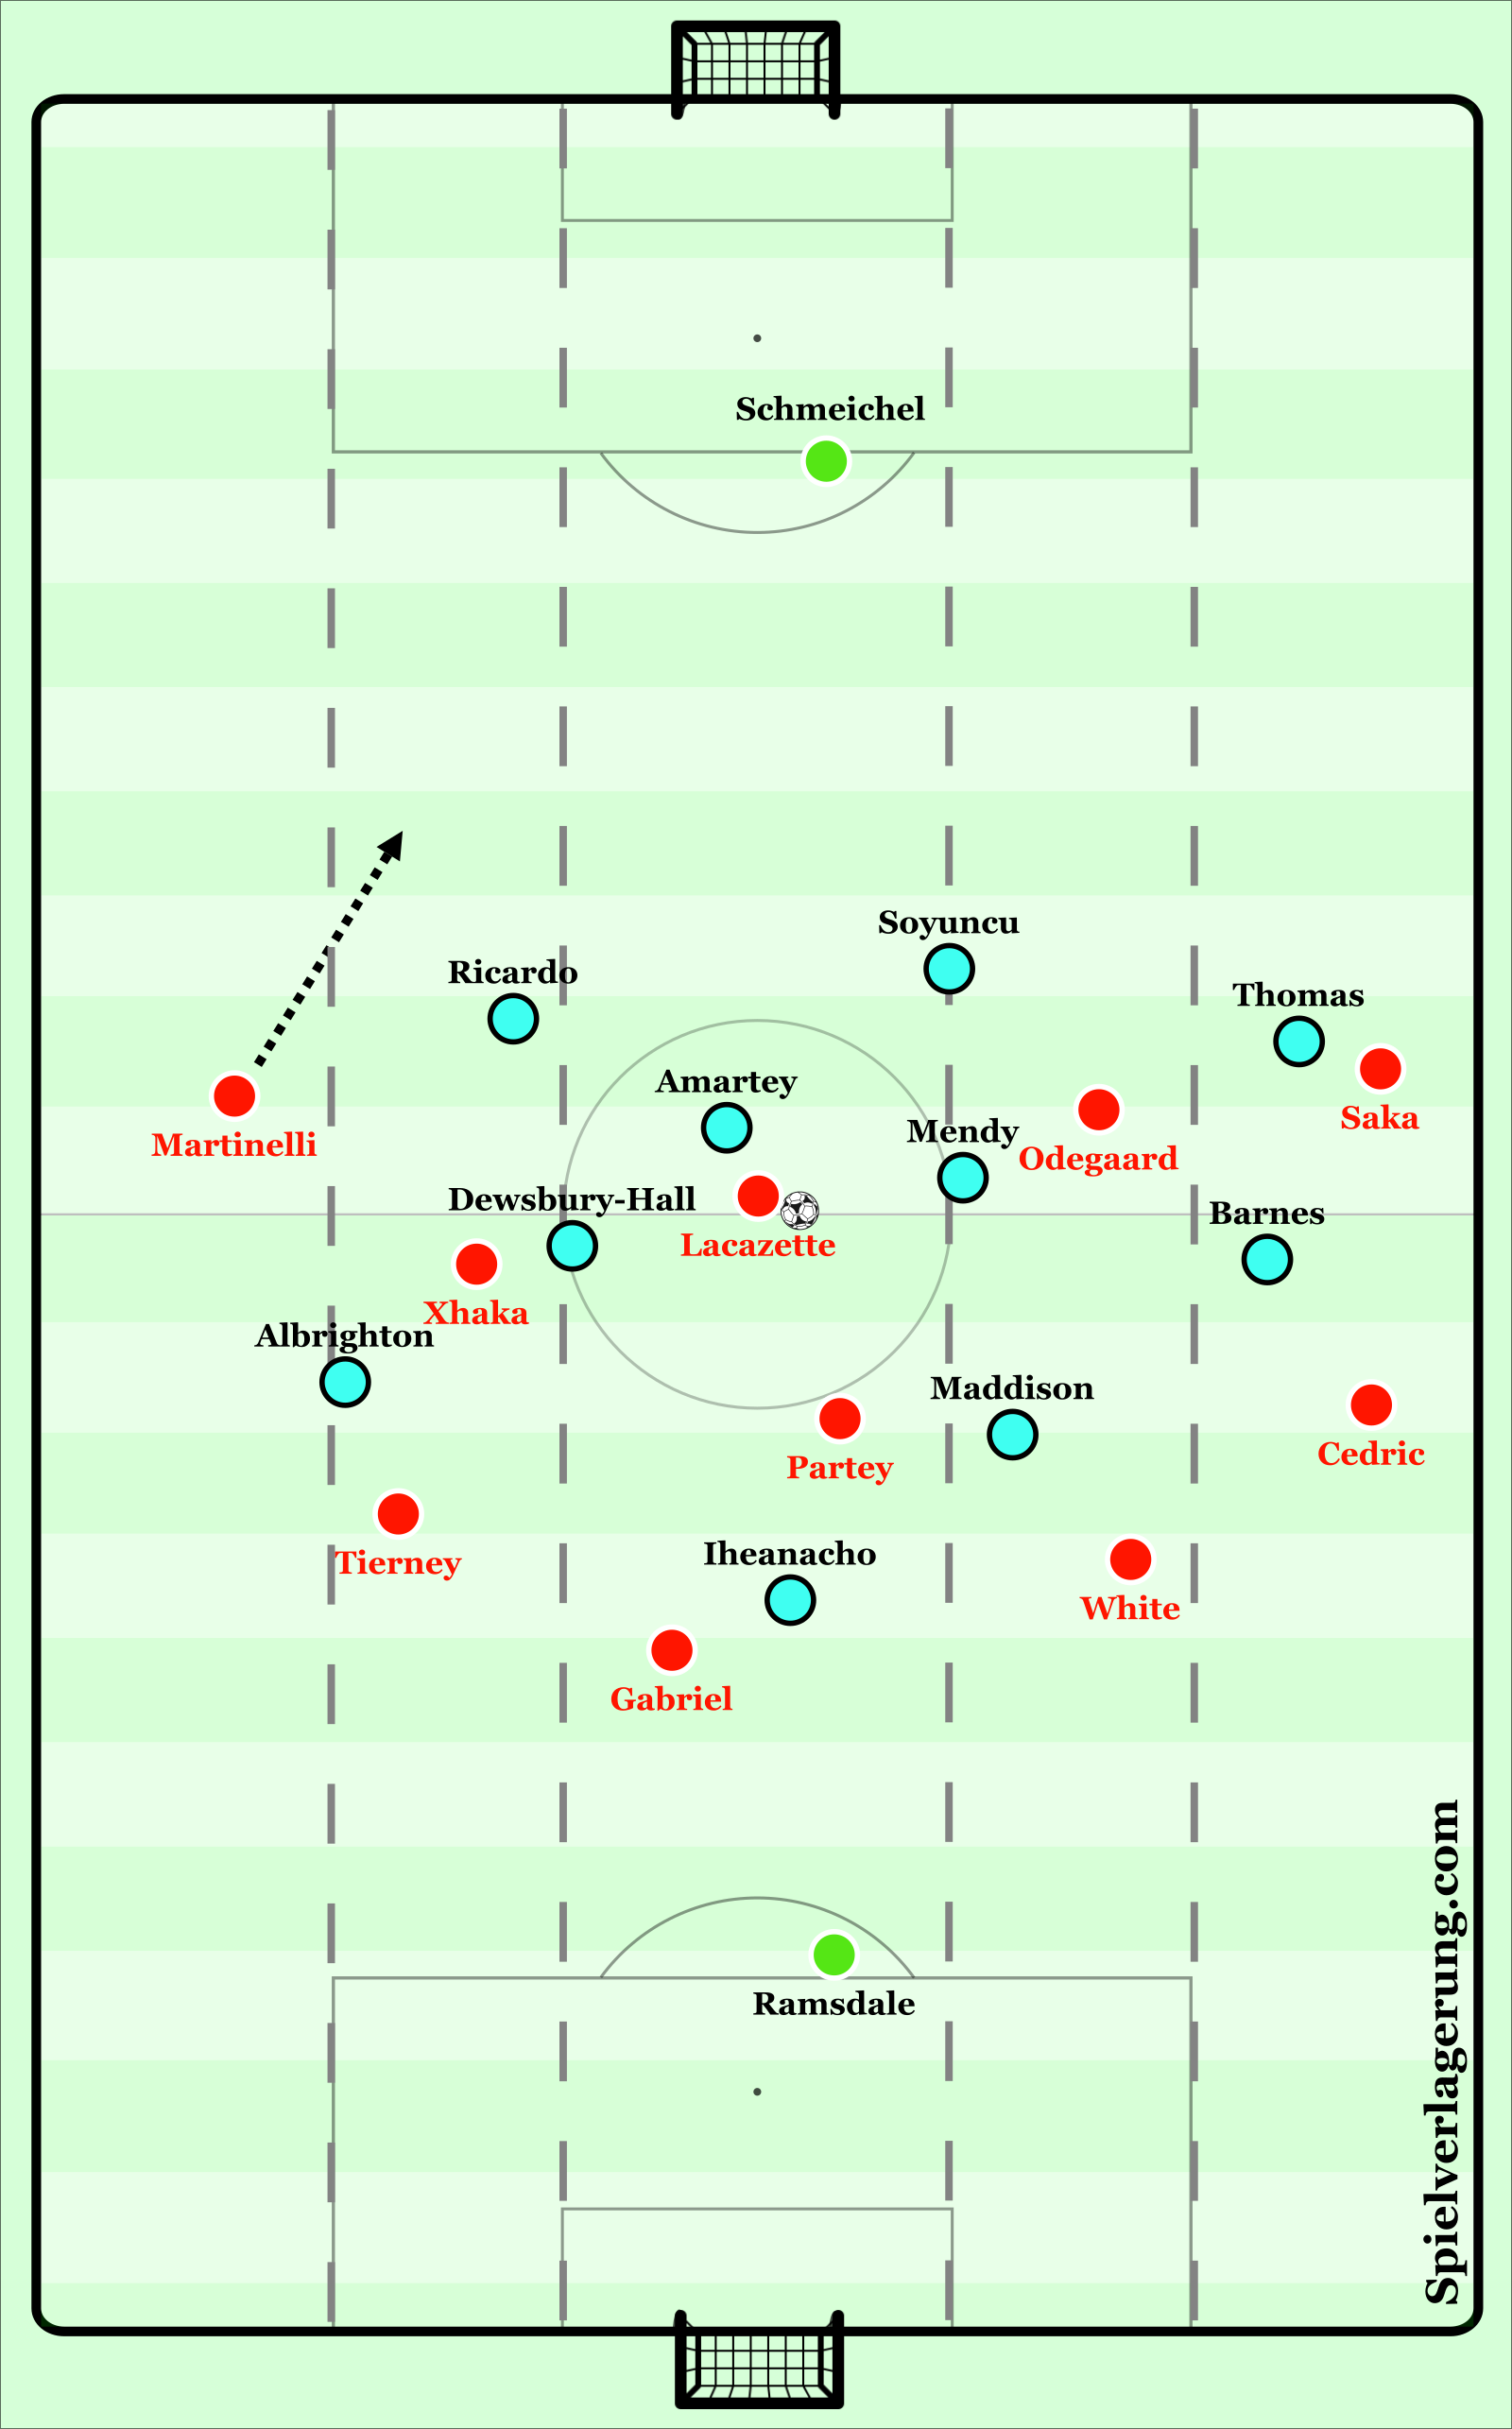
As displayed below, with Martinelli in possession in the widest lane, Arsenal have again created a wide triangle through Tierney supporting possession deeper and Xhaka on the cusp of the half-space. Away from this, importantly Odegaard has drifted into the central lane of the pitch and beyond the back shoulder of Dewsbury-Hall as an option to combine which he does at a later stage of this pattern, Lacazette fixes Leicester’s central-defensive pair to create the necessary space within the half-space and Partey secures a position as the point-down in midfield. Again, as a consistent theme of Arsenal’s play, the defensive line step higher into Leicester’s half to maintain a high resting defence position to counter-press and restrict Leicester’s ability to escape in transition.
In this scenario, Martinelli plays into Xhaka who makes a sharp movement and receive on the outside to free himself from Mendy who had been drawn from central areas to prevent Arsenal from creating a 2v1 in wide areas (as if he stayed central, Arsenal would be able to progress simply as in the above examples). Subsequently, upon Xhaka receiving he plays a square pass directly into Odegaard who has a vast amount of space considering his position on the edge of the box within the central lane, as Dewsbury-Hall is caught between covering the near-side and marking Xhaka, with Barnes too far away on the far-side to affect Odegaard, as he perhaps should have with the situation developing as it did. Meanwhile, following his initial pass into Xhaka, Martinelli begins to make a narrow 3rd man run to penetrate the half-space, reaching the inside of Mendy as shown by the time Odegaard is in possession.

As such, once Odegaard has received the ball, this allows him to slide Martinelli in following the completion of his 3rd man run, which would have successfully penetrated the half-space if Odegaard had released earlier or Martinelli curved/checked his run as he was caught marginally offside in this example. However, this example displays Arsenal’s flexibility to combine centrally should opponents look to double up and restrict direct progression in wide areas.
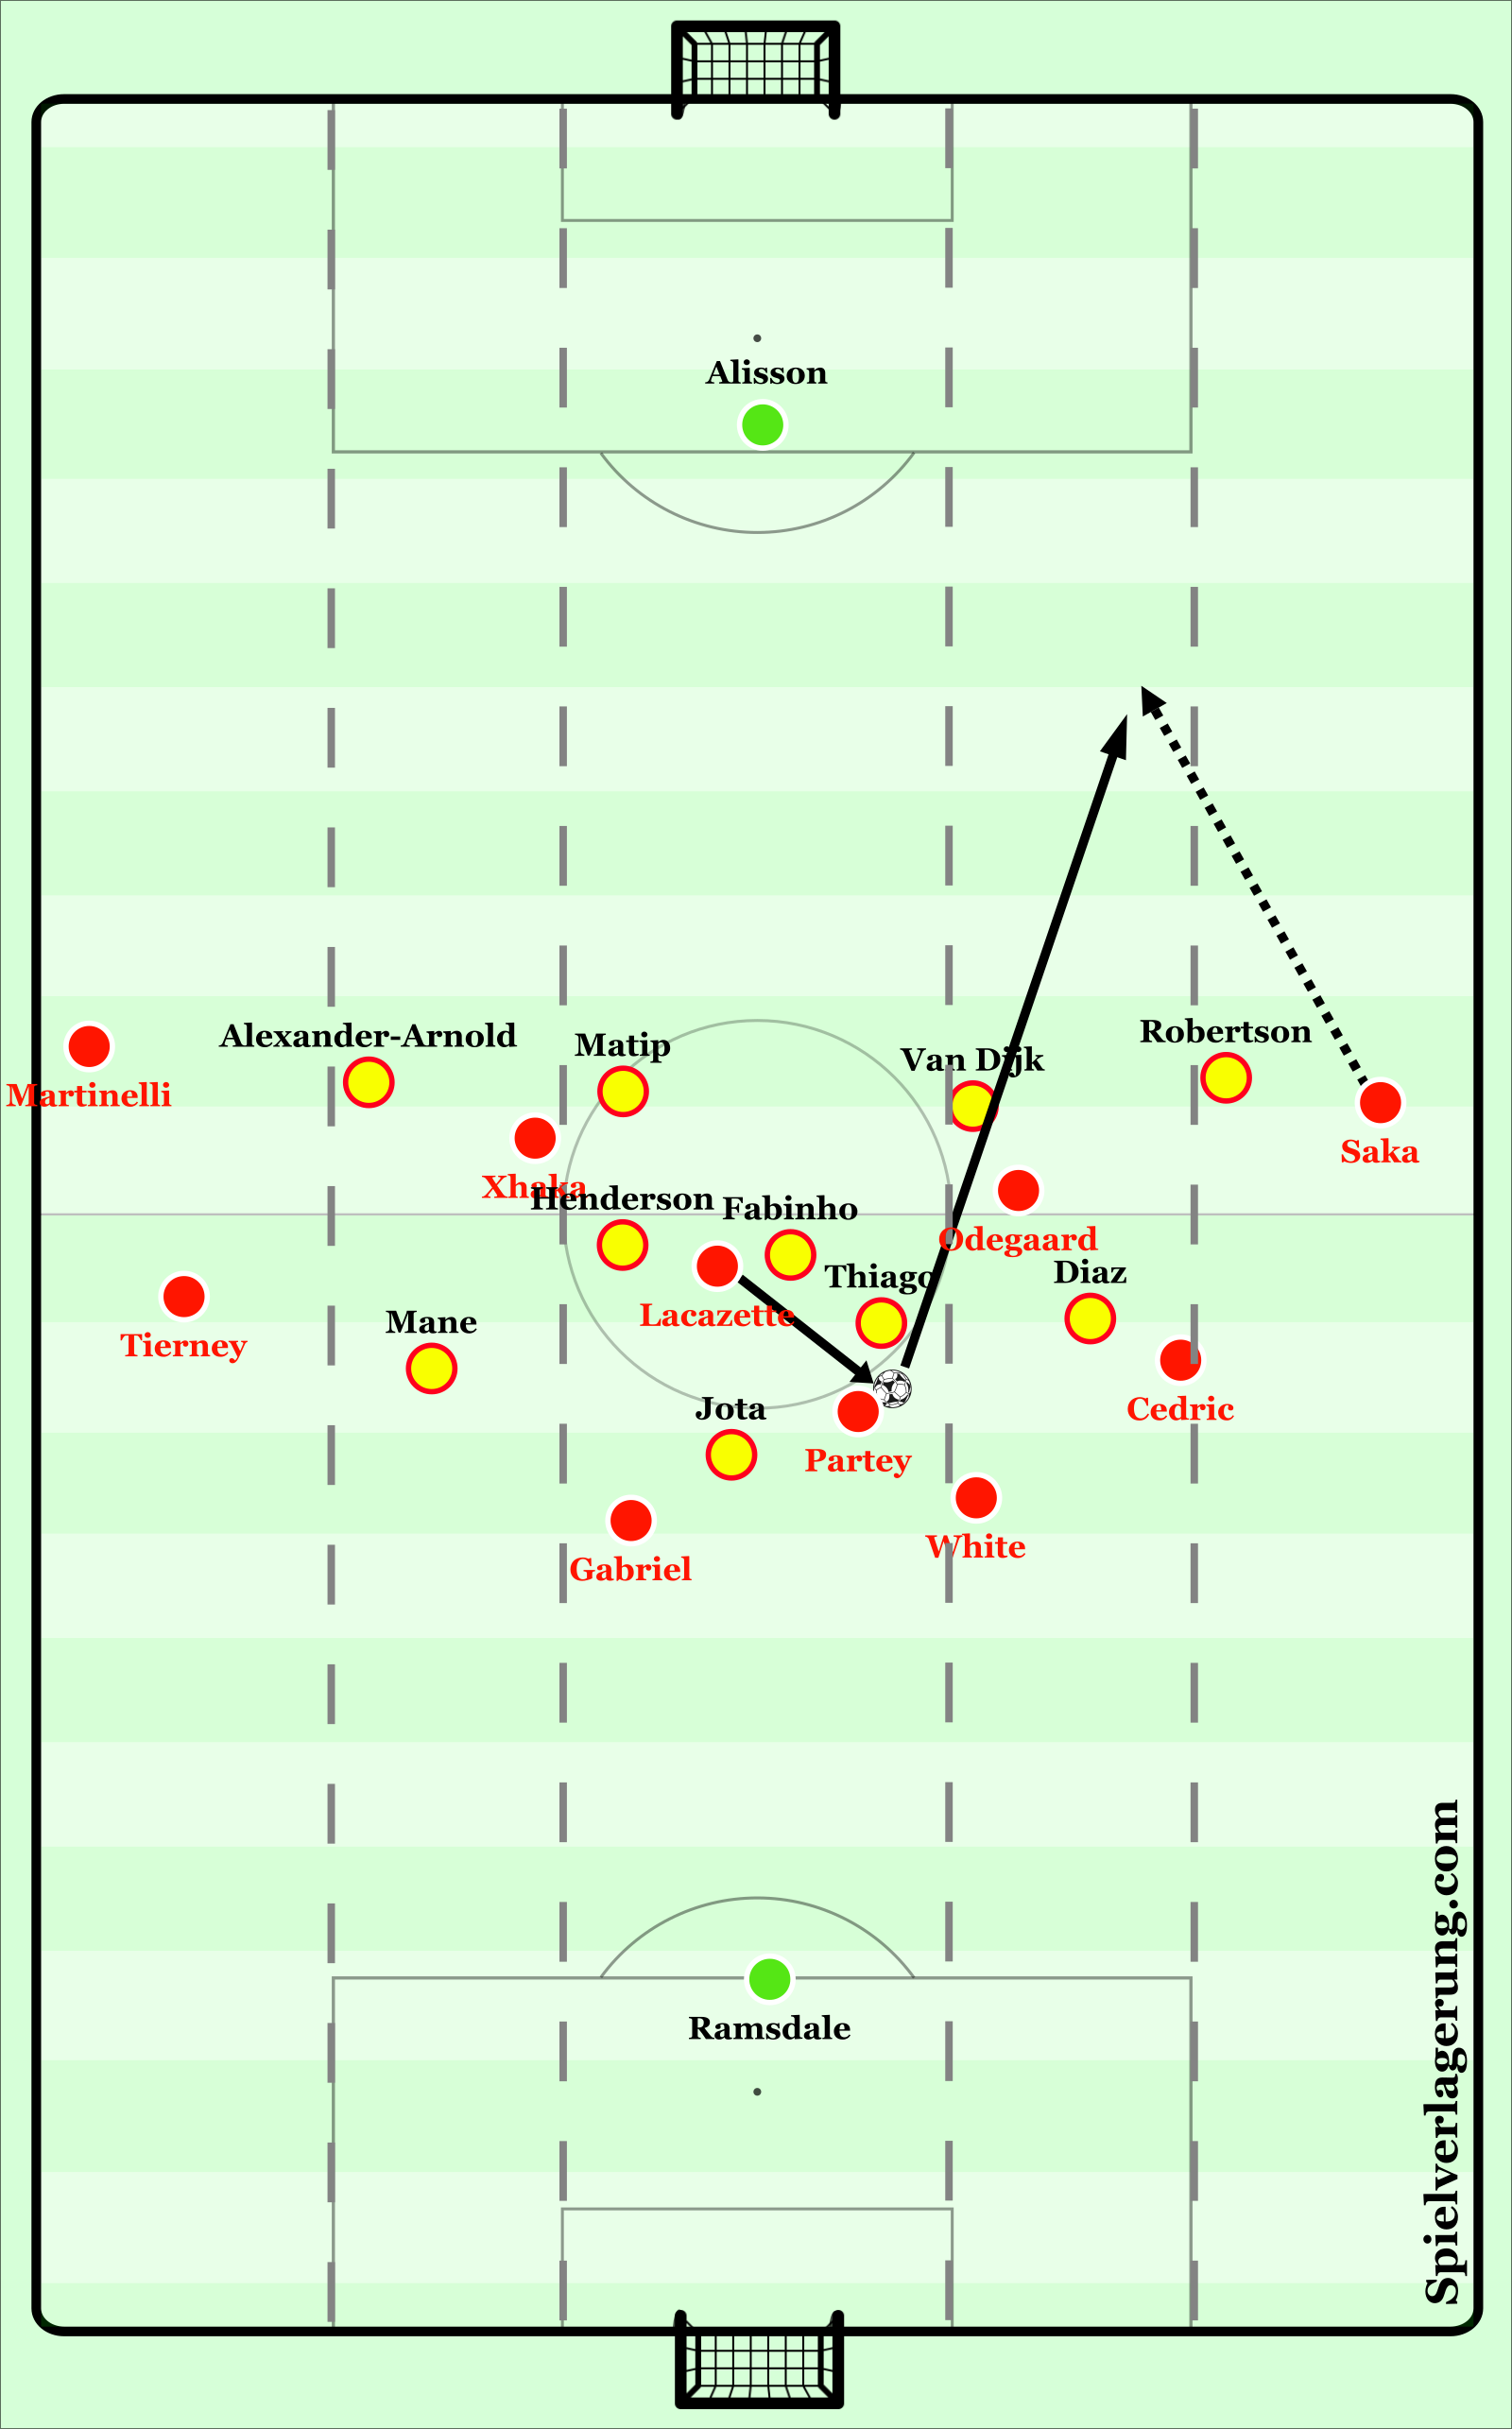
Whilst it is also relevant to mention that Arsenal also preserves the ability to be more direct in their attacking play, using a more direct approach at times to exploit high defensive lines should this be employed by their opposition. This allows them to utilise the speed they possess in wide areas particularly when Saka and Martinelli are playing, as shown in the below example against Liverpool, one of the most aggressive teams in the Premier League in relation to the height of their back-line.
In this example, using the backwards pass into Partey from Lacazette (who had dropped in deep to aid build-up as previously explored) as a trigger with Liverpool’s defensive line stepping up on this action as well, Saka checks and makes a curved run to stay onside with Matip and Alexander-Arnold on the opposite side of the pitch playing him onside. As Saka makes this run, timed perfectly to allow him the forwards momentum needed to both stay onside and ensure he isn’t caught by the recovering full-back, Partey plays a clipped pass over the top of Robertson who is still stepping forwards in an attempt to play Saka offside, allowing Arsenal to successfully play over Liverpool’s defensive line and create an opportunity to score. Once again, this displays flexibility in Arsenal’s attacking approach, rather presenting opportunities to penetrate the opposition’s defensive line more effectively and efficiently should these scenarios occur.
Pressing Structures
When out of possession, Arsenal under Arteta are a team with an aggressive approach and attempt to regain possession high up the pitch through their high pressing structure.
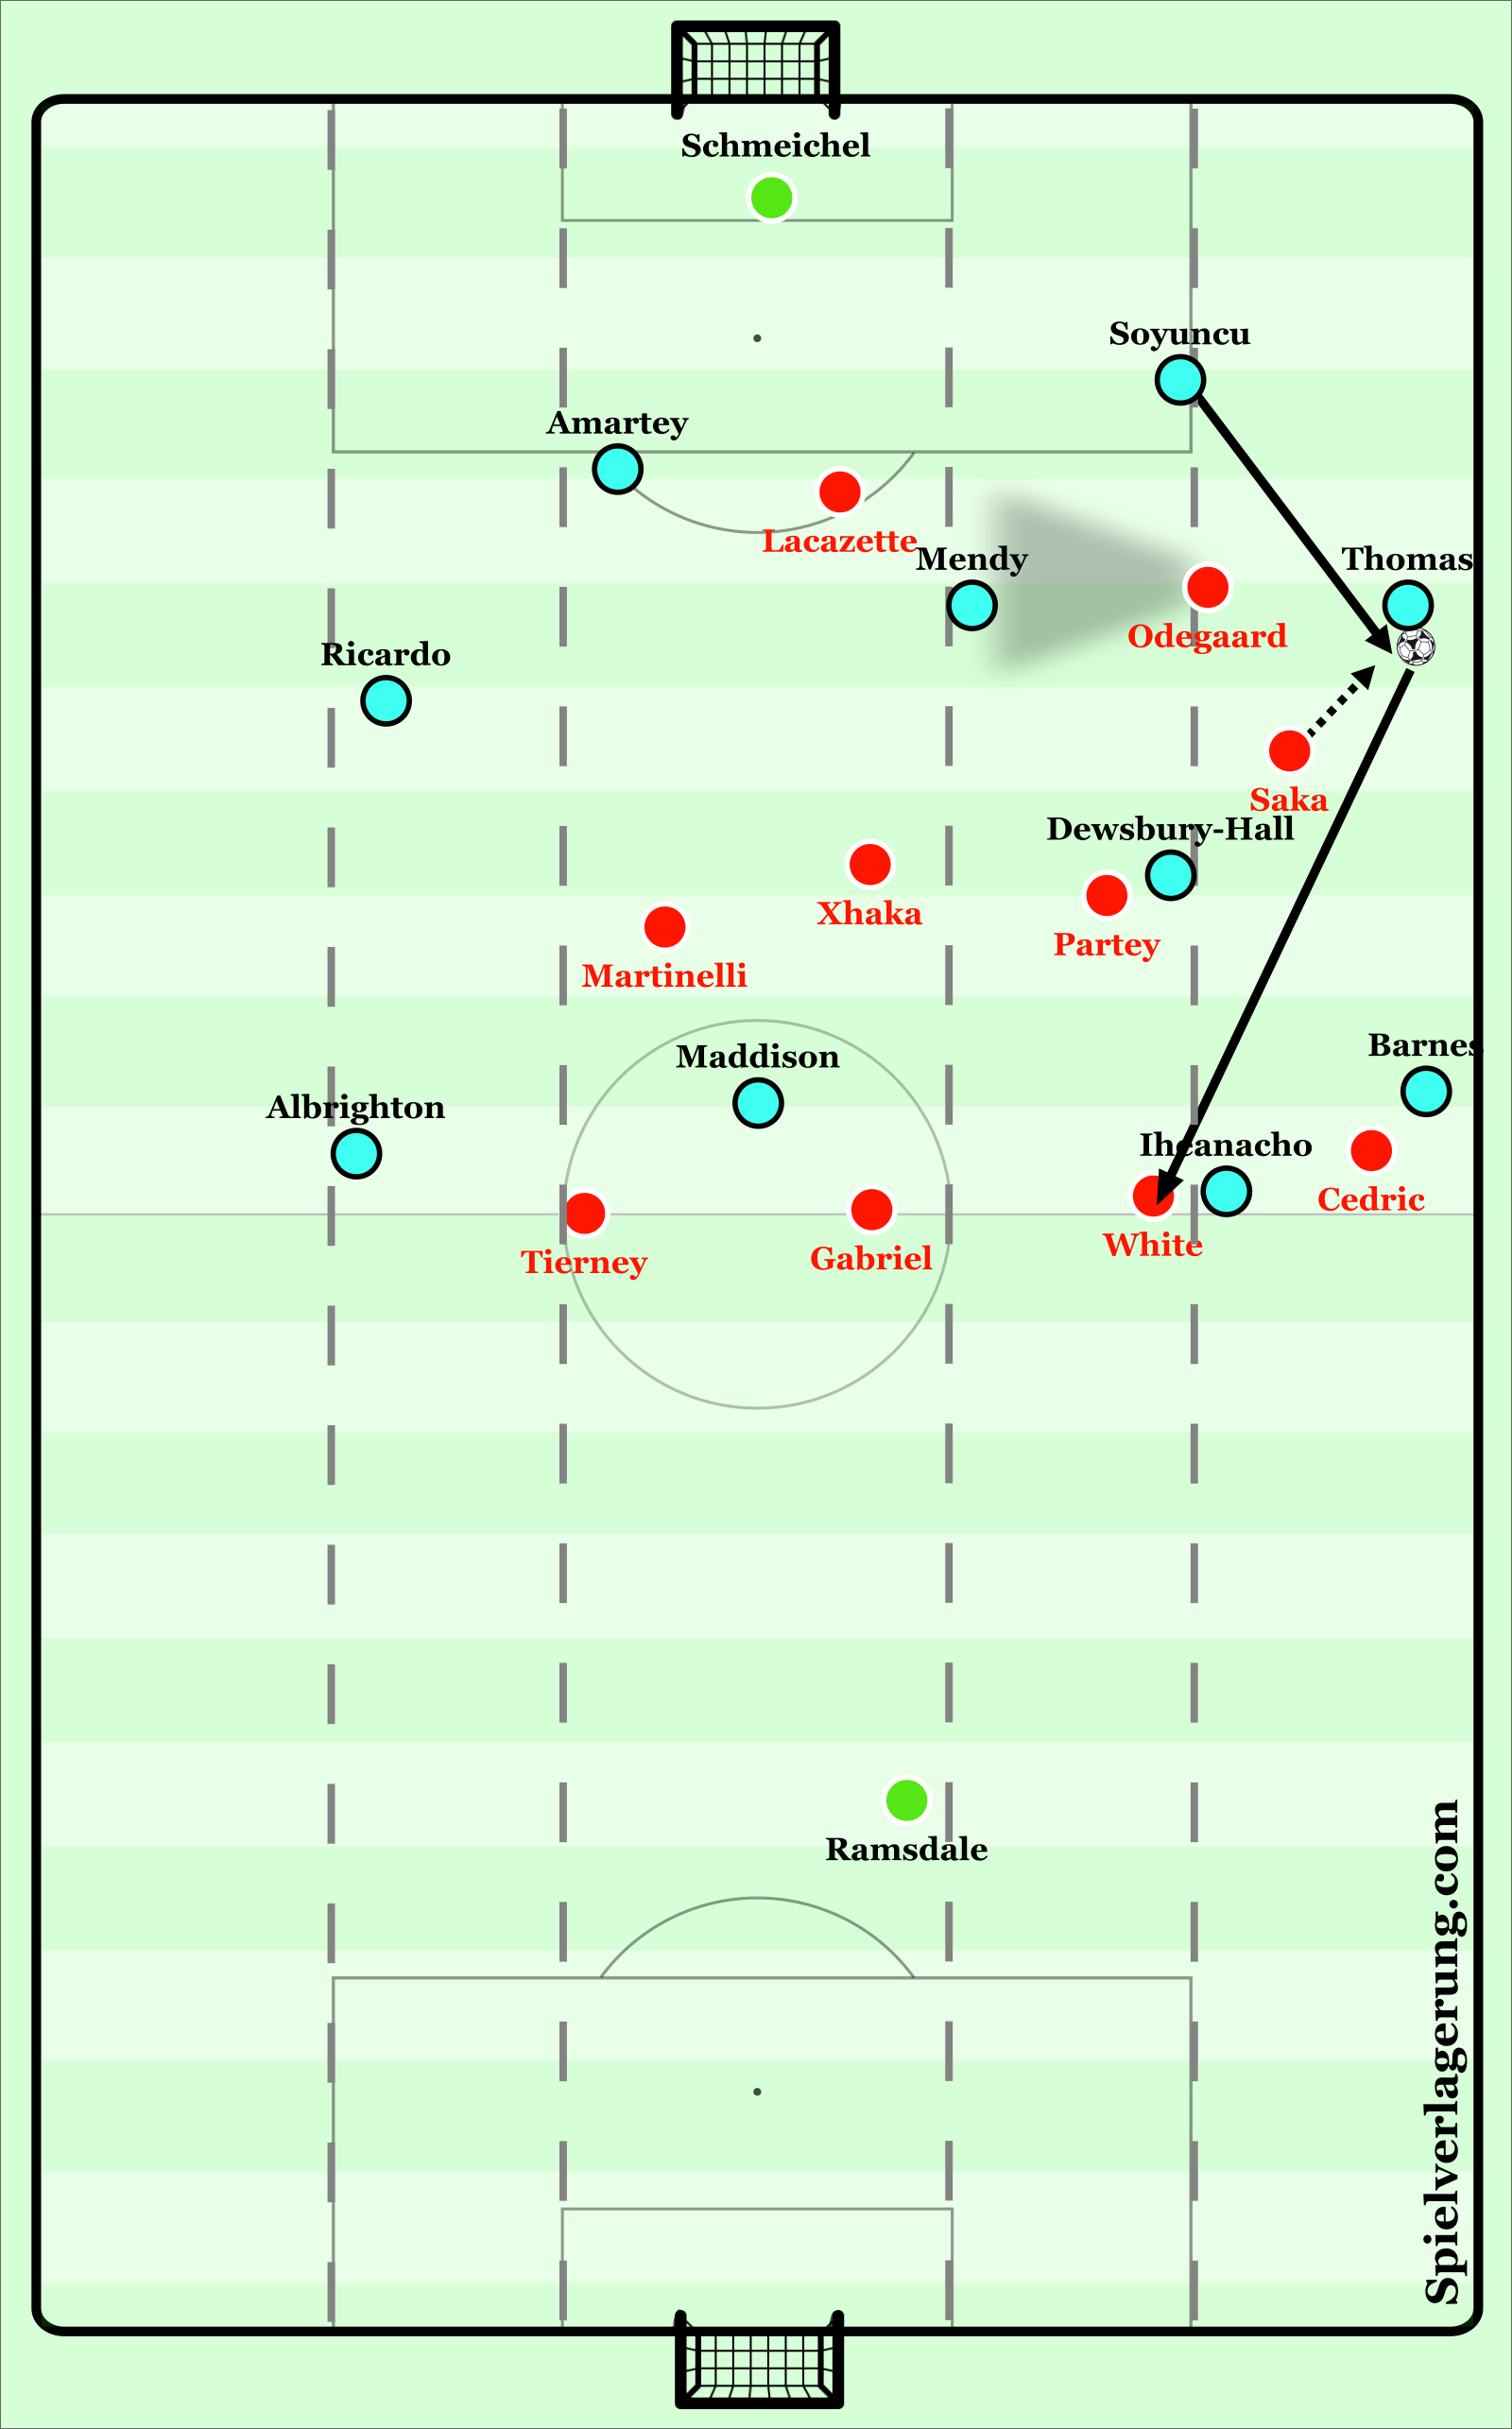
As displayed below with the example against Leicester, Arsenal’s principal pressing structure is based upon a 4-4-2 double pivot to regain possession in wide areas. With Schmeichel playing into Soyuncu as shown, Odegaard uses this as a trigger to press aggressively with a slightly curved run as to maintain intensity whilst also dissuading a pass back into Schmeichel which would break his pressing run. It is important to highlight at this point that Odegaard starts in a higher position when the starting point is from a goal-kick, rather than the slightly deeper position as shown in this example since possession had returned to Schmeichel from higher up the pitch. As this occurs, Lacazette takes up a central position enabling him to be in a position to complete two jobs; first, to restrict a pass back into Schmeichel or Amartey which would break the press and second, to maintain a position to pressurise Mendy centrally if this pass takes place. Beyond this, the midfield four shift horizontally to restrict space for follow-up actions; Saka progresses and shapes to press aggressively with a straight pressing run upon the pass into Thomas, Partey locks-on to Dewsbury-Hall to prevent him receiving possession, Xhaka moves slightly higher and into a position to affect Mendy should this pass be played, whilst Martinelli tucks into a very narrow central position to reduce horizontal distances and increasing narrow the available space. Within the defensive line, Arsenal are matched up 4v4 with Maddison’s higher position obtaining Gabriel’s attention.

Upon Soyuncu receiving and with Odegaard’s immediate pressure upon him, Saka retains a slightly narrower position as to invite the pass into Thomas at left-back which subsequently takes place (Soyuncu could have in theory gone longer, but if he did this would have presented a good opportunity for Arsenal to regain aerially with only Iheanacho as a real aerial target within the front-four). Upon this pass, as mentioned Saka presses with a straight run to force Thomas under immediate pressure, whilst Odegaard continues his pressing run to both restrict a pass back into Soyuncu and take up a position front-screening any square passes into a central area to escape the wide pressing trap, even if Odegaard was slightly out of position, both Xhaka and Lacazette take up compact positions to affect Mendy should he be played into. Further afield, Arsenal retain the same structure; Partey marks Dewsbury-Hall, Martinelli slides narrower and compact to reduce horizontal distances and restrict the potential for a diagonal pass to escape the press, whilst the back-line remain locked on to prevent any escape passes.
As such, Thomas is forced to attempt a driven pass into Iheanacho to escape the press and progress up the pitch, though White intercepts and allows Arsenal to regain possession effectively.
However, Arsenal have also adapted their pressing structure successfully against opposition playing a back three. As shown below against Wolves, Arsenal are set up into a different structure to combat Wolves 3-4-2-1 in build-up.
Upon Sa’s pass into Coady, Lacazette makes a curved pressing run to prevent Wolves from progressing down the right, where they have a numerical advantage compared to the left-hand side. Arsenal’s pressing structure would retain the triggers and responsibilities it does in this example if Coady did play into Kilman, though the distances would be larger to cover in order to press and Wolves would have progressed higher up the pitch before experiencing pressure, giving them a greater chance to escape the press. Beyond Lacazette, Martinelli maintains a position to press Kilman should Lacazette’s run not reach its intended outcomes, Odegaard maintains a high central position and front-screens Neves beyond him, whilst Saka maintains a narrow position ready to press upon the trigger of Coady’s pass into Saiss, which subsequently occurs.
Within Arsenal’s midfield line, Partey maintains a secure central position in order to press Moutinho should Coady initially or Saiss in the second instance look to play into him (though both Odegaard and Saka’s positions dissuade this) and protect Gabriel should Wolves look to play direct into Jimenez who possesses good aerial quality, whilst Xhaka takes up a position to press the narrowed Podence. Importantly, within Arsenal’s defensive line, Cedric starts in a higher position and creeps even higher upon the pass into Saiss as his role is to jump and press Ait-Nouri should that pass occur (if he remained deeper, it is unlikely he would be able to jump and press this effectively enough to force pressure and affect Ait-Nouri), White steps in to occupy Hwang who with Podence starts narrower in an attempt to create a 4v3 against Arsenal’s midfield (if he didn’t step higher, this would present Wolves with the opportunity to play out centrally), Gabriel stays central to cover Podence and Tierney retains balance with possession shifting onto the other side of the pitch.
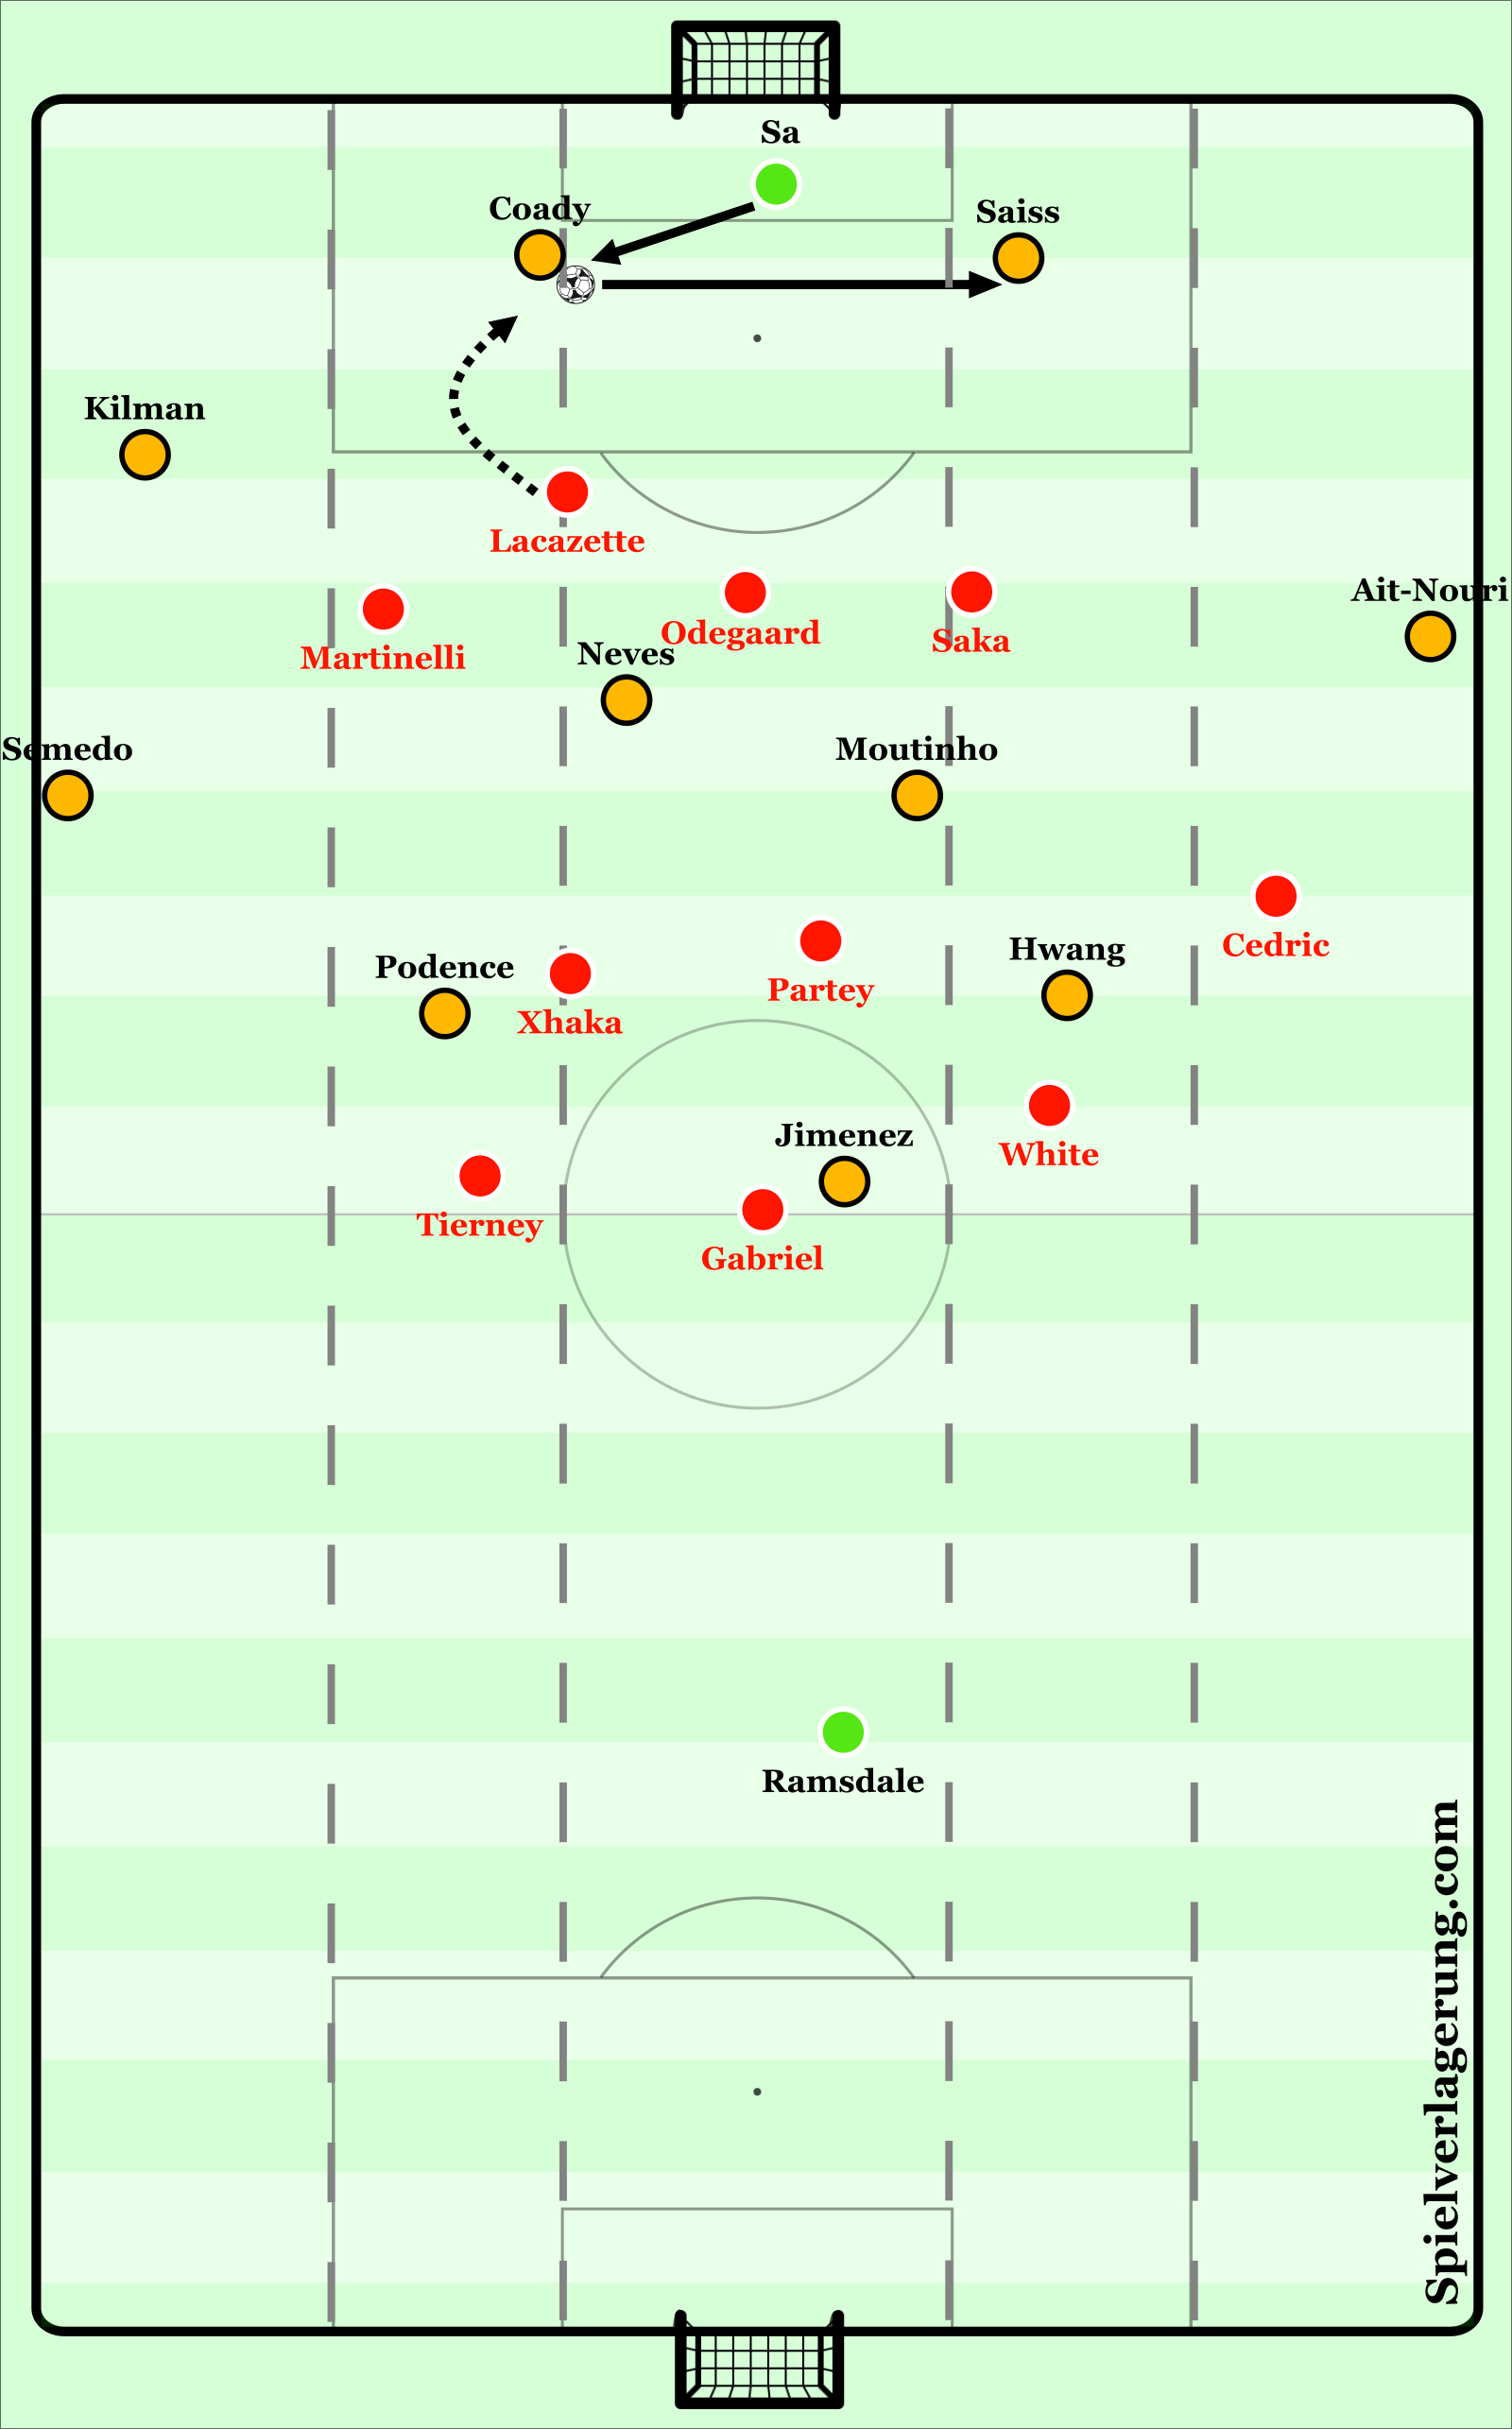
Following Coady’s pass into Saiss, Saka uses this as a trigger to press aggressively upon Saiss which immediately forces a pass into Ait-Nouri, subsequently triggering Cedric to jump and press Ait-Nouri in the wing-back position.
In order to prevent Wolves from escaping centrally upon these actions, Odegaard shifts across to prevent a pass into Moutinho, whilst Lacazatte drops in to cover Neves who was vacated by Odegaard’s actions, as if either of these were able to receive it would render Saka and latterly Cedric’s press useless as Wolves would be able to escape centrally. In deeper areas, Partey drops into a deeper position to affect a potential pass into Hwang with White already stepped higher to prevent this, allowing White to drop slightly deeper to retain a more defensively secure position, with Xhaka covering Podence in the opposite half-space and Tierney again retaining cover for the defensive unit.
As a result, Ait-Nouri is limited in available options and attempts a hopeful pass into Jimenez’s run into the widest lane (with this space vacated by Hwang’s narrower position). However, Gabriel covers this off, intercepts and completes Arsenal’s regain of possession easily.

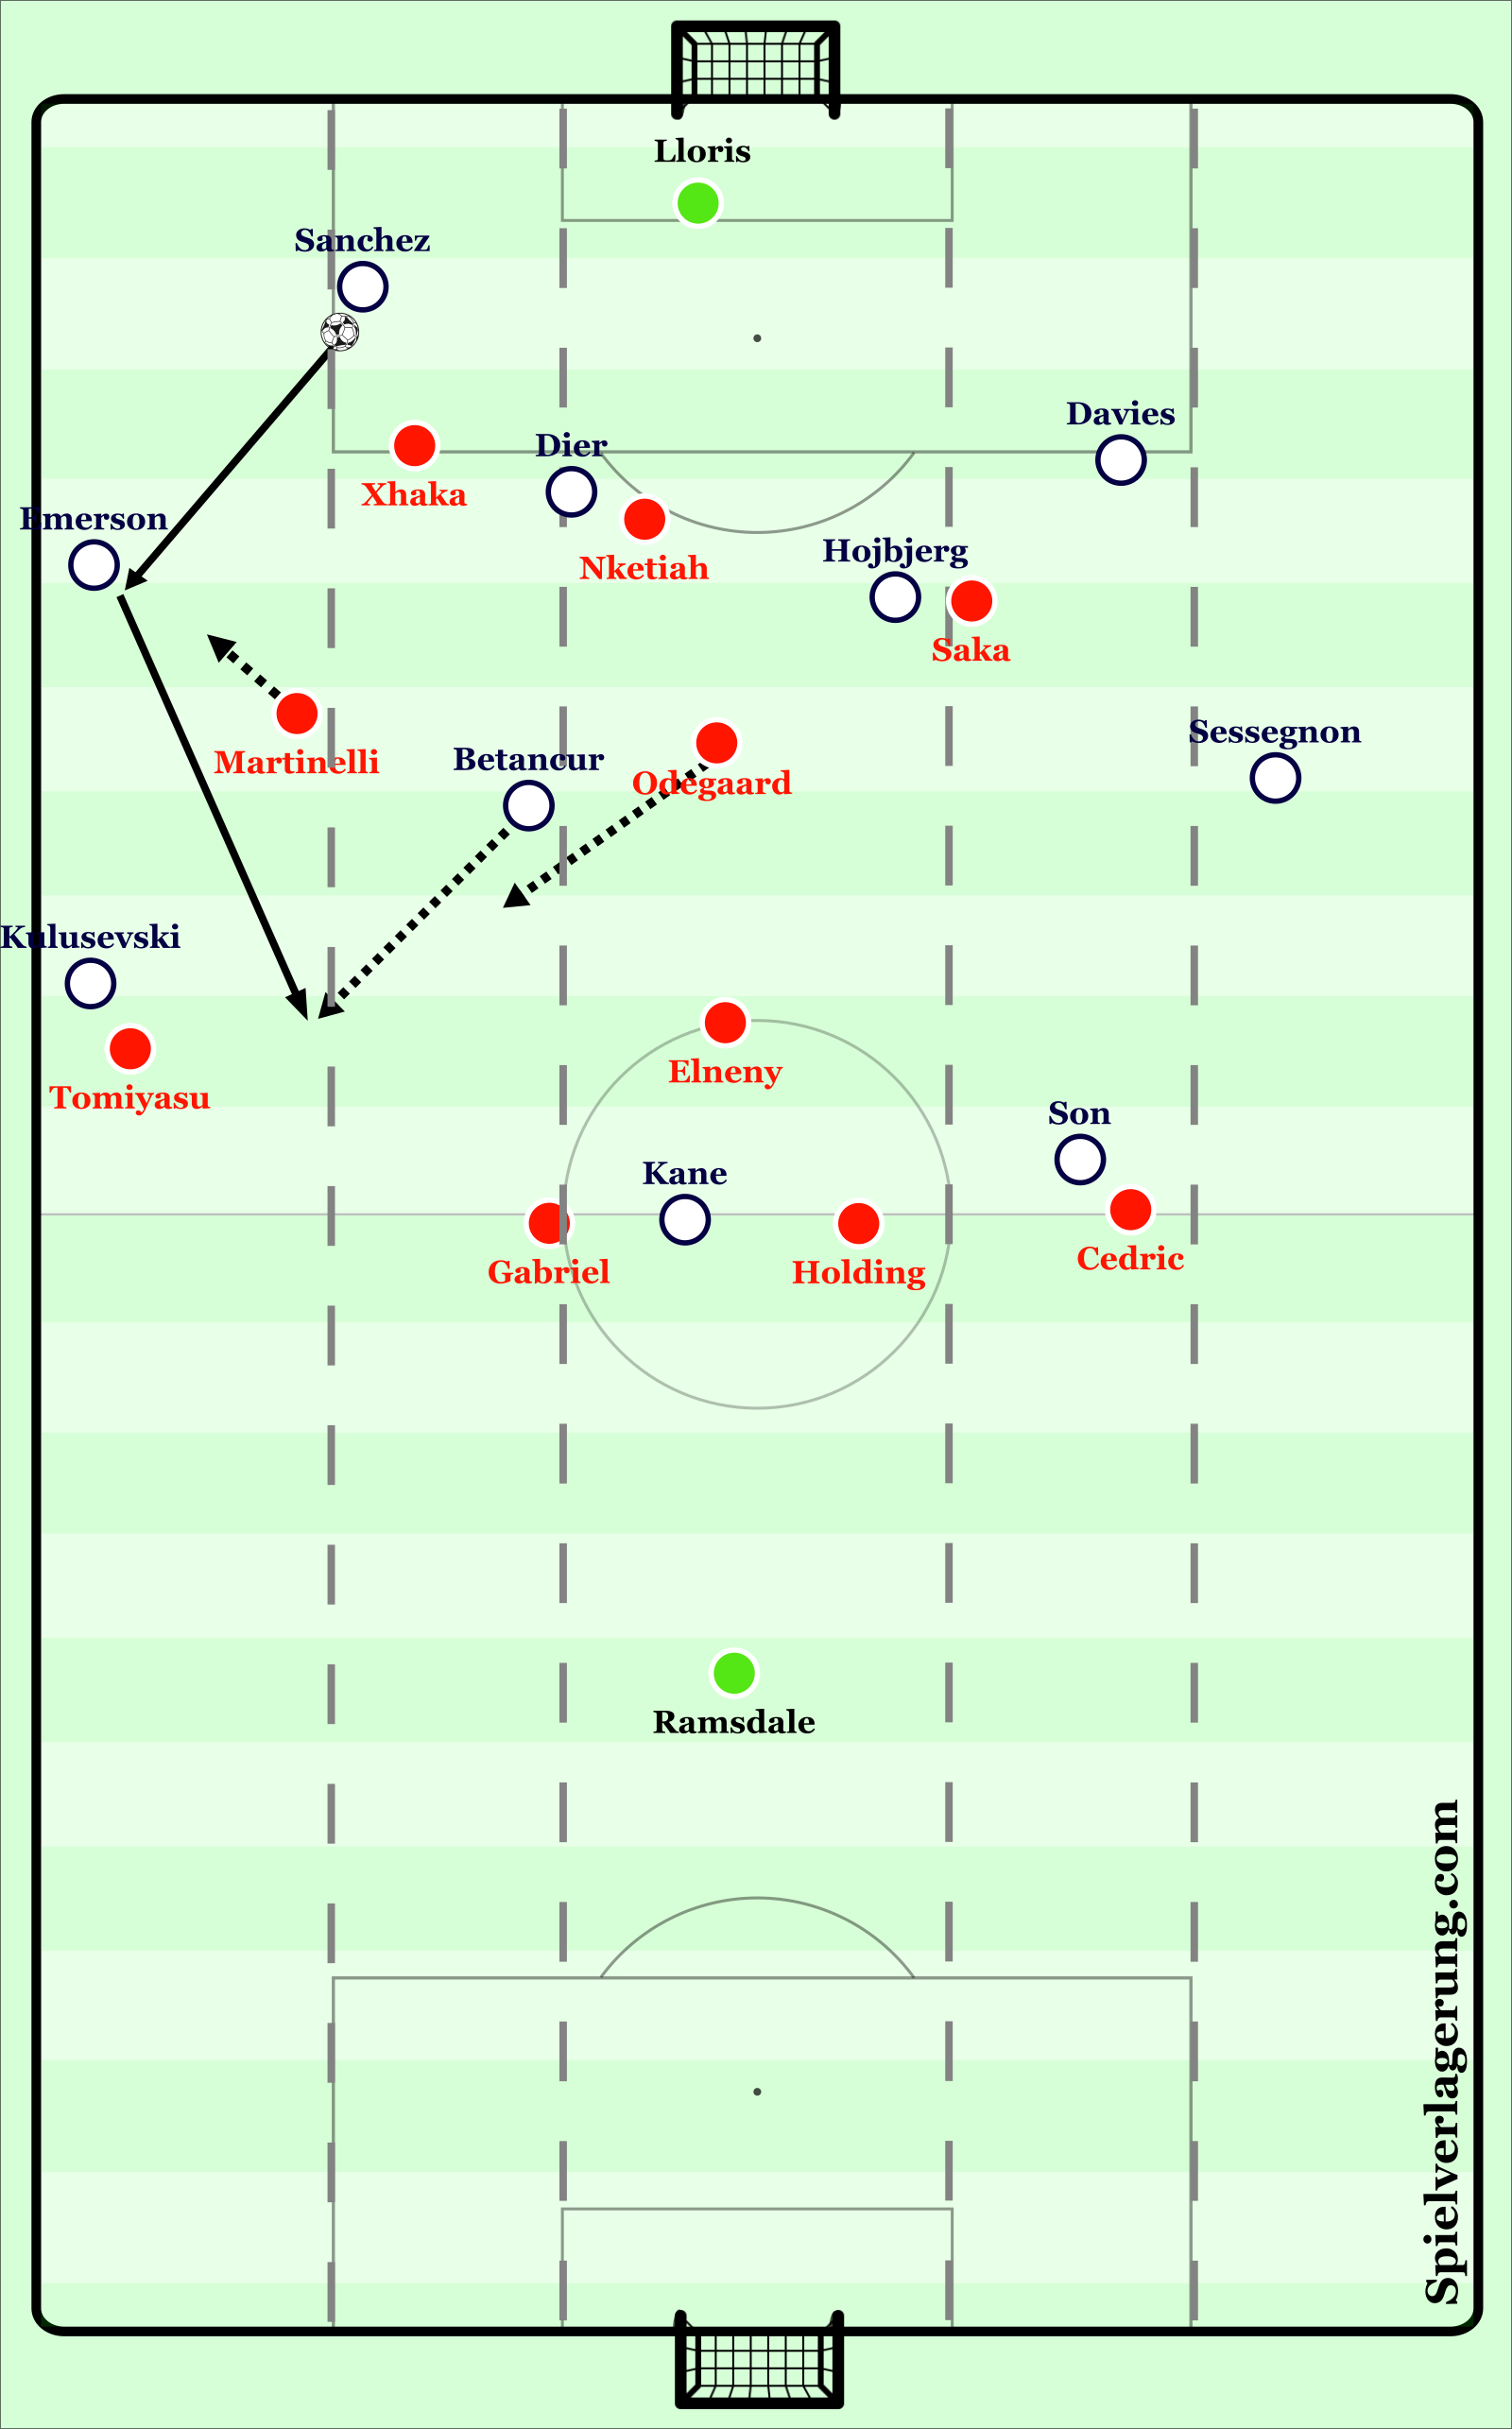
Although Arsenal’s high press has been picked off on occasion, namely the below variation used against Tottenham below, with Spurs using intelligently positioned players to make distances between Arsenal’s players too big to cover in the required time.
As shown, Spurs adapted their 3-4-2-1 in key areas with Dier stepping into the midfield line alongside Hojbjerg in deep central areas during build-up, with Dier covered by Nketiah dropping deeper and Saka starting narrower to mark Hojbjerg. Meanwhile, in Spurs third-line Kulusevski/Son stretched Arsenal’s defensive line horizontally by taking up positions in the widest lanes respectively (forcing Tomiyasu/Cedric wider as a consequence), whilst Kane fixed Arsenal’s defensive pair of Gabriel and Holding with Elneny providing front-screen cover. This highlights from the outset a vast vertical distance between Arsenal’s midfield unit, with Xhaka/Odegaard and even Saka/Martinelli as an extension of this, extremely high in comparison to Elneny deeper, providing an insight into how Spurs later exploited Arsenal within this vacant space.
The situation unfolded as follows, upon Lloris’ pass into Sanchez, Xhaka jumped out to press and somewhat front-screen Bentancur in the process. As this action took place, Odegaard begins to shift across to cover Bentancur as the free player, whilst Martinelli starts to creep forwards to engage Emerson should the pass be played into him, likewise with Tomiyasu on Kulusevski, as if they didn’t it would provide Spurs with an easy option to escape the press in wide areas. Away from this, Arsenal shift across to compact space as is to be expected.

After receiving, Sanchez plays quickly into Emerson who as expected is immediately pressured by Martinelli, leaving Odegaard attempting to shift across quickly to cover Bentancur as the previously mentioned vacant player. However, Emerson plays beyond Martinelli’s press immediately and into the forward run from Bentancur to break Arsenal’s press and allow Spurs to break into space dangerously, the speed of these combinations being the essential aspects to preventing Odegaard recovering across to Bentancur in time to prevent this pass.
It is once again pertinent to explore how subtle positioning by Spurs allows this scenario to occur. Firstly, Dier and more importantly Hojbjerg’s positioning in the deeper left half-space forces Odegaard into a start position towards him, as if he started centrally, it would potentially leave him too far away from Hojbjerg if Lloris had played into Davies instead in the first instance once Saka had jumped out to press. Consequently, it means he has a greater distance to travel in order to cover Bentancur once Xhaka jumped out to press Sanchez, meaning Spurs were able to escape. Secondly, Kulusevski’s wide positioning prevents Tomiyasu from being in a narrower position to affect the pass into Bentancur, as if he was narrower not only would it dissuade the eventual pass, but he could also travel to intercept it, but he had to stay wider to be able to press Kulusevski should have Emerson opted to play down the line instead of inside. Finally, Kane’s high central position also restricted Gabriel/Holding/Elneny from intercepting the eventual pass into Bentancur, though it is a fair consideration whether Elneny was indeed necessary in this scenario and if he could have jumped out to intercept or even mark Bentancur, given there would still have remained a 4v3 overload on the defensive line in Arsenal’s favour should Elneny have stepped out.
Conclusion
It is clear Arsenal have made indisputable progress under Arteta, becoming competitive towards the top end of the Premier League again since his arrival and displaying extremely effective strategies both in and out of possession in the process, notwithstanding some exceptions in tactical battles against some of the best managerial tacticians. However, the 2022-23 season presents a critical juncture for the Gunners, with new signings Gabriel Jesus, Oleksandr Zinchenko and Fabio Vieira adding depth and quality, Arteta will be tasked with breaking into the top four at a minimum as a sign of continued progression. Arsenal’s and Arteta’s tactical prowess and competitiveness against the best will certainly be a barometer of this progress during this season, but it will certainly be an intriguing watch to see how the Gunners season unfolds!
2 Kommentare Alle anzeigen
Sinan November 9, 2022 um 5:32 pm
Is there any other tactis website in the internet on the same level?
Dae hee ko October 25, 2022 um 3:53 am
Thank you for good article..!
Can i translate this article for Korean??