Wins for BVB and Hoffenheim with structured build-up plans
The 6th game week of the Bundesliga season delivered a number of interesting clashes. Bosz’ table-topping Dortmund hosted their great rivals Gladbach led by Dieter Hecking, and this was accompanied by the battle of the talented young German coaches as Nagelsmann and Tedesco’s team’s clashed. In both matches there were interesting approaches to build-up with structures focused on using the available space left by the opponent to progress. The analyses therefore have a small conceptual element included.
To grasp the dynamics of the following games, an important side note to understand is that every single formation used in defence leaves spaces somewhere on the field, both between and around the defensive shape. The mere choice of a defensive shape is (consciously or otherwise) an acceptance of allowing the opponent to play in these areas, since initially the defence will struggle to have access in these areas.
When a team are strong at using the spaces left by the opponent in build-up, and are structured well to bypass the pressing movements used by the opponent to close these spaces; they can create dynamic breakthroughs fairly simply.
Whilst formations are just the starting point for the interactions of the match, it is clear that each defensive formation has certain “problem areas” that the opponent will likely play in, either by simply playing away from pressure, or by focusing on using these problem areas to start attacks. This space usually exists in areas between or around numerous opponents and can cause issues with regards to which defenders leave their position to create access.
Bosz’ BVB destroy Hecking’s 4-4-2-0
In the 4-4-2 defensive shape of Hecking’s Gladbach, the space besides the forwards, behind the forwards and the channels between wide and central players are clear potential problem areas. These are spaces that Bosz’ Dortmund side are strong in, and the match up between their orthodox-Dutch 4-3-3 and Gladbach’s 4-4-2-0 created very clear paths to progress for the home side.

The problem areas for Gladbach, and Dortmund’s potential movements used to access them
Clear solutions
Gladbach were largely passive, preferring to block Weigl with both strikers staying narrow. For Bosz’ men, Sokratis and Toprak played very wide, with Weigl constantly positioned behind the Gladbach strikers. After long switch passes between the centre backs, the ball-near Gladbach striker would at times move up to press the ball. Blocking the pass to Weigl, but also making the switch to the far centre back difficult.
In these situations there were two clear options for Dortmund. Firstly, the ball-near 8 could drop into the space besides the forwards, receive the ball and switch to the far centre back or pass to Weigl, depending on the positioning of the ball-far Gladbach striker. Secondly, the centre back could pass out wide to the near full-back, if the near striker remained high to block the back pass to the centre back, then Weigl would be open in the central space behind the forwards. From this position the young German had the conditions to look and play forwards.
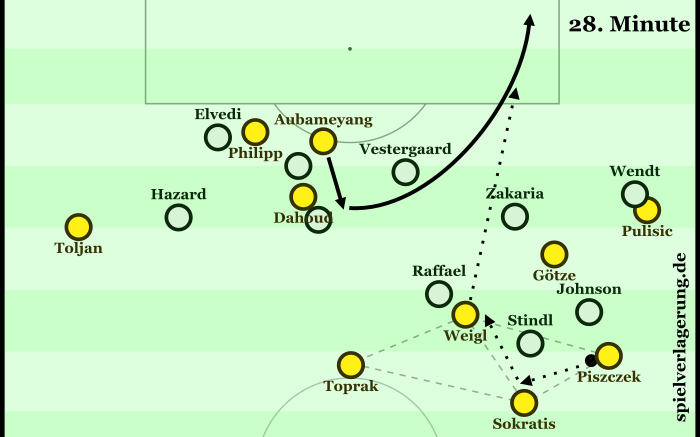
The ball recently coming from the wing, combined with Dortmund’s double wing occupation meant that the channel between Gladbach’s wide players (winger and full-back) and the nearest central players was open for Weigl to play through. A similar situation saw Dortmund take the lead with Aubameyang making a diagonal run through this open channel. The use of the wings to draw pressure from the passive Gladbach defence was a key feature in this game. And Gladbach’s inability to defend the clear paths Dortmund had to progress from the wings were fatal.
Thanks to the great MR (who has also analysed this game) for the image. Click on the image to read MR’s analysis.
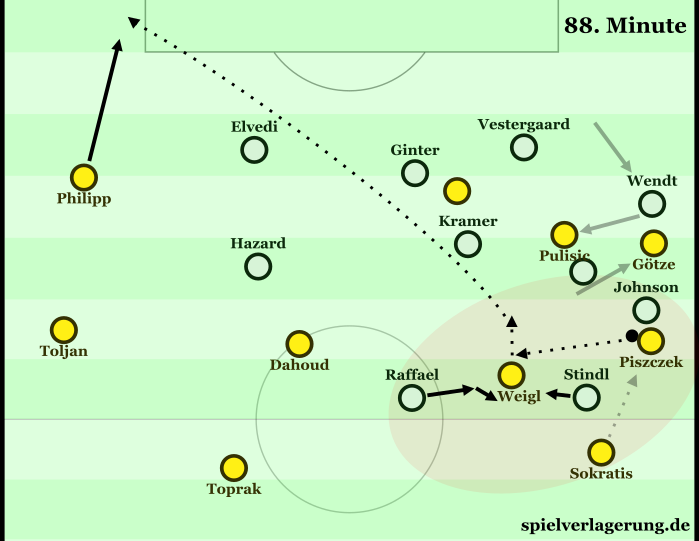
In the situations where Weigl received from a full-back and Gladbach had shifted well to close the channels between wide and central players, they inevitably left large space on the far side. Since Gladbach lacked access to the young German, he had the conditions to find the free space and set up dangerous attacks through switches to Philipp or Toljan following closely on the overlap.
Again, thanks to MR for the image
Whilst the pass from full-back inside to Weigl allowed him to face forwards upon receiving the ball, due to his prior movement (sideways), the other option for the full-back in these situations was not quite as progressive. On most occasions when a Dortmund full-back had the ball, the near 8 would drop from their position between the lines, to just in front of Gladbach’s midfield line. This movements would often be followed by Gladbach’s closest central midfielder. In doing so, the passing lane to the open Weigl was often narrowed, both by the position of the 8, and the opponent brought with them.
The fact that the 8 was marked when dropping, combined with the dropping movement meaning a backwards facing field of vision meant that these situations often led to passes back across to the ball-far centre back. Whilst the 8s would rarely be able to receive from the full-backs if they remained between the lines, they would clear space for Weigl by staying in position. Furthermore, they could create a double threat whereby they could receive behind the ball-near Gladbach midfielder if he moved up to press, or allow Weigl to dribble forwards if the Gladbach midfielder stayed in position.
Use of Burki
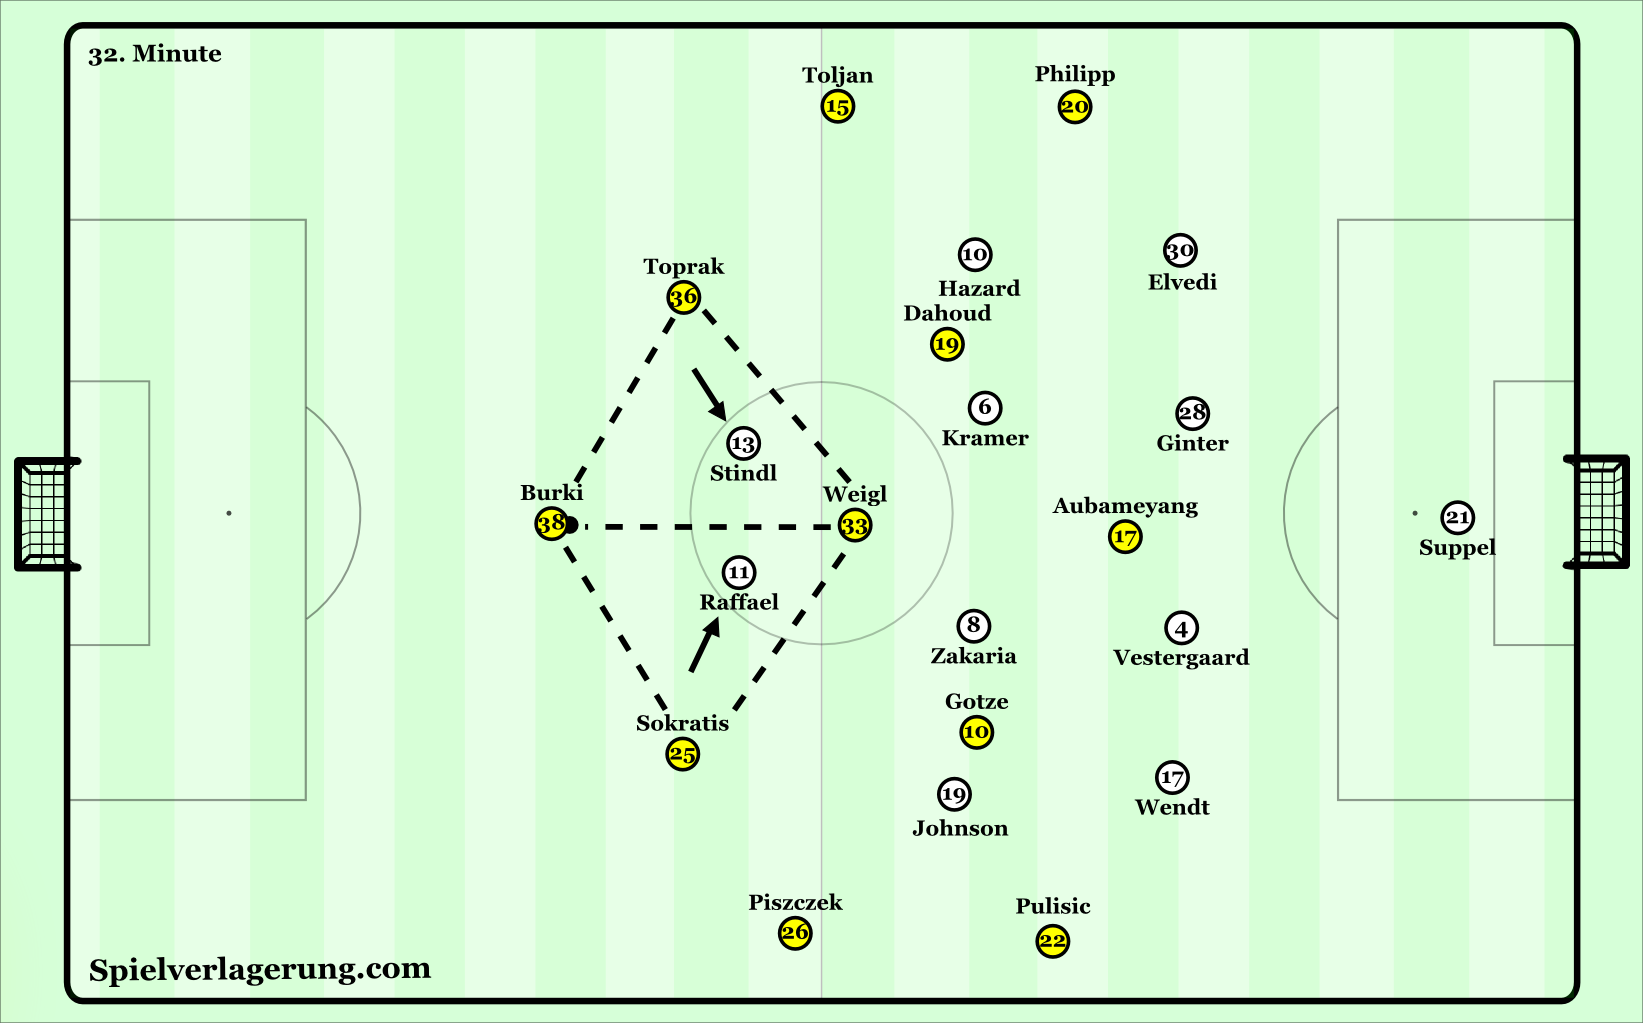
There were a number of situations where both Stindl and Raffael pushed up, the ball-near striker doing so whilst covering the lane to Weigl, and the ball-far striker blocking the switch to the far centre-back. This was not done with much intensity, yet created issues in how to bypass the coverage without playing into undue pressure. In these situations the Dortmund goalkeeper played very high outfield, often around the centre circle area!
With his presence they created a diamond base. This created a very short back passing option for the ball carrying centre-back in this situation. With the ball at Burki’s feet he could threaten to play vertically into Weigl behind the strikers, in response Raffael and Stindl had to narrow their positions, allowing the centre backs to receive in space outside the strikers.
Structural shifts
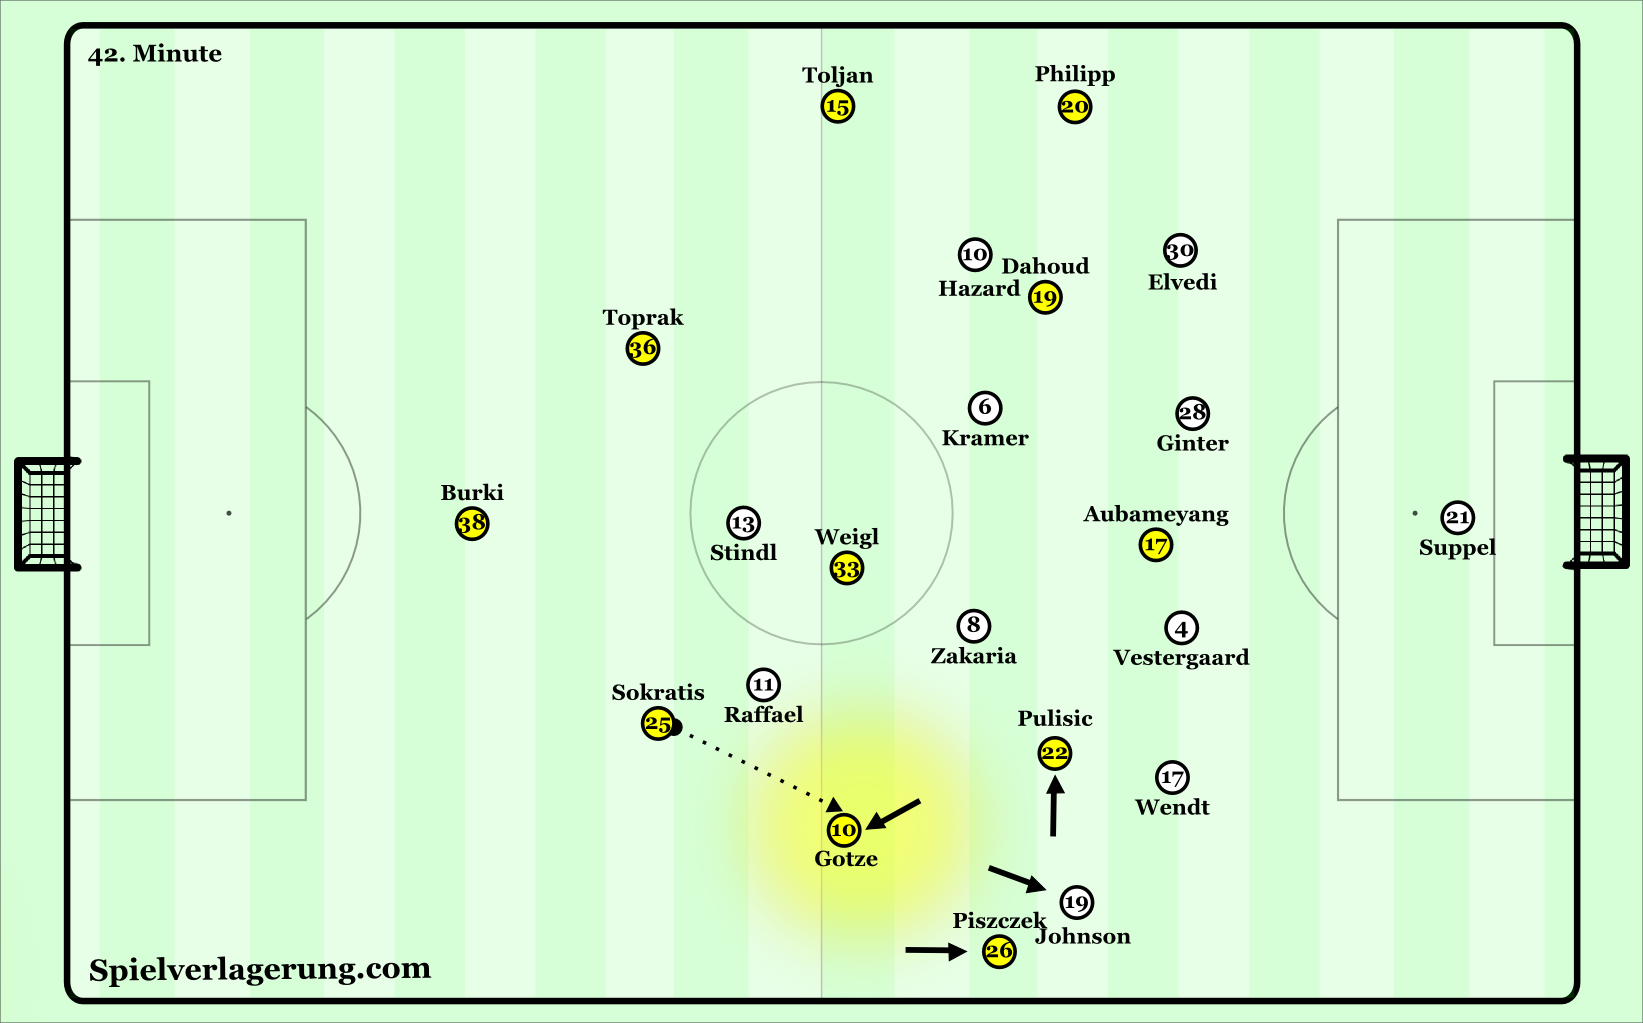
On several occasions later in the first half Bosz’ men often used a structural shift to play even more directly in the space besides Stindl and Raffael that Hecking’s side struggled to control. The 8s would drop from their high position into the deep half spaces, with the full-back moving high on the wing and the winger moving into the 8s previous position. On a few occasions this led to an even more dominant build-up, since they could immediately advance from the half space, and they could progress diagonally from one centre back to the ball-far 8.
However the full potential of these structural shifts was not often utilised. Although the 8s often had time and space, they often passed too early. With short dribbles they could have drawn either the opposing winger or central midfielder out of position, and the nearby triangle (diamond including the centre back) would mean clear options to bypass this pressure, and access the space behind the pressing opponent.
Nagelsmann’s Hoffenheim trump Tedesco’s Schalke
Clearly structured build-up plans
Both coaches prepared clear plans for how to outplay the defensive structure and pressing of the opposing team, and these were visible during the match.
Hoffenheim
Tedesco’s Schalke typically defend in a 5-2-3-0 shape, forcing the opponents to the wings, and using the ball-near wing-back to move up and press in midfield as they shift into a 4-3-3. Nagelsmann’s side, in response, played in a 2-3-3-2 shape in build-up. The differences to their typical 3-1-4-2 were Vogt as a central defensive midfielder as opposed to at the centre of a back 3, and Geiger as a central attacking midfielder instead of as a defensive midfielder.
With Vogt positioned behind Di Santo (Schalke’s striker), he created a central triangle with the centre backs which would allow them to combine past his pressing attempts. The full-backs largely played in line with Vogt, and along with the centre backs they created a wide triangle to combine past the Schalke wingers, regardless of which angle they pressed from. With Vogt positioned in the space between Schalke’s 2-3, Geiger positioned in the space between Schalke’s 5-2 and the 8s (Kramaric and Amiri) positioned outside Schalke’s midfield 2, Hoffenheim created a central diamond. This central diamond could surround Schalke’s midfield pair, and thus act as a base to control the game.
This was assisted by the positioning of the roaming wide forwards, Gnabry and Uth who played between Schalke’s wing-backs and half backs. From this wide position they could pin back the Schalke defenders by threatening to run into any space left behind if a Schalke defender stepped forward to press. This positioning was particularly important to prevent Schalke from using their wing-backs in pressing as usual. If Schalke couldn’t send their wing-backs forward to press, Nagelsmann’s men should theoretically have been able to control the midfield through the central diamond.
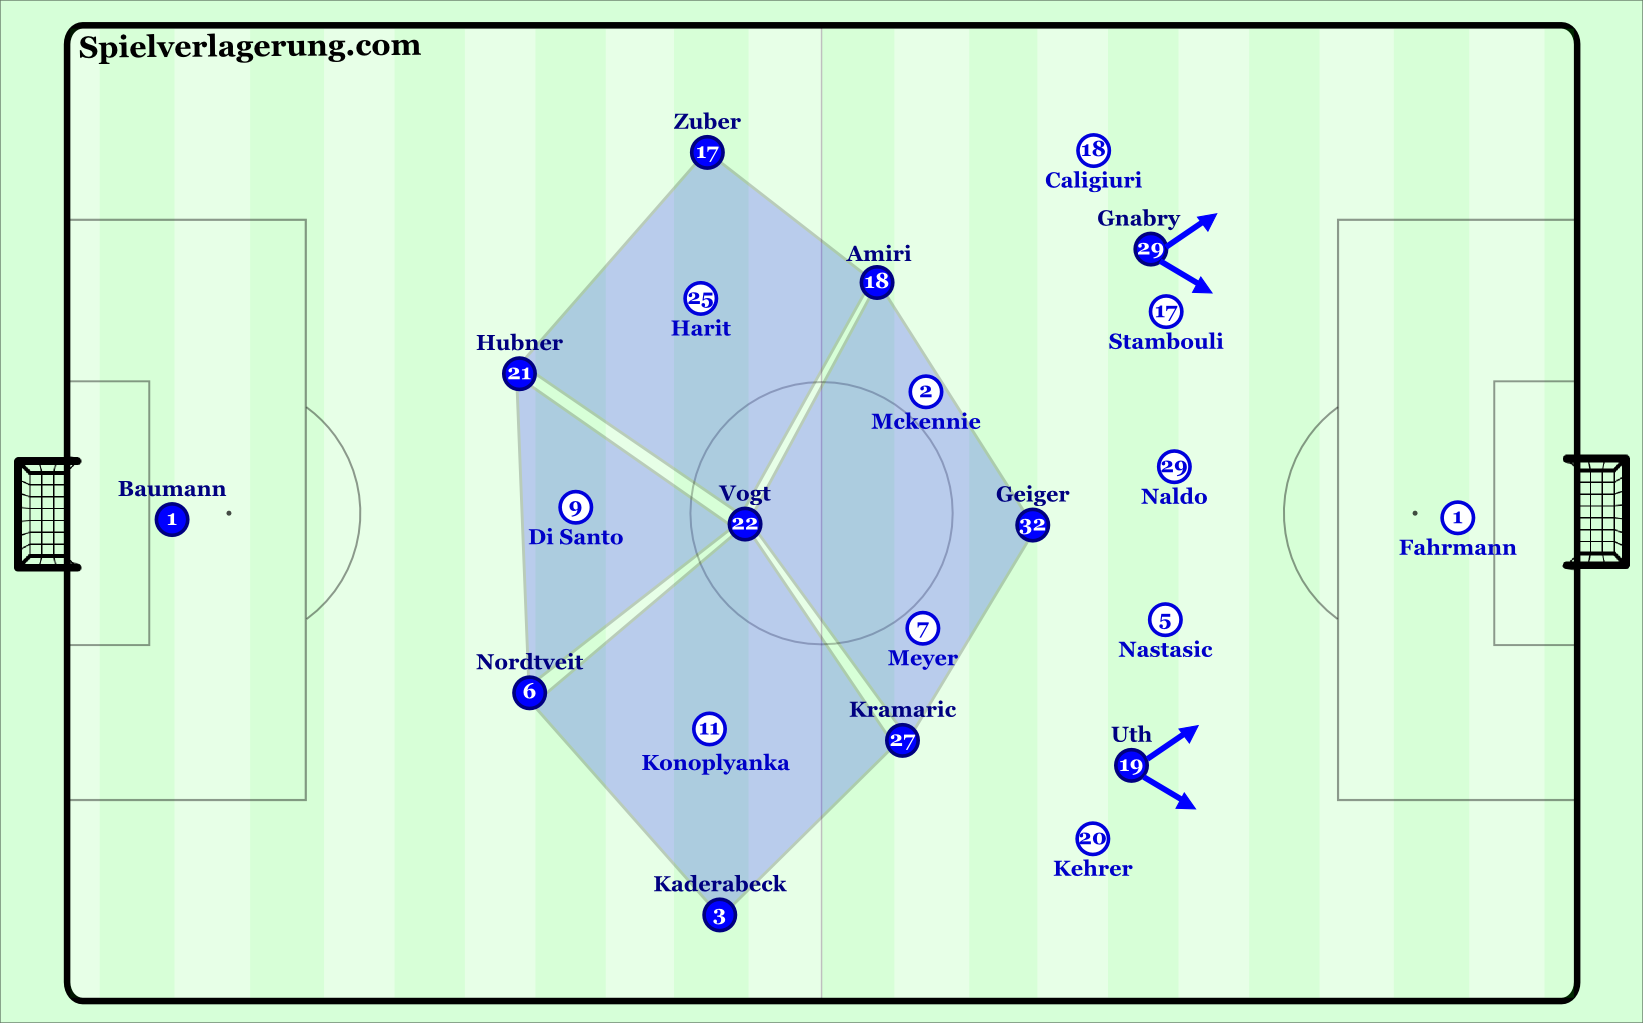
The number of triangular and diamond networks that Vogt was involved in, meant it was clearly vital that he held his position in the space behind Di Santo.
Schalke
Hoffenheim defend in a 5-3-2 shape, with strong cover of the centre through the front 5 players they force their opponents to the wing, where the near 8 or wing-back can press and block diagonal routes into the centre. Schalke played a 3-4-3 with unique positions and movements, for clear purposes against Hoffenheim’s 5-3-2. Whilst most teams play with two 10s behind the central striker, Schalke’s wingers stayed wide on the flanks.
The central defensive 3 gave Schalke an overload in the first line, which could be used to create space for a half back to dribble forwards. These forward dribbles were often followed by inwards movements from the wing-backs, attempting to pin Hoffenheim’s wing-back and 8 back, and give the winger space to receive directly on the wing. When the winger was supported by the nearby central midfielder as well as the infield wing-back, they had a number of good breakthroughs through combining past the pressure of the Hoffenheim wing-back, and/or accessing the space behind them.
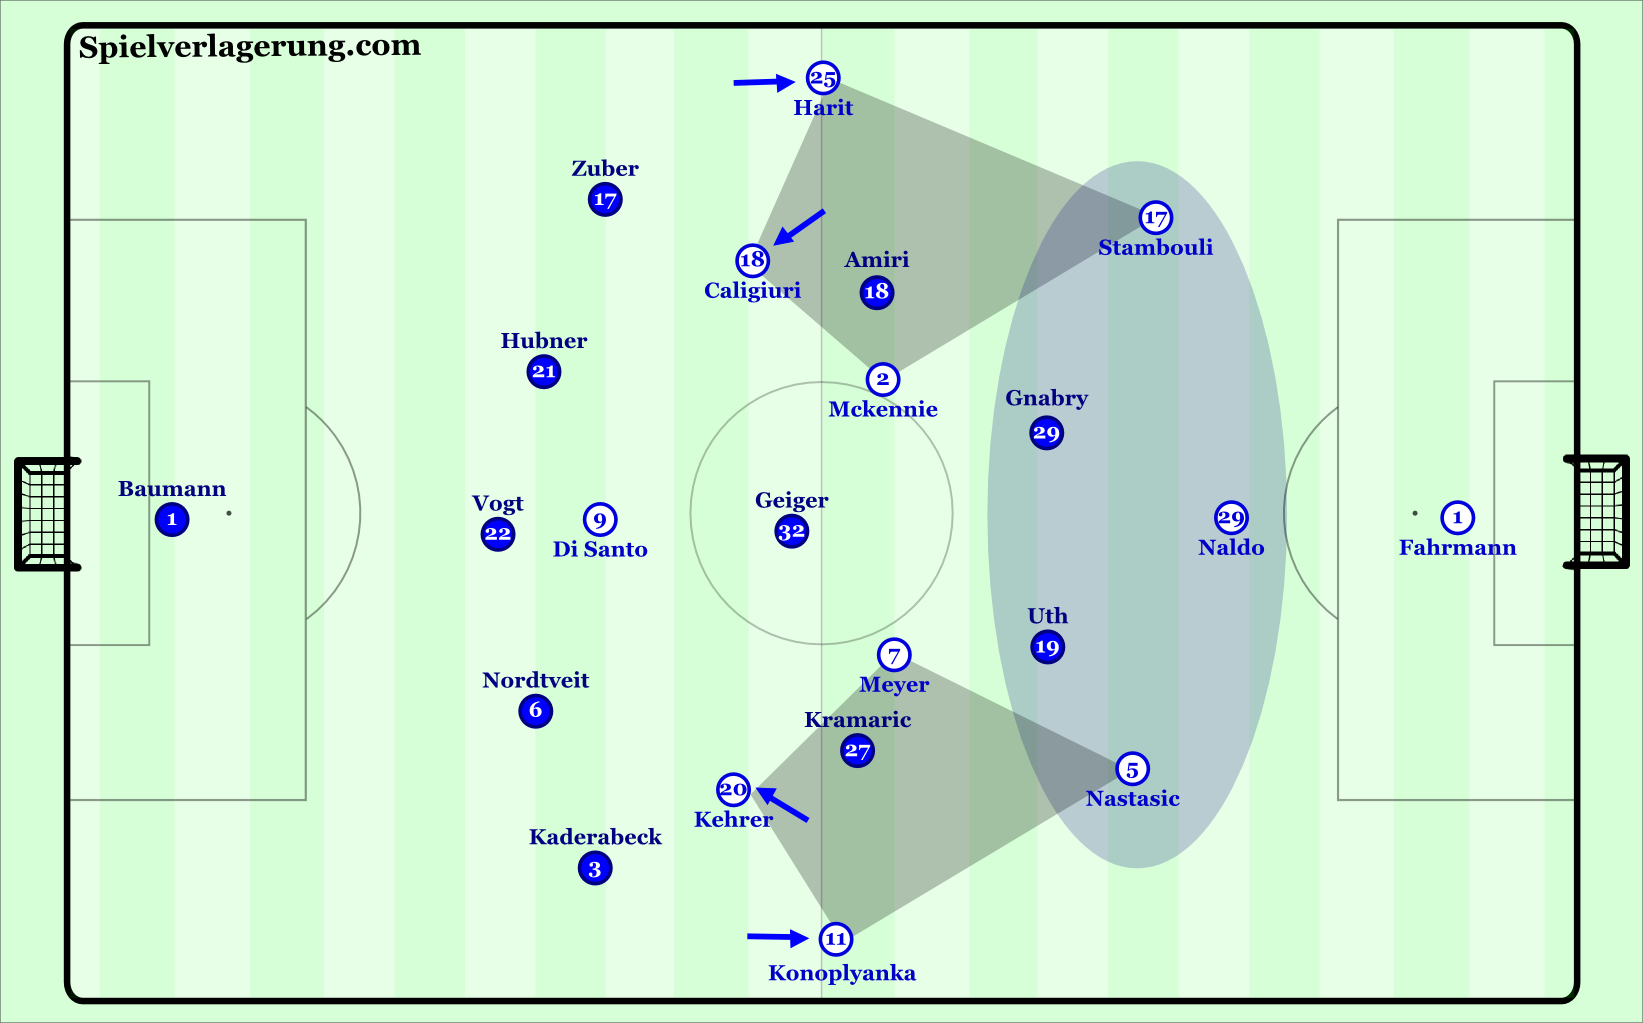
Schalke’s ball-far wing-back often moved into the half space, from here they could offer an option to switch and receive the ball in the space besides Hoffenheim’s 3-2 lines. The presence of the wingers high and wide on the wings would prevent Hoffenheim’s wing-back jumping forwards to press. After receiving, the wing-back could transfer this advantage to the winger by dribbling forwards until Hoffenheim’s wing-back moved up to engage them.
Spanners in the plans
Despite the well thought through plans of the two sides, there were a few factors which prevented them from consistently playing out as the coaches had imagined before the game.
Hesitance and Schalke’s pressing; Hoffenheim’s struggles
From his defensive midfield position Vogt was key in connecting Hoffenheim’s structure, ensuring there were options to combine past Schalke’s pressing. However, there were a number of situations where Schalke’s pressing blocked the paths to the full-backs, or to the centre backs whilst Baumann had the ball, and the ball carrier was hesitant to pass to Vogt. As such, they at times played long percentage balls unnecessarily despite Vogt being open and providing an alternative route to play to the full-backs.
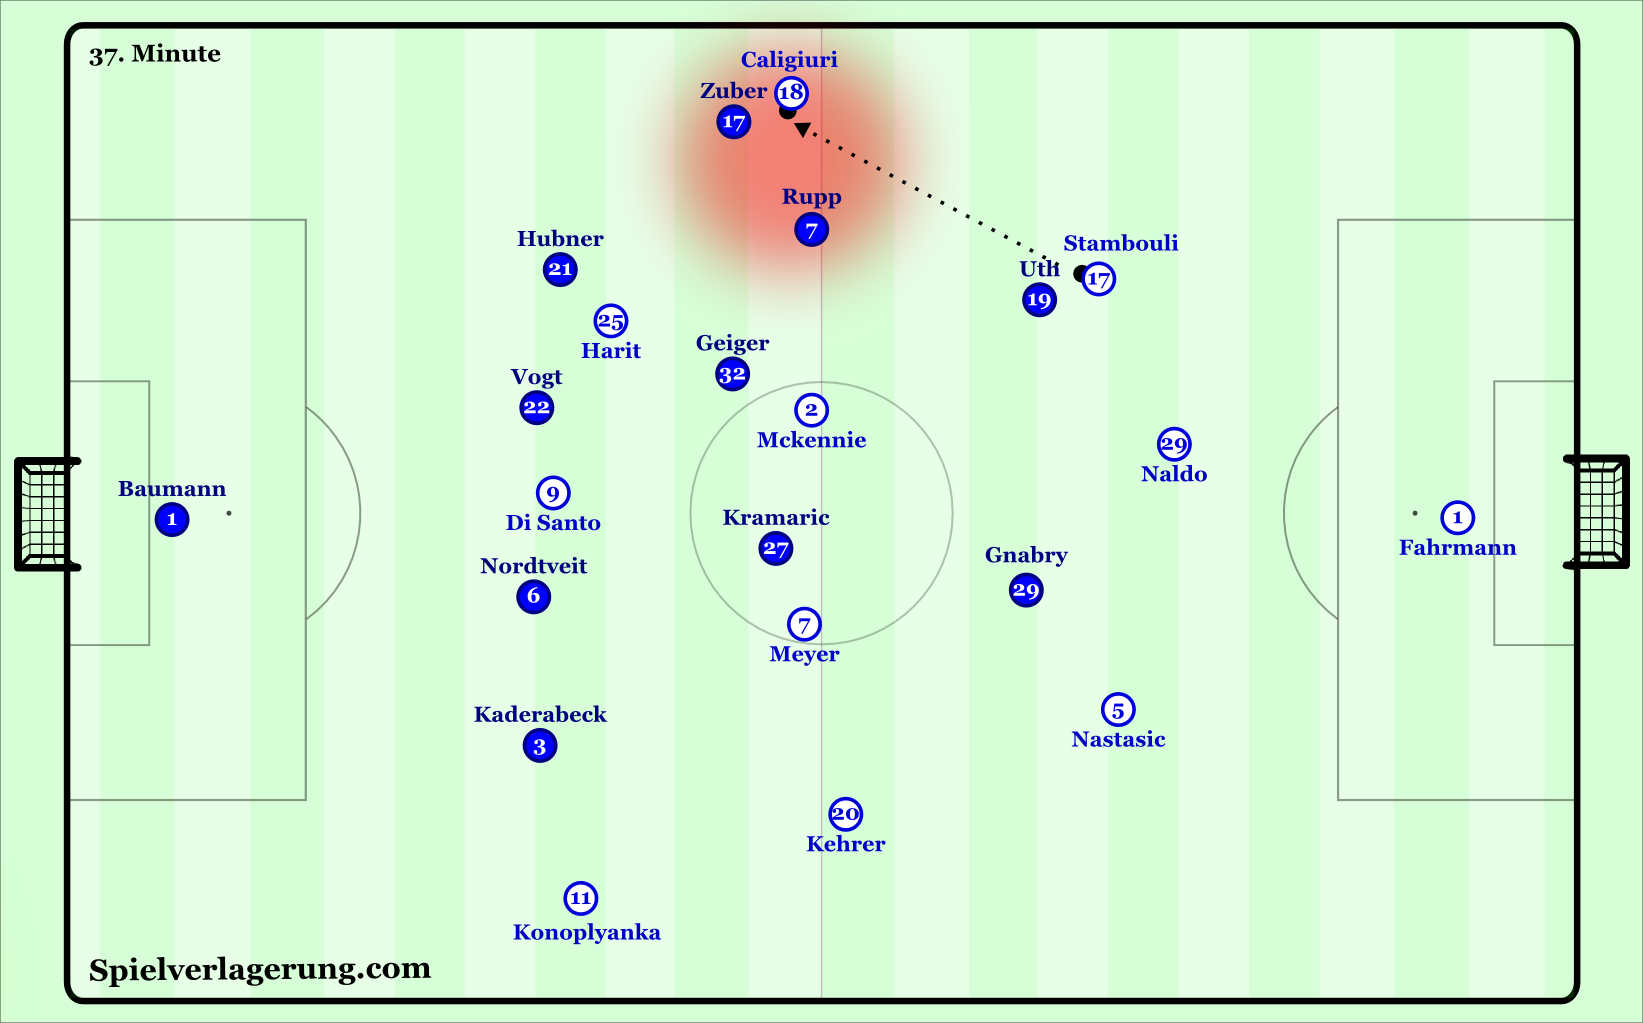
Furthermore Tedesco’s side showed a nice adjustment in their pressing which allowed them to block Hoffenheim’s routes of combination in build-up. Schalke would push the ball-near central midfielder to block Vogt, whilst Di Santo pressed the centre back and blocked the pass to the far centre-back. This meant the Schalke wingers could stay wider and block the use of Hoffenheim’s full-backs. In addition, Schalke’s ball-near wing-back would push up, and guard the passing lane to Hoffenheim’s near 8 to ensure the channel between winger and central midfielder couldn’t be exploited. Although the wing-back pushing up left space for Gnabry/Uth to exploit, the rest of Schalke’s back four shifted well, meaning that a pass through would be diagonally towards the sideline, and thus relatively simple to cope with.
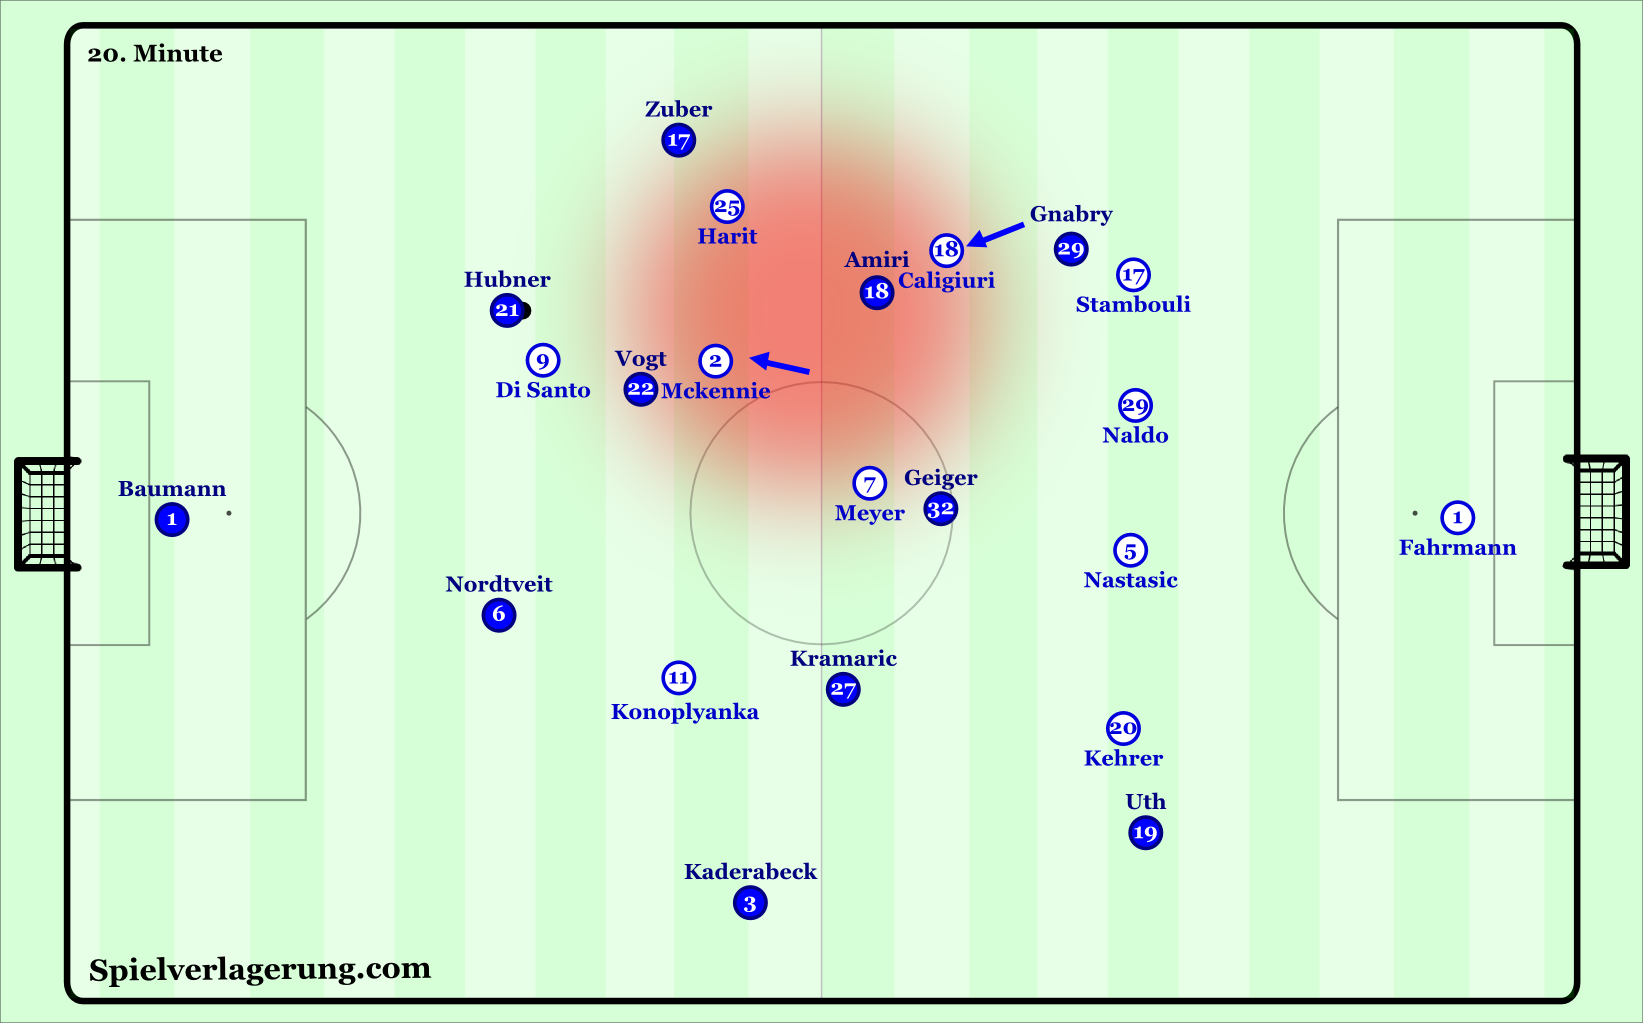
How best to press against a diamond? Well, with a diamond of course! An additional note is how Zuber’s refusal to hold the width allows Harit to block him without completely opening the half space.
Weak half space support; Schalke’s issues
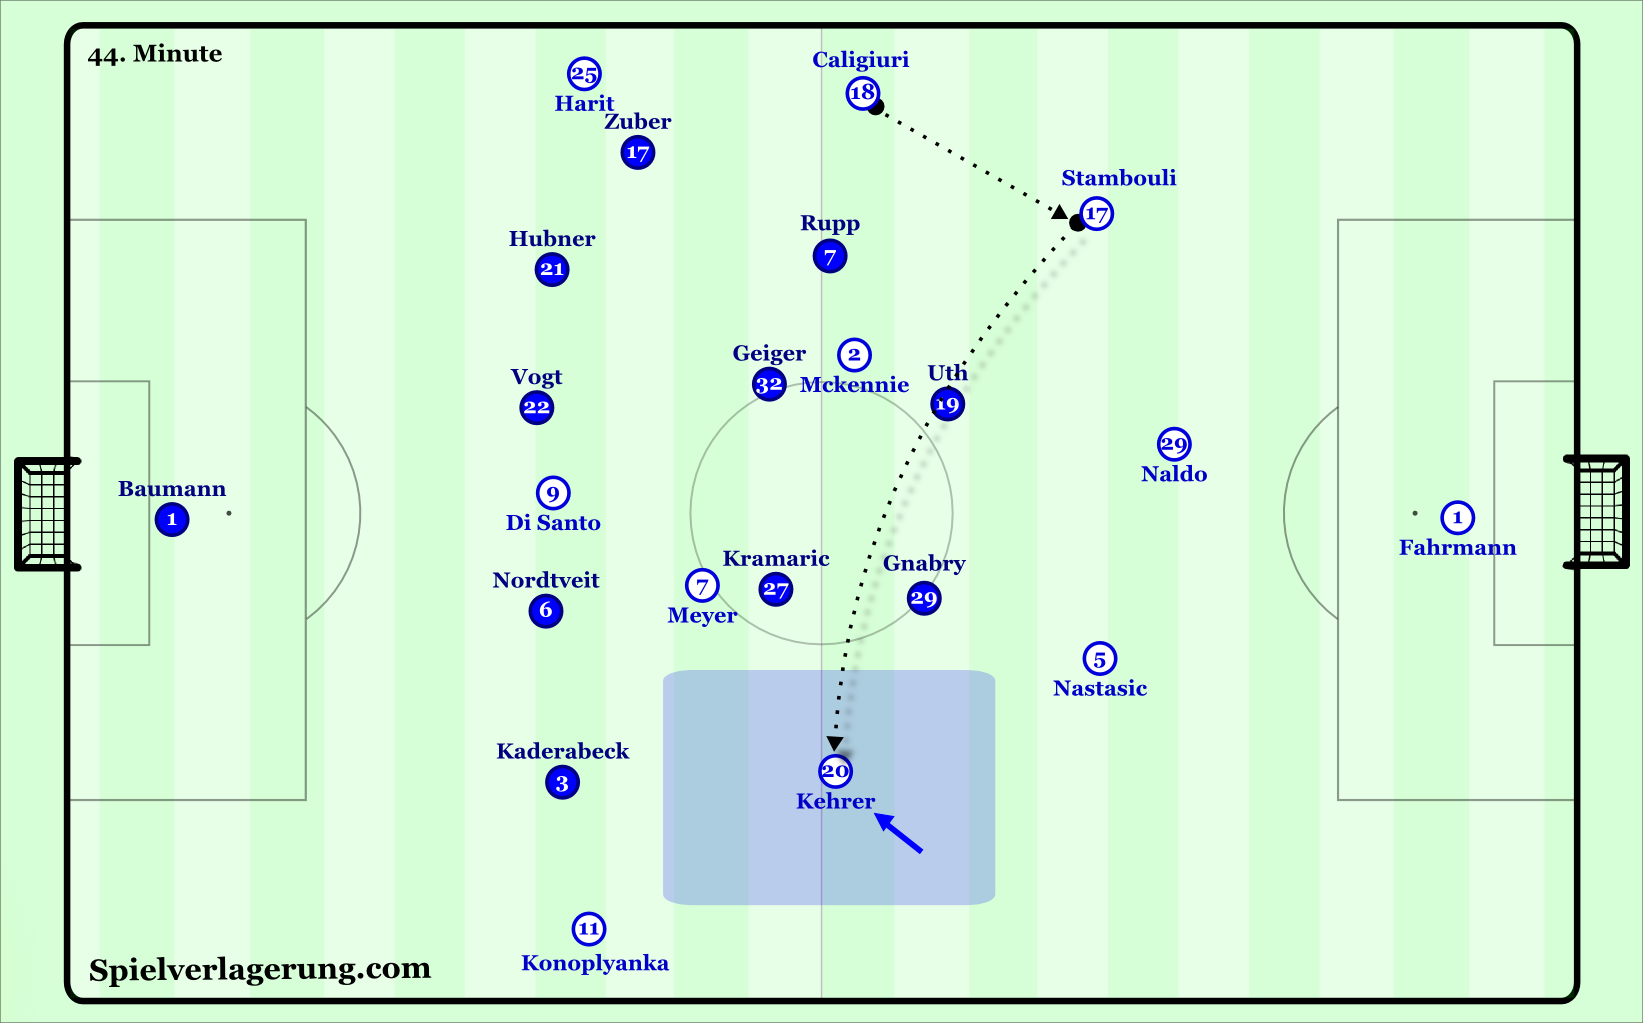
Schalke’s build-up was based heavily on the wide diamonds they created between the half backs, wing-backs, wingers and central midfielders and using this to advance through the wings in an advantageous way. However, the central midfield pair were often staggered in a 1-1, rather than a flat 2 as their base positions dictated. The 1-1 staggering meant they were both positioned in the centre, and were often slow to provide support in the half space to the winger and wing-back.
Without support from the central midfielders, Schalke were easily forced into linear attacks on the wing, and struggled to take advantage of the space behind Hoffenheim’s pressing wing-backs. On other occasions, the receiver on the wing was isolated and outnumbered when the wing-back ran too far forwards, or the winger played too far infield. This created tough situations to keep the ball, let alone progress.
Keine Kommentare vorhanden Alle anzeigen